background image


3

1

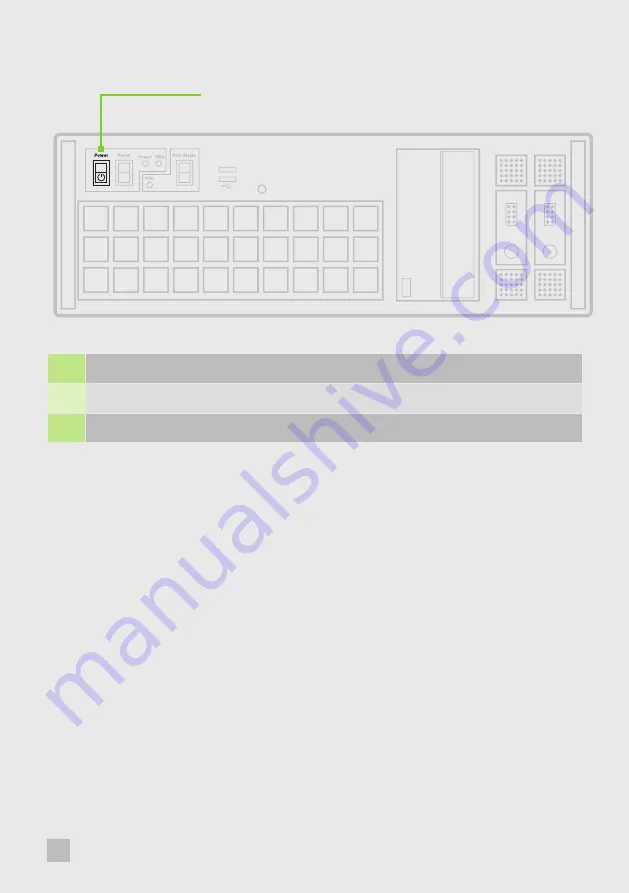
Connect power cable(s) to the VSN wall controller then plug into a mains supply.

2

Switch on the power supply units.

3

Switch on the system using the power button on the front panel.

Note:


If you have a VSN Expansion Chassis connected to the main unit (Step 2), the power supply units on the 

expansion chassis should be switched on prior to the main VSN wall controller. There is no requirement to switch 
on the expansion chassis on the front panel (3).

STEP 7 - WINDOWS 10 SETUP

Once the system has been built and configured in our factory, the operating system is resealed. Therefore, when 
switching the system on for the first time, the operating system setup commences. You will be prompted to 
enter information to set up the Windows 10 operating system. 

There is no requirement for users to activate Windows 10, activation is done automatically. 
An internet connection is required for the automatic activation.

You are strongly recommended to create a ‘Restore USB Flash Drive’. (See Step 9)

6

Aetria WallControl Quick Start Guide

Summary of Contents for Aetria WallControl VSN Series

Page 1: ...Engineering the world s best visual solutions Aetria WallControl Quick Start Guide ...

Page 2: ... over a decade Aetria WallControl software connects VSN powered video walls to the Aetria system and enables complete seamless control VSN INPUT Each Datapath VSN wall controller is custom built to order therefore the motherboard and number and type of inputs and outputs will differ from system to system Each VSN wall controller is shipped with a printed diagram outlining the specific types of inp...

Page 3: ... panel System Reset Power PSU Status PSU Alarm Rear Panel Front Panel STEP 2 CONNECT EXPANSION CHASSIS OPTIONAL A VSN Expansion Chassis may have been purchased as part of a large video wall system or ordered separately Connect the HLink G3 card in the main system to the SLink G3 card in the expansion chassis using the ExCable G3 The ExCable G3 is packaged and shipped with the VSN Expansion system ...

Page 4: ...have purchased a VSN wall controller with video inputs the input connectors are located on the rear panel as shown in the example below The printed input output diagram shipped with your VSN wall controller shows where the video inputs are located and the types of input connectors installed in your system Connect the input sources to the relevant video input connectors Cables may be supplied for s...

Page 5: ...control screen is initially required to set up the system including the operating system Windows 10 STEP 6 POWERING UP THE SYSTEM VSN wall controllers are supplied with either a Redundant Power Supply Unit RPSU or an ATX power supply An RPSU power supply requires two power cables and an ATX supply requires one power cable All power cables are supplied with your VSN wall controller VGA or DVI Contr...

Page 6: ...e expansion chassis on the front panel 3 STEP 7 WINDOWS 10 SETUP Once the system has been built and configured in our factory the operating system is resealed Therefore when switching the system on for the first time the operating system setup commences You will be prompted to enter information to set up the Windows 10 operating system There is no requirement for users to activate Windows 10 activ...

Page 7: ...age of the configuration the DDCT will recommend the optimum way to connect your VSN wall controller to your video wall displays A full description of the DDCT can be found in the User Guide located on the Documentation Media It is recommended that you carefully read the instructions on each page of the wizard To commence your wall configuration click on Start Wizard Select the type of displays be...

Page 8: ... wall If the wall consists of different displays select each one in turn to configure the type of display The DDCT has an extensive database of displays however if your display is not contained in the list you can input the details manually by selecting Create Custom Display It is strongly recommended that measurements are taken from the display manufacturer s specifications if available 8 Aetria ...

Page 9: ...es available enabling you to select a percentage of overlap between displays Once the layout has been created and the type s of displays configured click on Add Displays Continue and the following dialogue is displayed At this stage of the set up you can choose to create another independent display group from the same system This would be considered if one machine will be used to drive a number of...

Page 10: ...ur system ensuring the load is balanced between the graphics hardware Click Recommended for the optimal configuration for your system Should you wish to manually wire your system and decide for yourself which output is connected to which display click on Custom You will next be presented with the Summary page 10 Aetria WallControl Quick Start Guide ...

Page 11: ...aded from the Datapath website software downloads page should it not already be installed on your system To manually select the outputs right click on the display group and select Edit You can then select each individual display and allocate your preferred output Right click on a selected display to reveal the list of outputs available When all outputs have been allocated by either Recommended or ...

Page 12: ...el who may be required to restore the system You will need to boot into the Windows Restore portal to begin the process of creating your Restore USB Flash Drive Switch on your machine and when the boot messages display the Choose an operating system screen use the cursor keys to select Windows Restore as shown in the following dialogue It should be noted that the dialogue is only displayed briefly...

Page 13: ...ll lead you to the Windows 10 Restore Menu as shown below Click on the Create Restore Media icon then insert the USB flash drive into a vacant USB slot min capacity 16GB 13 Aetria WallControl Quick Start Guide ...

Page 14: ...pplication will now scan the system USB ports to detect your USB flash drive Once the flash drive has been discovered it will appear in the Select Drive dropdown list Select the flash drive you wish to use from the list and click on Make Restore Once the Windows 10 Restore USB flash drive has been created a Build Complete dialogue is displayed 14 Aetria WallControl Quick Start Guide ...

Page 15: ...n this documentation No part of this documentation may be reproduced released disclosed stored in any electronic format or used in whole or in part for any purpose other than stated herein without the express permission of Datapath Limited Whilst every effort is made to ensure that the information contained in this Quick Start Guide is correct Datapath Limited make no representations or warranties...

Page 16: ...ose Park Wayzgoose Drive Derby DE21 6XQ United Kingdom 44 0 1332 294 441 sales uk datapath co uk Datapath North America 2490 General Armistead Avenue Suite 102 Norristown PA 19403 USA 1 484 679 1553 sales us datapath co uk www datapath co uk QSG AET EN3 V1 0 ...

Reviews: