background image

2   |   USB Host Installation Instructions

USB Host Installation Guide

10

11. Gently separate the panel from the printer frame.

Note: 

With the display cable still attached, the panel cannot be fully separated.

12. Disconnect the display cable from the front panel connector.

Caution: 

Do not pull the wires. Pulling the wires could damage both the wires and the

connector.

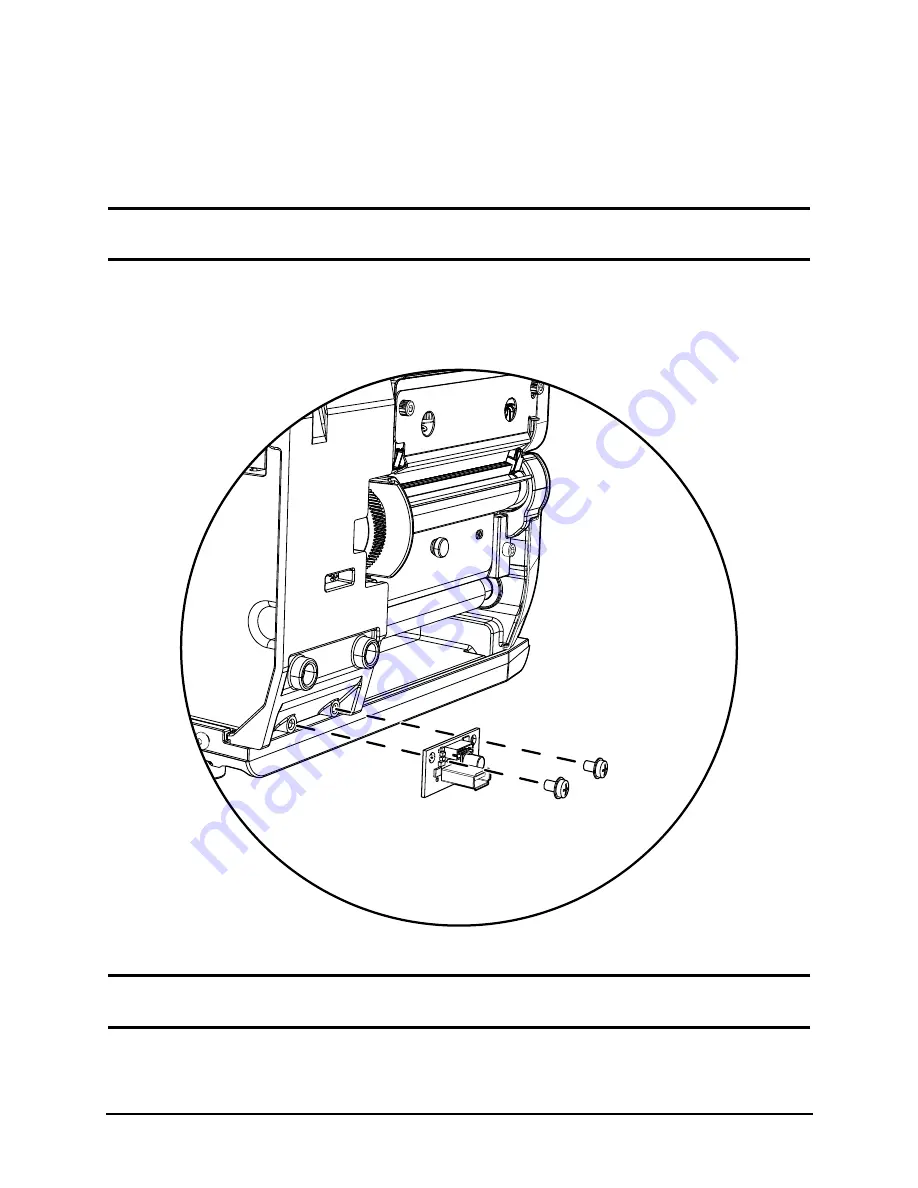
13. Secure the USB host assembly to the printer chassis using the supplied socket 

head screws.

Figure: 2 - 9 USB Host Assembly 

Caution: 

Exercise caution when handling and installing the USB host assembly. The

components are fragile and susceptible to damage.

Summary of Contents for Perfomance Series

Page 1: ......

Page 2: ......

Page 3: ...e personnel Any on site assembly required during the installation process must be performed by properly trained and qualified service personnel When operating the product must be connected to a properly grounded and appropriately rated AC receptacle using the supplied cord set Caution This product contains sensitive electronic components that could be damaged if exposed to excessive force Caution ...

Page 4: ...3 USB Host Installation Guide 2 USB Host Installation Instructions USB Host Figure 2 1 USB Host ...

Page 5: ...Unauthorized service will void the manufacturer s warranty Warning The printer must be powered off and disconnected from utility power prior to performing these procedures Failure to heed this warning may result in personal injury or damage to internal components Maintain complete ESD protection in a safe clean environment at all times while servicing this equipment When handling the printhead gra...

Page 6: ...esent sensor option is installed on the cover gently pry the sides of the cable chain outward to disconnect it from the present sensor cable connection cover Note If there is no present sensor mounted on the media cover continue to step 5 Figure 2 2 Cable Chain Disconnect Note To clarify the illustration above the cable chain is shown disconnected from the printer chassis backbone ...

Page 7: ...cable connection cover to the media cover Figure 2 3 PCB Cover 4 Disconnect the present sensor cable connector and route the connector male out of the opening 5 Loosen all three 3 2 5mm hex head screws from the upper cover mount Note For an easier re installation loosen but do not remove the screws Figure 2 4 Upper Screws ...

Page 8: ...head screws securing the right side cover to the printer chassis Figure 2 5 Right Side Screws 7 Lift and remove the cover assembly from the printer chassis Caution Exercise caution when removing the cover set assembly and secure it in a safe position where it will not be damaged Figure 2 6 Lift Cover Assembly ...

Page 9: ...2 USB Host Installation Instructions USB Host Installation Guide 8 8 If applicable loosen and remove the power ribbon transport assembly screw and cover Figure 2 7 Power Ribbon Transport Assembly Cover ...

Page 10: ... of the panel from the printer frame Figure 2 8 Front Panel Removal Caution Be careful not to damage any surrounding components 10 While holding the upper part of the panel gently push the lower panel locking tab downward enough to separate the panel from the printer frame Caution Be careful not to damage any surrounding components Upper Tab Lower Tab ...

Page 11: ...Disconnect the display cable from the front panel connector Caution Do not pull the wires Pulling the wires could damage both the wires and the connector 13 Secure the USB host assembly to the printer chassis using the supplied socket head screws Figure 2 9 USB Host Assembly Caution Exercise caution when handling and installing the USB host assembly The components are fragile and susceptible to da...

Page 12: ...ure 15 Route the cable through the slot opening on the front of the printer chassis through the cable clamp to the main PCB assembly area Caution Be sure the cable is routed properly to prevent it from rubbing other components 16 Connect the larger connector to junction J3 of the main PCB assembly 17 Reinstall all other printer components in the reverse order as they were disassembled ...

Reviews: