


CAMERA SETUP
35
3
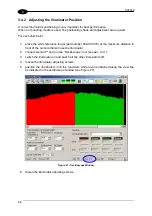
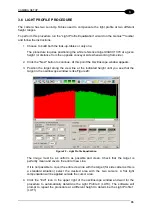
3.6 LIGHT PROFILE PROCEDURE
The camera has two Look-Up Tables used to compensate the light profile at two different
height ranges.
To perform this procedure run the “Light Profile Equalization” wizard on the Genius™ toolbar
and follow the instructions.
1. Choose to build both the look-up-tables or only one;
The procedure requires positioning the white reference target 93ACC1370 at a given
height (or distance from the opposite conveyor side when working from side).
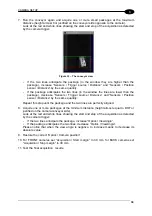
2. Click the "Next" button to continue. At this point the Oscilloscope window appears.
3. Position the target along the view line at the indicated height until you see that the
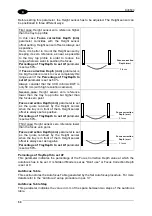
target in the oscilloscope window is like Figure 29:
Figure 29 – Light Profile Equalization
The image must be as uniform as possible and clean. Check that the target is
perfectly clean and covers the entire View Line.
If it is not possible to cover the entire view line with the target (for side cameras this is
a standard situation) select the desired area with the two cursors. A flat light
compensation will be applied outside the cursor area.
4. Click the "Exit" icon in the upper right of the oscilloscope window and wait for the
procedure to automatically determine the Light Profile 0 (LUT0). The software will
prompt to repeat the procedure at a different height to determine the Light Profile 1
(LUT1).
Summary of Contents for DV9500 Series
Page 1: ...DV9500 Installation Manual ...
Page 2: ......