background image

EASY

SENSE V-Hub Reference Manual 


 DO260 (2) 


 Data Harvest Group Ltd, 2017 


10 

V-Hub 


PC Windows 

computer 


USB 

Using V-Hub connected via USB to a Windows PC for the first time 


Step 1: 

Install the EasySense software, if it is not already on your computer. For details of how to install and 
operate this program, please refer to the instructions provided with the EasySense


software.  

V-Hub requires 

version 3.9 

or later of the EasySense PC Windows software. (The version number can 

be verified in About from the Help menu).  


Step 2:  

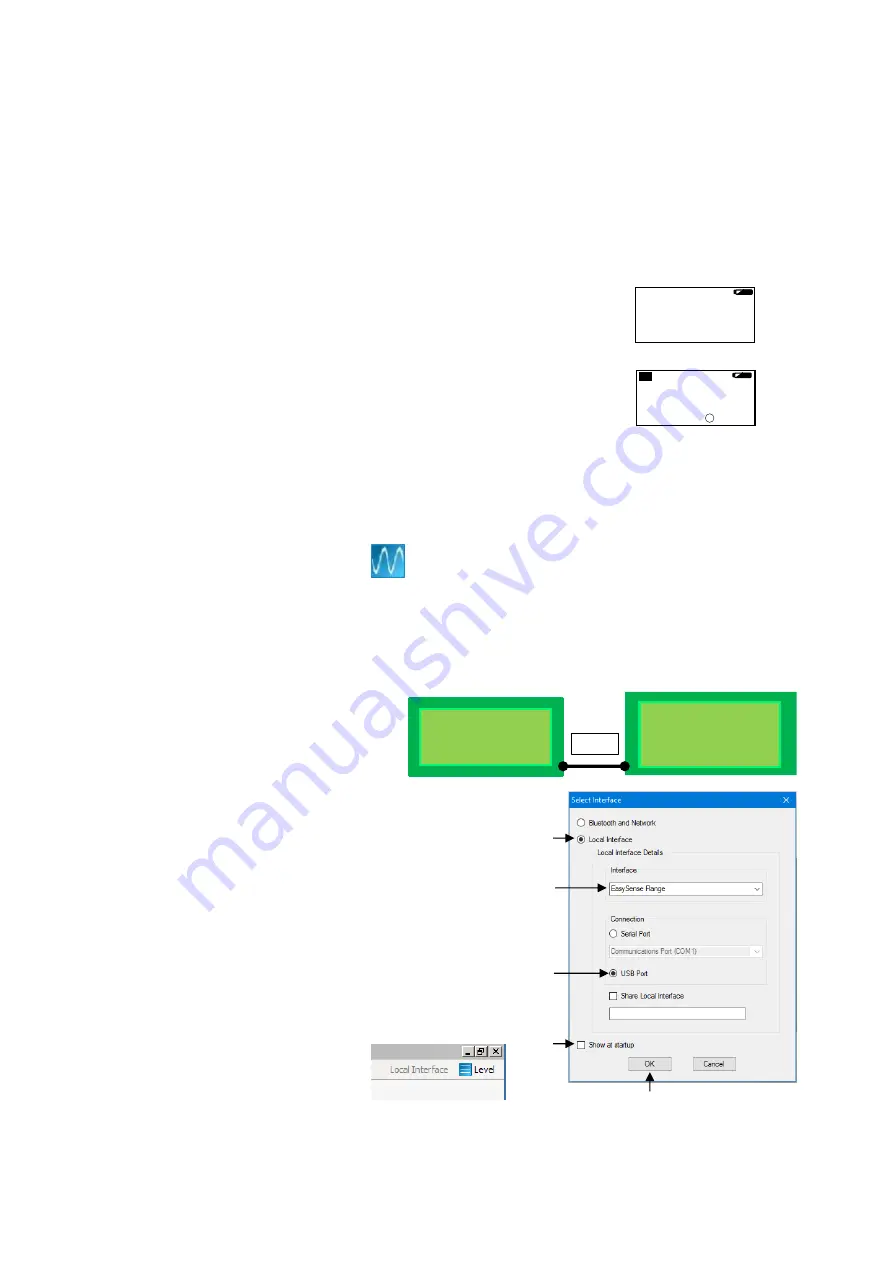
On V-Hub short press the button until the cursor points to USB. Press the 
button for approximately 3 seconds until the option highlights then release.  
The screen will show the name of the logger. 


Step 3: 

Connect V-Hub to the co

mputer’s USB port using the USB cable supplied. 

Windows will automatically detect a new device and install the drivers. When a 
connection is established the word USB will be displayed top left of screen. 


Step 4:  

Connect the 

Smart Q 

sensors being used to the sensor inputs.  


Note: 

If digital sensors are to be used for Timing operations they must be connected to the inputs labelled 1:A and 

2:B. 


Step 5:  

Open the EasySense


software program 


The first time the EasySense


program 

is opened a ‘Select Program Level’ window will automatically open. 

Select a suitable user’s level. 


Level 1 is aimed at ‘start’ level (e.g. up to 9 years old), Level 2 is aimed at ‘mid’ level (e.g. 9 – 15 years old) and Level 
3 is aimed at ‘exam’ level (e.g.15 years plus).  


Note:

 The program level can be altered at any time using the Level icon. 


Step 6:  

An Interface option window will open.  


1)  If connecting V-Hub direct to a PC 

Windows computer select: 

 
(a) 

Local Interface


(b) 

Interface: 

EasySense Range


(c) 

USB Port

 as the connection.  

(d) 

If these settings will stay the same leave 
the ‘Show at startup’ box unticked.  


If the box is ticked (enabled) the ‘Select 
Interface

’ window will automatically open 

when you next start 

EASY

SENSE, so you 

can check the selected method of 
connection is correct 

(e) 

Click on OK. The program will save the selection.  


The text at the top right of the 

EASY

SENSE window will indicate 

that a Local Interface connection 
has been established.  

(b) 

(a) 

(c) 

(d) 

(e) 

  Bluetooth 

USB 

   Wi-Fi 

   About 

USB 


Fisher 20 


                        to exit  
 

Summary of Contents for EASYSENSE V-Hub

Page 1: ...EASYSENSE V Hub Reference Manual ...

Page 2: ...Hub interface 3 The V Hub interface 4 V Hub s button 4 LCD display 4 Sensors 5 The sensor leads 5 The plug in sensors 5 Selecting the sensor range 5 V Hub 8 s built in sensors 6 The metal rod 7 Ways to capture data 7 Powering V Hub 7 Batteries 7 Auto switch off 7 Hard Reset 8 Specifications 8 Care Maintenance 9 Updating EASYSENSE V Hub s Firmware 9 Using V Hub connected via USB to a Windows PC for...

Page 3: ...USB cable supplied with it A full charge can take up to 4 hours V Hub can also charge from a USB mains charger that outputs 5 V at 1 A or more A battery charging symbol will be displayed on V Hub s screen while the logger is charging Your computer must be turned on and not in sleep or standby mode otherwise the battery may drain instead of charge 2 x long sensor leads 3005 2 x short sensor leads 3...

Page 4: ...10 seconds until the word V Hub displays then release If battery powered and not in use V Hub will switch off automatically after 2 minutes Press the button to switch back on LCD display The LCD displays a Menu of the connection options available to select Bluetooth USB or Wi Fi if fitted About to check the logger s firmware version logger name and serial number Indicator of the status of the batt...

Page 5: ...upplied with the logger When a sensor is connected it will automatically be detected Sensor inputs 1 and 2 are dual labelled as A and B These inputs are for Timing operations when digital sensors must be connected to either input 1 A or input 1 A and 2 B Selecting the sensor range Some of the internal sensors in V Hub8 and some plug in sensors have more than one range Once a range has been selecte...

Page 6: ...le for recording bright light levels indoors or low light levels outdoors 0 to 100 k lx This large range makes it ideal for outdoor use sunlight and environmental monitoring The Humidity sensor has one range 0 to 100 The sensor is used to monitor relative humidity i e the amount of water actually in the air compared with the amount of vapour needed to make the air saturated at the air s current te...

Page 7: ...a power supply when used in Wi Fi mode as the power requirements are high and will drain the battery quickly Batteries V Hub is fitted with a rechargeable lithium ion battery pack Whenever V Hub is connected to the USB port on the computer it will automatically re charge the battery Wait a few seconds after disconnecting power before checking battery charge status top right of screen When its batt...

Page 8: ...idity Air Pressure 4 Smart Q sensor inputs Timing inputs A B 12 bit analogue sampling resolution Digital timing accuracy 3 2 µs Fastest logging speed per channel 50 000 samples per second 20 microsecond µs between samples 50 kHz Firmware upgradeable USB communication to PC V1 1 V2 0 compatible Power specifications 5 V at 500 mA or more from USB or 1 A or more from charger Rechargeable battery pack...

Page 9: ...V Hub has been left in the cold let it warm to near room temperature before waking it from sleep Do not expose to direct sunlight for extended periods of time Do not expose to temperatures greater than 60 C e g near a heater or inside a car in hot weather Do not store V Hub with its battery fully discharged Ideally V Hub should be stored at least 40 or more state of charge Updating EASYSENSE V Hub...

Page 10: ...ensor inputs Note If digital sensors are to be used for Timing operations they must be connected to the inputs labelled 1 A and 2 B Step 5 Open the EasySense software program The first time the EasySense program is opened a Select Program Level window will automatically open Select a suitable user s level Level 1 is aimed at start level e g up to 9 years old Level 2 is aimed at mid level e g 9 15 ...

Page 11: ... The program will save the current selection The text top right of the EASYSENSE window will indicate that connection as the Controlling system has been established On the Windows computer that will be acting as a Viewer select a Bluetooth and Network b If the Show at startup box is ticked enabled this window will automatically open when you next start EASYSENSE so you can check the selected metho...

Page 12: ...will open Select one of the experiment modes e g EasyLog Pictogram Meters Snapshot Counting or Timing Using V Hub connected via Bluetooth to a computer If using V Hub battery powered fully charge the battery before use e g leave to charge overnight for use in lessons the next day When the battery is in good condition and fully charged it will power a Bluetooth connected V Hub for about 8 hours Not...

Page 13: ...hen connecting to a iPad or Android device An iPad will need to support Bluetooth Low Energy BLE also known as Smart or 4 iPad 3 or later or any iPad Mini V1 12 or later of the EasySense iPad software must be installed An Android will need to support Bluetooth Low Energy BLE Smart OS 4 4 or later V1 05 or later of the EasySense Android software must be installed Note Do NOT pair the devices when p...

Page 14: ... connection using the default settings 1 On V Hub short press the button until the cursor points to Wi Fi Press the button for approximately 3 seconds until the option highlights then release 2 Connect the iPad or Android to the V Hub s Access Point network Select Settings Select the Wi Fi link Ensure Wi Fi is ON Choose the V Hub s name AP network from the list of available networks Wait for confi...

Page 15: ... of the screen When the controlling iPad Android disconnects this will disconnect all the others A new controlling iPad Android is chosen by ensuring that it is the first to re connect Limited warranty For information about the terms of the product warranty see the Data Harvest website at https data harvest co uk warranty FCC Details This device complies with Part 15 of the FCC Rules Operation is ...

Reviews: