background image

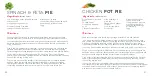
1 lb Honeycrisp apples
2 tsp unsalted butter
½ tsp pumpkin pie spice
1 tsp fresh lemon juice

1 tsp cinnamon
3 tsp sugar
4 tsp corn flour
4 tsp water

1 sheet premade pie crust 

or puff pastry dough (if 

using homemade dough, 

roll out thinly)

Ingredients:


(Makes 4 pies)

apple

 pie

¹

8

/

Directions:

Peel, halve, and core the apples. Cut each half into 4 wedges. Cut the wedges 

crosswise into thin slices, making about 3 cups sliced apples. 
In a medium skillet over medium-high heat, melt the butter. Add the apples, mixing 

to coat them with the butter. Mix in the pumpkin pie spice. Cook until the apples are 

wet, stirring often. Keep cooking, stirring, until the apples are tender and the liquid 

has evaporated, about 5 minutes in total. Mix in the lemon juice. Set the filling aside 

to cool.
Plug in and pre-heat your Mini Pie Maker. Cut 4 circles from your pie crust using the 

Pie Base side of the Crust Cutter. Set the bottom pie crust into the lower Cooking 

Surface and gently overlap the edges so that the crust fits neatly in the Mini  

Pie Maker.
Cut 4 circles for the top crust using the Pie Top side of the Crust Cutter. Set the 4 

smaller upper crusts aside. Equally fill the lower crust with the apple filling, spooning 

about ½ cup of filling into the crust. 
Top your pie with one of the smaller circles for the upper pie crust. Bake until brown, 

checking after around 4 minutes to see if the pie is almost done. Remove and cool 

completely. Repeat with the other crust circles for 4 mini Apple Pies.

∙ 28 ∙

Summary of Contents for DPIE100

Page 1: ...mini pie MAKER 4 Cooking Surface Nonstick 350 Watts recipes inside DPIE100...

Page 2: ...3 Important Safeguards 4 7 Parts Features 8 9 Using Your Mini Pie Maker 10 19 Cleaning Maintenance 20 Tips Tricks 21 Recipes 23 33 Customer Support 34 Warranty 35 mini pie maker t h e dash team...

Page 3: ...mages caused by improper use of the appliance Improper use of the appliance can result in property damage or even in personal injury This appliance has a polarized plug one blade is wider than the oth...

Page 4: ...acceptera aucune responsabilit pour les dommages caus s par une utilisation incorrecte de l appareil Une utilisation inappropri e de l appareil peut entra ner des dommages mat riels voire corporels C...

Page 5: ...Indicator Light Blue Cover Non slip Feet Cover Handle Cooking Surfaces Crust Cutter Main Body 8 parts Features parts features 9 parts Features...

Page 6: ...Wipe dry with a soft cloth NEVER IMMERSE THE MINI PIE MAKER OR CORD IN WATER OR ANY OTHER LIQUID Position the Mini Pie Maker on a dry level heat resistant surface It is recommended to operate this ap...

Page 7: ...is for cutting the base of your pie The side indicating Pie Top is for cutting the top circle of your pie The top circle will be smaller than the base photo C Place the Pie Base side of the Crust Cutt...

Page 8: ...pie Place the larger circle of dough in the lower Cooking Surface of your Mini Pie Maker photo F Warning Move quickly and be careful when placing the pie crust onto the pre heated Cooking Surface as...

Page 9: ...ce does not get too hot or cold When this occurs the Indicator Light turns on and off photo K Actual cooking time will vary depending on ingredients and type of pie being prepared As a general guideli...

Page 10: ...oking utensils The actual size of your finished pie will be around 4 inches in diameter and about 2 inches deep NOTE Do not use metal utensils to remove or place food on the Cooking Surface as this wi...

Page 11: ...i Pie Maker Prick the crust evenly all over then bake until golden brown about 5 minutes Remove from Mini Pie Maker and fill Baked crusts work well for recipes such as Key Lime Pie Use packaged thawed...

Page 12: ...RECIPE GUIDE mini pie maker Check out our Instagram unprocessyourfood for more recipes and videos...

Page 13: ...the filling has thickened about 2 minutes add lemon remove from heat let cool and use as pie filling Plug in and pre heat your Mini Pie Maker Cut 2 circles from your pie crust using the Pie Base side...

Page 14: ...ove and cool completely Repeat with the other crust bottoms making 4 tart shells Fill each tart shell with cup of the lemon curd Arrange fresh raspberries to cover the lemon curd Serve immediately Dir...

Page 15: ...apples are tender and the liquid has evaporated about 5 minutes in total Mix in the lemon juice Set the filling aside to cool Plug in and pre heat your Mini Pie Maker Cut 4 circles from your pie crus...

Page 16: ...he carrots and peas according to package directions Drain and set aside In a medium saucepan melt the butter over medium high heat Saut the onion until soft about 4 minutes Mix in the flour thyme and...

Page 17: ...t the crust fits neatly in the Mini Pie Maker Cut 2 circles for the top crust using the Pie Top side of the Crust Cutter Set the 2 smaller upper crusts aside Fill the lower crust with a sprinkle of ch...

Page 18: ...STOREBOUND SHALL NOT BE LIABLE FOR ANY INCIDENTAL OR CONSEQUENTIAL DAMAGES OR FOR BREACH OF ANY EXPRESS OR IMPLIED WARRANTY ON THIS PRODUCT EXCEPT TO THE EXTENT REQUIRED BY APPLICABLE LAW ANY IMPLIED...

Page 19: ...1 800 898 6970 unprocessyourfood bydash com...

Reviews: