background image


10 

both illuminate for 3 seconds, indicating that Xbox® controller has been successfully 
connected. The KEY LOCK LEDS will then return to indicating the KEY LOCK status.  
Note that if the Xbox controller was not successfully connected, the two KEY LOCK LEDS 
will flash three times, then return to indicating the KEY LOCK status. Unplug all cables and 
repeat the above steps. 

6.


Press the HOME button to start the game. 


Nintendo Switch Console 

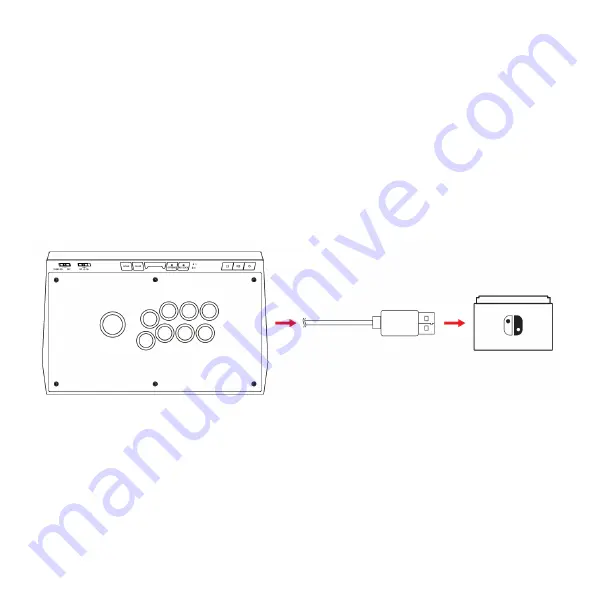
Perform the following steps to connect the Arcade Fighting Stick to a Nintendo Switch®. 


1.


Open the STORAGE SPACE cover and pull out the built-in cable. 

2.


Position the built-in cable in the CABLE OUTLET on the STORAGE SPACE cover, then close 
the cover. 

3.


While pressing and holding the A and X buttons on the Arcade Flight Stick, plug the built-in 
cable into the USB port on the Switch dock. 


Summary of Contents for Arcade Fighting Stick

Page 1: ...Arcade Fighting Stick P N 43710 User s Manual...

Page 2: ...high temperatures Do not place or install this device in an area where it can be exposed to excessive amounts of dust humidity oil smoke or combustible vapors Clean using a soft dry cloth only Do not...

Page 3: ...t Monoprice Customer Service for a replacement 1x Arcade Fighting Stick 1x Hex Screwdriver 1x USB Cable 1x User s Manual SYSTEM REQUIREMENTS You must be using one of the following systems to connect a...

Page 4: ...ACTION BUTTONS and slide the TURBO SWITCH to the ON position to enable the turbo function for that button B CONTROL STICK SWITCH Use this switch to determine the control represented by the CONTROL STI...

Page 5: ...on for details H L3 R3 BUTTONS These two buttons emulate the L3 and R3 buttons on a controller I SWITCH TOUCHPAD BUTTON Momentarily press the button to emulate the touchpad button on a controller When...

Page 6: ...the Xbox or PS4 consoles Nintendo Switch PC and Android devices do not need a controller connected to function M CABLE OUTLET Small hole in the side of the STORAGE SPACE cover to allow the cover to b...

Page 7: ...7 Rear Panel Open O HEX SCREWDRIVER Storage location for the included Hex Screwdriver...

Page 8: ...e PS4 console 5 Press and hold the SWITCH TOUCHPAD BUTTON for 2 seconds to switch to console mode The two KEY LOCK LEDS will flash alternately indicating that the Arcade Fighting Stick is in console m...

Page 9: ...out the built in cable 2 Position the built in cable in the CABLE OUTLET on the STORAGE SPACE cover then close the cover 3 Plug the built in cable into one of the USB ports on the Xbox console 4 Pres...

Page 10: ...LOCK status Unplug all cables and repeat the above steps 6 Press the HOME button to start the game Nintendo Switch Console Perform the following steps to connect the Arcade Fighting Stick to a Ninten...

Page 11: ...3 Plug the built in cable into a USB port on your Windows PC or Android device After 30 seconds the KEY LOCK LEDS will flash three times then return to indicating the KEY LOCK status 4 By default the...

Page 12: ...ex Screwdriver then close the cover 2 Use the included Hex Screwdriver to remove the seven screws securing the base plate to the Arcade Fighting Stick frame 3 Remove the base plate 4 Disconnect the wi...

Page 13: ...ce 7 Reconnect the wire to the button The following chart shows which color wires connect to each button 8 Position the base plate on the frame then use the Hex Screwdriver to secure it in place using...

Page 14: ...a design of your choosing Perform the following steps to replace the panel wallpaper 1 Open the STORAGE SPACE cover remove the Hex Screwdriver then close the cover 2 Use the included Hex Screwdriver...

Page 15: ...luded to secure the center shaft at the bottom of the joystick to prevent it from turning then unscrew the small ball at the top of the joystick 7 Use the included Hex Screwdriver to remove the six sc...

Page 16: ...nto the top of the joystick 11 For each button insert it into the top panel then rotate it until you hear a click indicating that the button is locked into place 12 Reconnect all wires to the buttons...

Page 17: ...website www monoprice com or through email by sending a message to tech monoprice com Check the website for support times and links To download the latest drivers firmware manuals etc go to www monop...

Page 18: ...ts for a Class B digital device pursuant to Part 15 of the FCC Rules These limits are designed to provide reasonable protection against harmful interference in a residential installation This equipmen...

Page 19: ...irectX Xbox Xbox One Xbox Series S and Xbox Series X are either registered trademarks or trademarks of Microsoft Corporation in the United States and or other countries Sony is a registered trademark...

Reviews: