background image

DL-200 Cellular Data logger


Quick Installation Guide


  30 

(Step-3) PPTP 

 
When 

PPTP

 is selected in Step-2 for VPN Type and either PPTP client or server is selected the 

client or server configuration window will appear. 
 

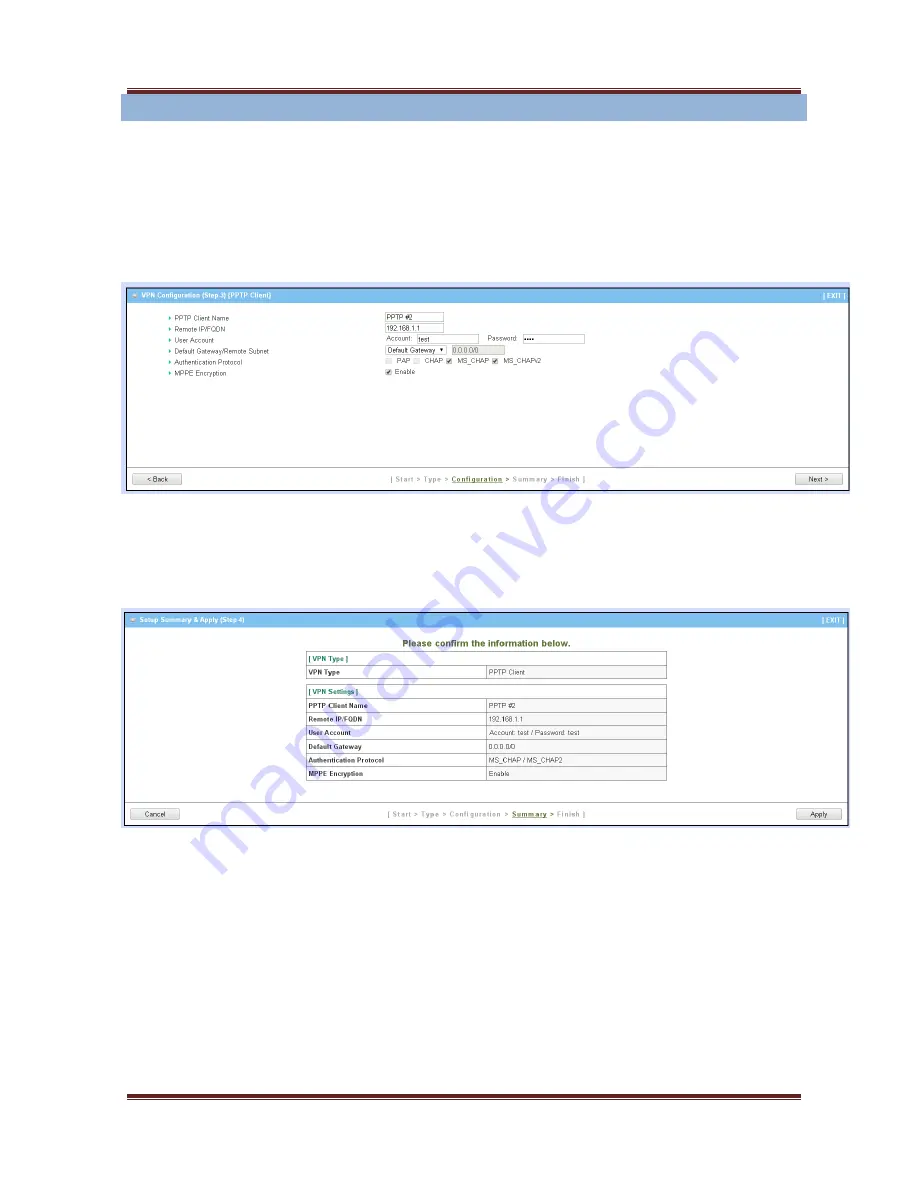
PPTP Client 

When 

PPTP Client

 is selected in Step-2 for VPN Type, PPTP configuration window will appear. 


When complete the PPTP Client configuration, click Next button, a setup summary will display.   
Confirm the setting then click the Apply button to complete the setting. 


Summary of Contents for DL-200

Page 1: ...Quick Installation Guide DL 200 Cellular Data logger V1 2_201610...

Page 2: ...WARNING 6 1 2 2 SYSTEM REQUIREMENTS 7 1 2 3 HARDWARE CONFIGURATION 8 1 2 4 LED INDICATION 10 CHAPTER 2 GETTING STARTED 11 2 1 HARDWARE INSTALLATION 11 2 1 1 MOUNT THE UNIT 11 2 1 2 INSERT THE SIM CAR...

Page 3: ...ranslated into any language or transmitted in any form or by any means mechanical magnetic electronic optical photocopying manual or otherwise without the prior written permission Trademarks All produ...

Page 4: ...T Internet Of Thing applications The redundancy design in fallback 9 48 VDC power terminal and VRRP and dual SIM cards make the device as a back up in power data transmission and network connection wi...

Page 5: ...Quantity 1 DL 200 M2M IoT Gateway 1pcs 2 3G Antenna 2pcs 3 WiFi Antenna 2pcs 4 Power Adapter DC 12V 2A 1 1pcs 5 Power Terminal Block 1pcs 6 8G USB Flash Drive 1pcs 7 RJ45 Cable 1pcs 8 RS 485 Cable 1pc...

Page 6: ...ce directly This product accepts DC power voltage from 9V to 48V Using a different voltage rating power source will damage the router Do not open or repair the case by yourself If the Product is too h...

Page 7: ...e subscription IEEE 802 11n or 802 11b g wireless clients 10 100 Ethernet adapter on PC Web based Configuration Utility Requirements Computer with the following Windows Macintosh or Linux based operat...

Page 8: ...user with a quick and easy way to resort the default setting Press the RESET button continuously for 6 sec and then release it The device will restore to factory default settings Auto MDI MDIX RJ 45 P...

Page 9: ...DL 200 Cellular Data logger Quick Installation Guide 9 Power Terminal Block PWR1 GND PWR2 GND DI DI DO DO SIM_B Slot SIM_A Slot 2 4G WiFi Antenna 2 4G WiFi Antenna...

Page 10: ...A Green Steady ON SIM card A is used SIM B Green Steady ON SIM card B is used LAN 1 LAN 4 Green Steady ON Ethernet connection of LAN is established Flash Data packets are transferred High 3G Signal G...

Page 11: ...roduct when out of factory Please screw the wall mount kits and DIN rail bracket on the product first 2 1 2 Insert the SIM Card WARNNING BEFORE INSERTING OR CHANGING THE SIM CARD PLEASE MAKE SURE THAT...

Page 12: ...ck carefully and connect to the right power requirements and polarity There are a DC converter and a DC12V 2A power adapter4 in the package for you to easily connect DC power adapter to this terminal...

Page 13: ...00 provides four RJ 45 ports to connect 10 100Mbps Ethernet It can auto detect the transmission speed on the network and configure itself automatically Connect the Ethernet cable to the RJ 45 ports of...

Page 14: ...tep to finish the setup process Browse and Activate the Setup Wizard Type in the IP Address http 192 168 123 254 5 When you see the login page type the password admin 6 and then click login button Aft...

Page 15: ...DL 200 Cellular Data logger Quick Installation Guide 15 Select Wizard for basic settings in a simple way...

Page 16: ...DL 200 Cellular Data logger Quick Installation Guide 16 Network Setup Wizard Network Setup Wizard will guide you through a basic configuration procedure step by step...

Page 17: ...ny text If you want to change password Enter the current password in this item New Password 1 String format any text Enter the new password New Password Confirmation The box is unchecked by default En...

Page 18: ...tting Description Time zone list 1 A Must filled setting Select the time zone for the system clock Detect Again NA Click the Detect Again button to detect the time zone from network Exit NA Click the...

Page 19: ...work Setup Wizard Step 4 WAN interface Step 4 WAN interface Setting Item Value setting Description Physical Interface A Must filled setting Here you specify the Physical Interface that connects your r...

Page 20: ...ost name provided by your Service Provider ISP Registered MAC Address An Optional setting Enter the MAC address that you have registered with your service provider Or Click the Clone button to clone y...

Page 21: ...ust filled setting Enter the WAN subnet mask given by your Service Provider WAN Gateway A Must filled setting Enter the WAN gateway IP address given by your Service Provider Primary DNS A Must filled...

Page 22: ...etting Enter the PPPoE password provided by your Service Provider Primary DNS A Must filled setting Enter the IP address of Primary DNS server Secondary DNS Optional setting Enter the IP address of Se...

Page 23: ...ider WAN Subnet Mask A Must filled setting Enter the WAN subnet mask given by your Service Provider WAN Gateway A Must filled setting Enter the WAN gateway IP address given by your Service Provider Wh...

Page 24: ...ider WAN Subnet Mask A Must filled setting Enter the WAN subnet mask given by your Service Provider WAN Gateway A Must filled setting Enter the WAN gateway IP address given by your Service Provider Wh...

Page 25: ...setting Description LAN IP Address A Must filled setting Assign an IP Address for LAN this IP address is a gateway IP Subnet Mask By default 255 255 255 0 24 is selected Select a Subnet Mask for the d...

Page 26: ...e or keep them with default settings SSID is the name that you will see on your PC when doing wireless network scan It s strongly recommending you to add authentication and encryption in your wireless...

Page 27: ...ata logger Quick Installation Guide 27 Step 7 Summary Check the information again If all settings are correct please press Apply button to save new settings Then it will take 70 seconds to take new se...

Page 28: ...u through to complete VPN tunnel setup Step 1 Setup Steps In Step 1 the VPN Setup Step is a screen that displays the summary of steps for VPN setup Click Next button to begin VPN setup Step 2 Select V...

Page 29: ...owing page When L2TP is selected go to Step 3 L2TP in the following page When GRE is selected go to Step 3 GRE in the following page Step 3 IPSec When IPSec is selected in Step 2 for VPN Type IPSec co...

Page 30: ...server is selected the client or server configuration window will appear PPTP Client When PPTP Client is selected in Step 2 for VPN Type PPTP configuration window will appear When complete the PPTP C...

Page 31: ...Server When PPTP Server is selected in Step 2 for VPN Type PPTP configuration window will appear When complete the PPTP Server configuration click Next button a setup summary will display Confirm the...

Page 32: ...server is selected the client or server configuration window will appear L2TP Client When L2TP Client is selected in Step 2 for VPN Type L2TP configuration window will appear When complete the L2TP C...

Page 33: ...Server When L2TP Server is selected in Step 2 for VPN Type L2TP configuration window will appear When complete the L2TP Server configuration click Next button a setup summary will display Confirm the...

Page 34: ...e 34 Step 3 GRE When GRE is selected in Step 2 for VPN Type GRE configuration window will appear When complete the GRE configuration click Next button a setup summary will display Confirm the setting...

Page 35: ...DL 200 Cellular Data logger Quick Installation Guide 35 Micro Inverter Status Select Darfon Press Device to check Micro Inverter status...

Reviews: