background image


Description of the device 


Features 

With the IPS-EA it is possible to activate an alarm, manually or automatically. This can be a chime or voice 
file. It is possible to record a 120 seconds digital voice file. 


DC 24V function. 


120 seconds digital recording IC for voice file (rewritable). 


Manual/ automatic activating alarm, output alarm signal or voice recording files. 


MIC with priority function, switching off alarm or recording output. 


When the fire signal relived, alarm automatically stops and returns to manual control.


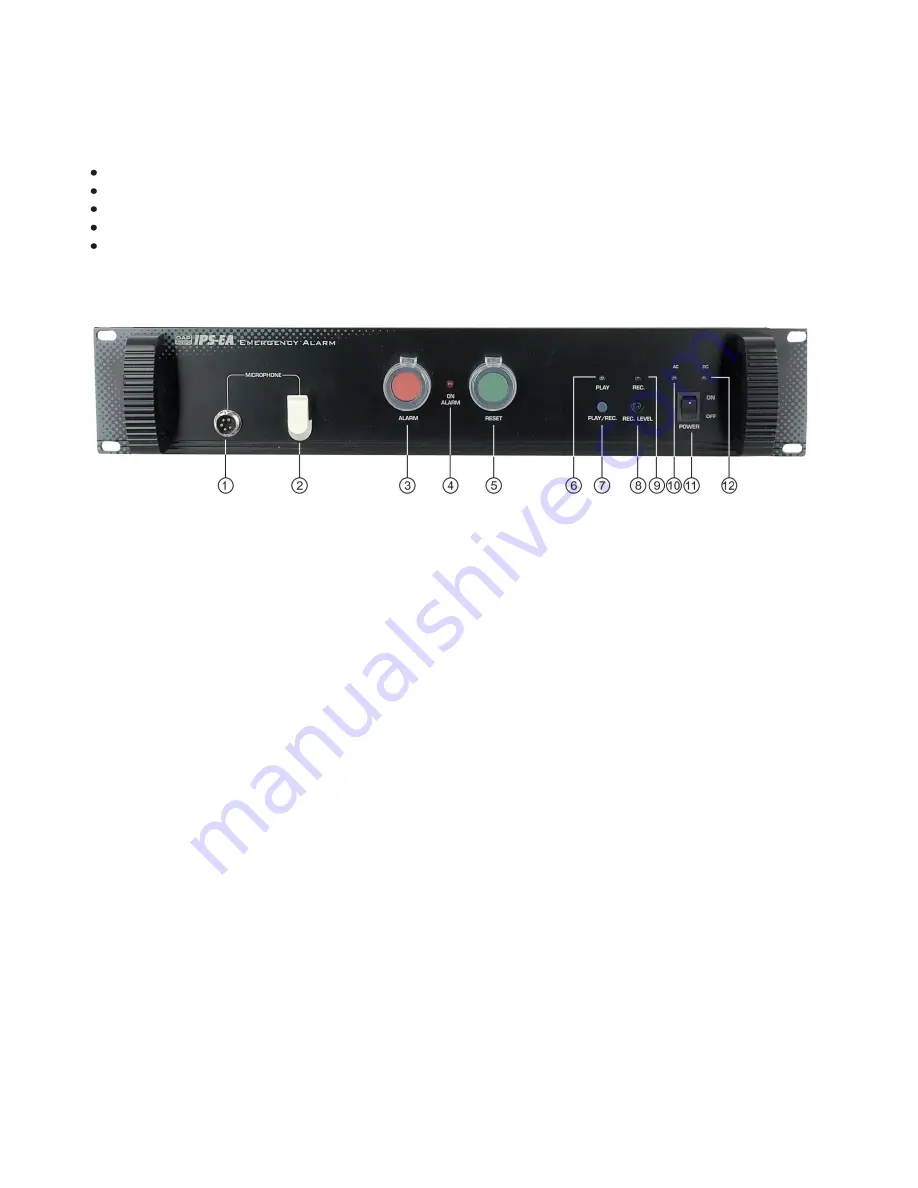
Front panel


Fig. 1 


 1.

 MIC Jack.


     U

sed to connect the supplied MIC. After using the MIC please turn down the volume on the MIC and  

      unlock the MIC.


 2. MIC Bracket. 

 3. 

ALARM SW. 

     Manual alarm switch. Pressing this switch will activate an alarm. Alarm signals will be put out. 

 4. ON Alarm LED. 

     Lights if an alarm is active. 

 5. RESET SW. 

     Manual reset switch. Pressing this switch will reset the alarm. 


6. PLAY Led. 


Lights up in PLAY status.


 7. PLAY/REC. 

     Pressing this switch will set the unit in PLAY mode. The  PLAY led will light. The recorded message  
     will be played back. Pressing the switch again will stop the recorded message. 
     Holding the switch for 5 seconds will set the unit in Record mode. Now you can use either the supplied   
     MIC or the Line input to record a message. Pressing the switch again will stop recording. Recording more  
     then 120 seconds will stop the recording automatically. 

  8. REC. Level. 
      

Is


used to adjust the volume of the recording. Turning it clockwise will increase the volume, while 


      turning it counterclockwise will decrease the volume. 
  

9. REC Led. 


Lights up in REC status. 

10. AC Led. 
     

 Indicates that AC power is connected and the device is turned on.  The LED will dim if the mains  

      power fails. 

11. Power SW. 

      This is the main Power switch. Press to turn the amplifier on. 

12. SUB Led. 
      

Indicates that an external 24Vdc  back up power supply is present. 

Summary of Contents for IPS-EA

Page 1: ...IPS EA ORDERCODE D6504 ...

Page 2: ...ed You can rely on DAP Audio for more excellent audio products We design and manufacture professional audio equipment for the entertainment industry New products are being launched regularly We work hard to keep you our customer satisfied You can get some of the best quality best priced products on the market from DAP Audio So next time turn to DAP Audio for more great audio equipment Always get t...

Page 3: ...S EA Guide Warning Safety instructions Operating Determinations Connecting to the mains Description Features Overview Front panel Overview Back panel Operation Connecting the device Remote in connection Maintenance Troubleshooting Product Specifications ...

Page 4: ...rd and all connections with the mains with particular caution Never remove warning or informative labels from the unit Never use anything to cover the ground contact Do not insert objects into air vents Do not connect this system to a dimmer pack Do not switch the system on and off in short intervals as this would reduce the system s life Do not open the device and do not modify the device Do not ...

Page 5: ...h when changing the power cord or signal cable or select the input mode switch In typical use please set the volume at 0dB position Sometimes when you want to send one signal to more than one amplifier you should use a signal distributor If your Dap Audio device fails to work properly discontinue use immediately Pack the unit securely preferably in the original packing material and return it to yo...

Page 6: ... your own safety and the safety of others Connection with the mains Connect the device to the mains with the power plug Always pay attention that the right color cable is connected to the right place International EU Cable UK Cable US Cable Pin L BROWN RED YELLOW COPPER FASE N BLUE BLACK SILVER NUL YELLOW GREEN GREEN GREEN EARTH Make sure that the device is always connected properly to the earth I...

Page 7: ... 5 RESET SW Manual reset switch Pressing this switch will reset the alarm 6 PLAY Led Lights up in PLAY status 7 PLAY REC Pressing this switch will set the unit in PLAY mode The PLAY led will light The recorded message will be played back Pressing the switch again will stop the recorded message Holding the switch for 5 seconds will set the unit in Record mode Now you can use either the supplied MIC...

Page 8: ...ith a fuse of same specification T315mA 14 GND Screw This screw offers a separate ground connection Can be useful in case of grounding problems 15 DC 24V Input Used to connect an external back up power supply of 24Vdc e g Battery 16 GND Lift Switch To eliminate grounding problems 17 Remote Out A B Relay outputs N O contacts are closed if an alarm signal is present 18 Remote In A B Need to be conne...

Page 9: ...eeds 2U rackspace Connect all cables Connecting the device Below an example of a possible setup NOTE Always turn off and disconnect the amplifier from mains voltage before making any connections Fig 3 NOTE If you re not confident in how to connect either low impedance or High impedance 100V Speakers to your Intelligent Speaker Selector Always ask a qualified technician ...

Page 10: ...out the product will not function whatsoever If this happens follow the directions below to do so 1 Unplug the unit from electric power source 2 Insert a flat head screwdriver into a slot in the fuse cover Gently pry up the fuse cover The fuse will come out 3 Remove the broken fuse If brown or unclear it is burned out 4 Insert the replacement fuse into the holder where the old fuse was Reinsert th...

Page 11: ...e Website www Highlite nl Email service highlite nl Power supply AC 110 120V 220 240V 60Hz 50Hz DC 24V Remote in Short circuit signal Remote out Short circuit signal Output alarm signal 1v 0dB 10kΩ Recording time 120 seconds Recording level 20dBV line in Dimensions WxHxD 483x370x88mm Net weight 6 05kg ...

Page 12: ...2007 DapAudio ...

Reviews: