background image

2

WARNING

FOR YOUR OWN SAFETY, PLEASE READ THIS USER MANUAL CAREFULLY

BEFORE YOUR INITIAL START-UP!

SAFETY INSTRUCTIONS

Every person involved with the installation, operation and maintenance of this system has to:

-

 be 

qualified

-


follow  the instructions of this manual

Before you initial start-up, please make sure that there is no damage caused by transportation. Should there
be any, consult your dealer and do not use the system.

To maintain perfect condition and to ensure a safe operation, it is absolutely necessary for the user to follow
the safety instructions and warning notes written in this manual.

Please consider that damages caused by manual modifications to the system are not subject to warranty.

This system contains no user-serviceable parts. Refer servicing to qualified technicians only.

IMPORTANT:

The manufacturer will not accept liability for any resulting damages caused by the non-observance of
this manual or any unauthorized modification to the system.

  Never let the power-cord come into contact with other cables! Handle the power-cord and all

connections with the mains with particular caution!

  Never remove warning or informative labels from the unit.

  Never use anything to cover the ground contact.

  Never leave any cables lying around.

  Do not insert objects into air vents.

  Do not connect this system to a dimmerpack.

  Do not switch the system on and off in short intervals, as this would reduce the system’s life.

  Do not open the device and do not modify the device.

  Do not drive the inputs with a signal level bigger, than required to drive the equipment to full output.

  Do not plug Mics into the console (or stagebox) while Phantom Power is on. Also mute the monitor /

Pa system when turning Phantom Power on or off. Allow the system to adjust for a couple of
seconds, before setting the input gains.

  Only use system indoor, avoid contact with water or other liquids.

  Avoid flames and do not put close to flammable liquids or gases.

  Always disconnect power from the mains, when system is not used. Only handle the power-cord by

the plug. Never pull out the plug by tugging the power-cord.

  Always operate the unit with the AC ground wire connected to the electrical system ground.

CAUTION!

Keep this system away from rain and moisture!

CAUTION! Be careful with your operations.

With a dangerous voltage you can suffer

a dangerous electric shock when touching the wires!

Summary of Contents for Gig 14

Page 1: ...Gig 14 ORDERCODE D2205...

Page 2: ...Audio for more excellent audio products We design and manufacture professional audio equipment for the entertainment industry New products are being launched regularly We work hard to keep you our cu...

Page 3: ...de Warning Safety instructions Operating Determinations Description Features Overview Frontside Backside Installation Set Up and Operation Mono Input Channel Stereo Input Channel Master Section Set Up...

Page 4: ...ains with particular caution Never remove warning or informative labels from the unit Never use anything to cover the ground contact Never leave any cables lying around Do not insert objects into air...

Page 5: ...rve valuable dynamic reserve headroom Avoid ground loops Always be sure to connect the power amps and the mixing console to the same electrical circuit to ensure the same phase If system is dropped or...

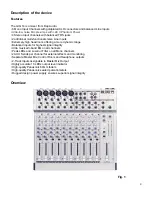
Page 6: ...fering a more dynamic range Balanced inputs for highest signal integrity Ultra musical 3 band EQ on all channels Peak LEDs and Low Cut Filter on all Mono channels 2 AUX Sends per channel for external...

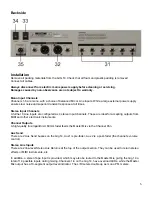
Page 7: ...5 Frontside...

Page 8: ...re ideal for accepting outputs from MIDI and other electronic instruments Channel Outputs A high quality true logarithmic 60mm fader feeds the Master Mix via the Channel Pan Aux Send There are 2 Aux S...

Page 9: ...subsonics The upper 5 and lower 7 shelving controls have their frequencies fixed at 12 Khz and 80 Hz respectively The Mid range control 6 has a peaking response with Q fixed at 2 octaves frequency at...

Page 10: ...t Channel 2 Equalizer except that the equalizer is stereo of course A stereo equalizer is generally preferable to using 2 mono equalizers when equalizing a stereo signal as often discrepancies between...

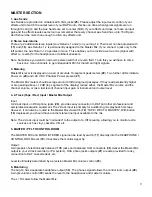
Page 11: ...ey read persistently higher or are peaking above 10 dB top segment of the display reduce either the Master Mix volume and the channel volume or as a last resort channel input gain or instrument unit o...

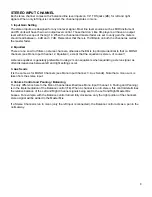
Page 12: ...e run in mono simply by connecting into the left jack socket only These channels are suitable for a variety of line levels sources including MIDI instruments and Tape returns from multi track 3 Stereo...

Page 13: ...your DAT or ADAT reference But your DAT or ADAT may be way under its maximum input limit Probably a better way to work out just how hard you can drive your recorder is to incrementally increase the re...

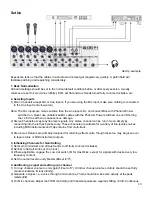
Page 14: ...always to your advantage Periodically check that your cables are in good condition that they are correctly wired and that all their contacts are perfectly efficient a great number of problems faulty...

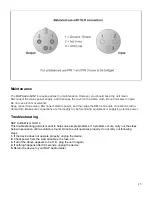
Page 15: ...dry before linking equipment or supplying electric power Troubleshooting DAP Audio Mixer GIG 14 This troubleshooting guide is meant to help solve simple problems If a problem occurs carry out the step...

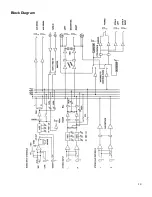
Page 16: ...14 Block Diagram...

Page 17: ...dwidth 10 Hz to 60 KHz 3 dB Distortion THD N 0 01 at 4dBu 1Khz Bandwidth 80 KHz Line level range 10 dBu to 40 dBu Equalization Hi Shelving 12 KHz 15 dB Mid Shelving 2 5 KHz 15 dB Low Shelving 80 Hz 15...

Page 18: ...2004 DapAudio...

Reviews: