DAPAudio DCP-24 Manual Download Page 7


Description of the device 


Features 

The DCP-24 is a 2-in, 4-out digital crossover 
• 48 KHz, 64Bits Sample rate 
• 10 parametric filters per input and output 
• USB interface with included user-friendly software 
• Engineered and assembled in Europe 
 
The DCP-24 is a very complete 2  in- 4 output digital speaker manager. Even if you are not an audio 
engineer you can easily setup this unit with the included software that you can connect to a PC or Mac 
with the onboard USB interface. It has 10 PEQ's at the in- and outputs and various types of filters to 
manage any kind of speaker or speaker system. Furthermore it has all features you need like phase invert, 
limiters and delays. Clear in and output meters in combination with the LCD display gives you all the 
necessary information in one overview. Our engineers will keep working on presets for the DAP speaker 
ranges to help you get a good start  for your personal DAP audio system. Those presets can be 
downloaded at 

www.dap-audio.info

 or ask your local dealer. The DCP-24 is suitable for PA, line arrays 

and audio installations, as well as sound distribution networks.  
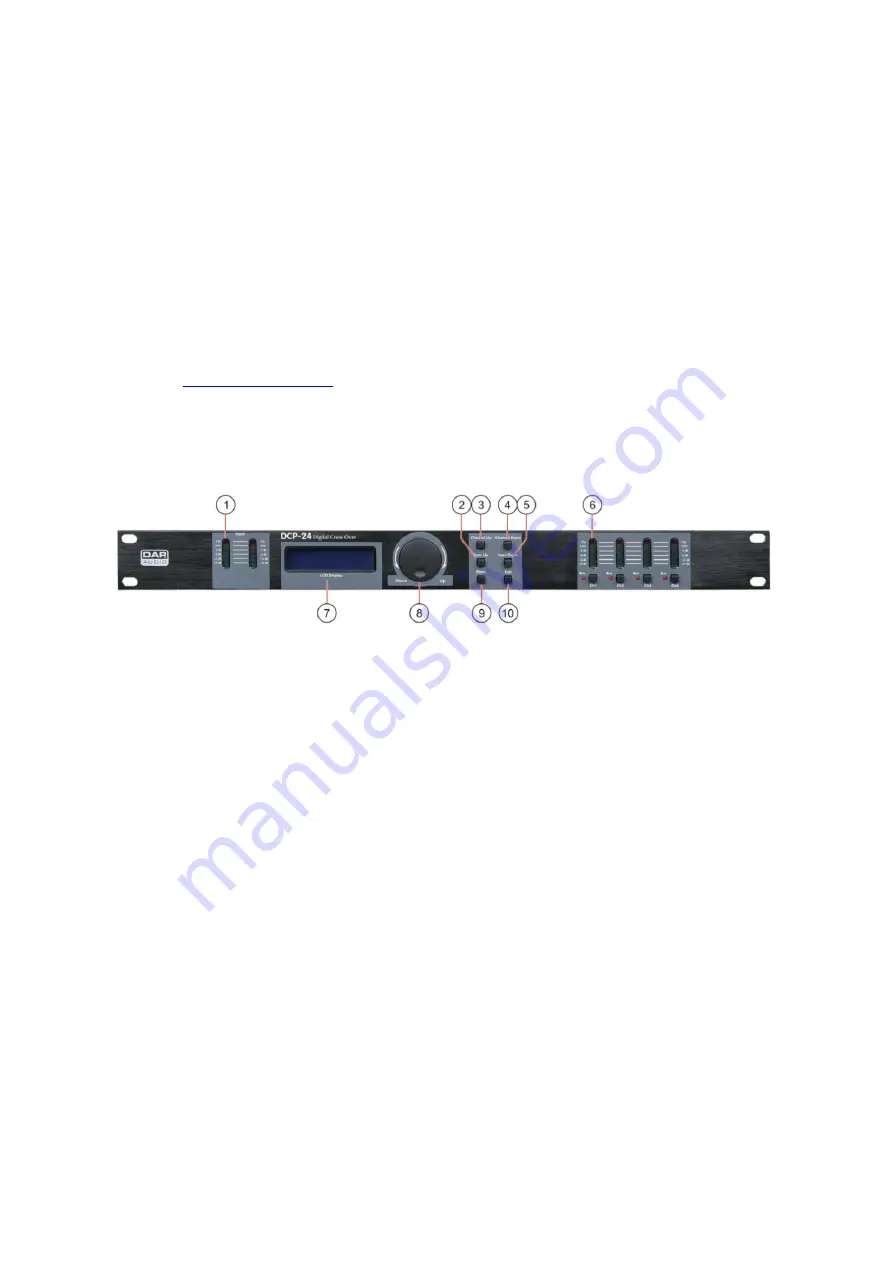


Overview 


   1) Input LED indicator  

       Indicates the input level. Make sure the Clip led only lights up occasionally. The limit led will light up if  
       the internal limiter is actually limiting the signal. 
   

2)


Item Up


button


       Pressing the Item up button allows select a parameter for editing in forward direction.  
       Input channels: 
       Gain – Lowpass – Highpass – PEQ1 – PEQ2 – PEQ3 – PEQ4 – PEQ5 – PEQ6 – PEQ7 – PEQ8 – PEQ9 –  
       PEQ10 – Limiter – Link. 
       Output Channels:  
       Gain – Mixer -Lowpass – Highpass – PEQ1 – PEQ2 – PEQ3 – PEQ4 – PEQ5 – PEQ6 – PEQ7 – PEQ8 – PEQ9  
       – PEQ10 – Limiter - Phase – Link. 

   3)


Channel Up button


       Pressing the Channel up button allows you select an input or output channel for editing in forward  
       direction:  In A – In B – Out 1 – Out 2 – Out 3 – Out 4. 
       If two channels are linked, both channels can only be selected and edited together. E.g. if the  
       display shows “Out 12” output channel 1 and output channel 2 are linked. 

   4)


Channel down button


       Pressing the Channel up button allows you select an input or output channel for editing in reverse 
       direction:  In A – In B – Out 1 – Out 2 – Out 3 – Out 4. If two channels are linked, both channels can  
       only be selected and edited together. E.g. if the display shows “Out 12” output channel 1 and output  
       channel 2 are linked. 

Summary of Contents for DCP-24

Page 1: ...DCP 24 ORDERCODE D2080 Highlite International B V Vestastraat 2 6468 EX Kerkrade The Netherlands...

Page 2: ...Audio for more excellent audio products We design and manufacture professional audio equipment for the entertainment industry New products are being launched regularly We work hard to keep you our cu...

Page 3: ...setup 7 Output setup 9 Loading and saving files 12 Access level 13 Software version 13 Digital Speaker Manager software Installation 14 Software installation 14 Connecting a single DCP 24 with your P...

Page 4: ...on Should there be any consult your dealer and do not use the system To maintain perfect condition and to ensure a safe operation it is absolutely necessary for the user to follow the safety instructi...

Page 5: ...or by the front panel rack mount screws Before changing your grounds around always turn your amplifiers down Keep this user s manual for future consultation Also remember that the device will get a b...

Page 6: ...erly pack fixture any shipping damage resulting from inadequate packaging is the customer s responsibility Highlite reserves the right to use its own discretion to repair or replace product s As a sug...

Page 7: ...ays and audio installations as well as sound distribution networks Overview 1 Input LED indicator Indicates the input level Make sure the Clip led only lights up occasionally The limit led will light...

Page 8: ...g the Jogwheel allows you to change parameters Clicking the Jogwheel allows you to enter or confirm 9 Menu button Pushing the Item down button allows you to select one of the following menus for editi...

Page 9: ...put channel A is selected Adjust the gain by dialing the jogwheel 8 Push the Item up 2 button to proceed with the next item In our example the Lowpass filter Adjust by dialing the jogwheel 8 You can s...

Page 10: ...proceed with the next parameter Select the filter type by dialing the jogwheel 8 Click the jogwheel 8 to proceed with the next parameter Switch the currently selected parametric EQ on or off by diali...

Page 11: ...are only able to select Out 12 and Out 34 all 4 channels are linked If you want to adjust all 4 output channels separately you ll have to unlink the channels see page 11 Adjust the gain by dialling th...

Page 12: ...Once selected the correct filter type click the jogwheel 8 to re adjust the lowpass frequency or push the Item up 2 button to proceed with the next item in our example PEQ 1 Adjust the gain by dialin...

Page 13: ...aling the jogwheel 8 Push the item up 2 button to proceed with the next item IMPORTANT Enabling the limiter on a specific output also changes the way in which the level is displayed on the correspondi...

Page 14: ...ect a location 1 50 to store your current settings Clicking the jogwheel 8 will save the current settings in the selected location The system will ask you give a name to the preset name Select a chara...

Page 15: ...gwheel 8 If desired change the password by dialling and clicking the jogwheel 8 If the password is set confirm your password by pushing the menu 9 button twice Software version menu By pushing the men...

Page 16: ...Installation If the CD doesn t start automatically open the CD and double click the setup exe icon Now the setup window as shown in the figure below will pop up Click the next button Accept the terms...

Page 17: ...15 If you re ok with the installation path recommended click the next button Click the install button Wait until the next screen pops up...

Page 18: ...16 Make sure to check the confirmation box to install Microsoft VisualC Runtime Click the finish button in order to install the VisualC Runtime program Click the next button...

Page 19: ...17 Check the confirmation box to accept the license terms Click the Install button Wait until the installation is finished...

Page 20: ...18 Now you ve successfully installed the DAP All control software which can be used to manage and edit your sound s for the DAP DCP 24 DCP 26 and or DCL 22...

Reviews: