background image


Ordercode: D1260 

Core Kontrol D4i 

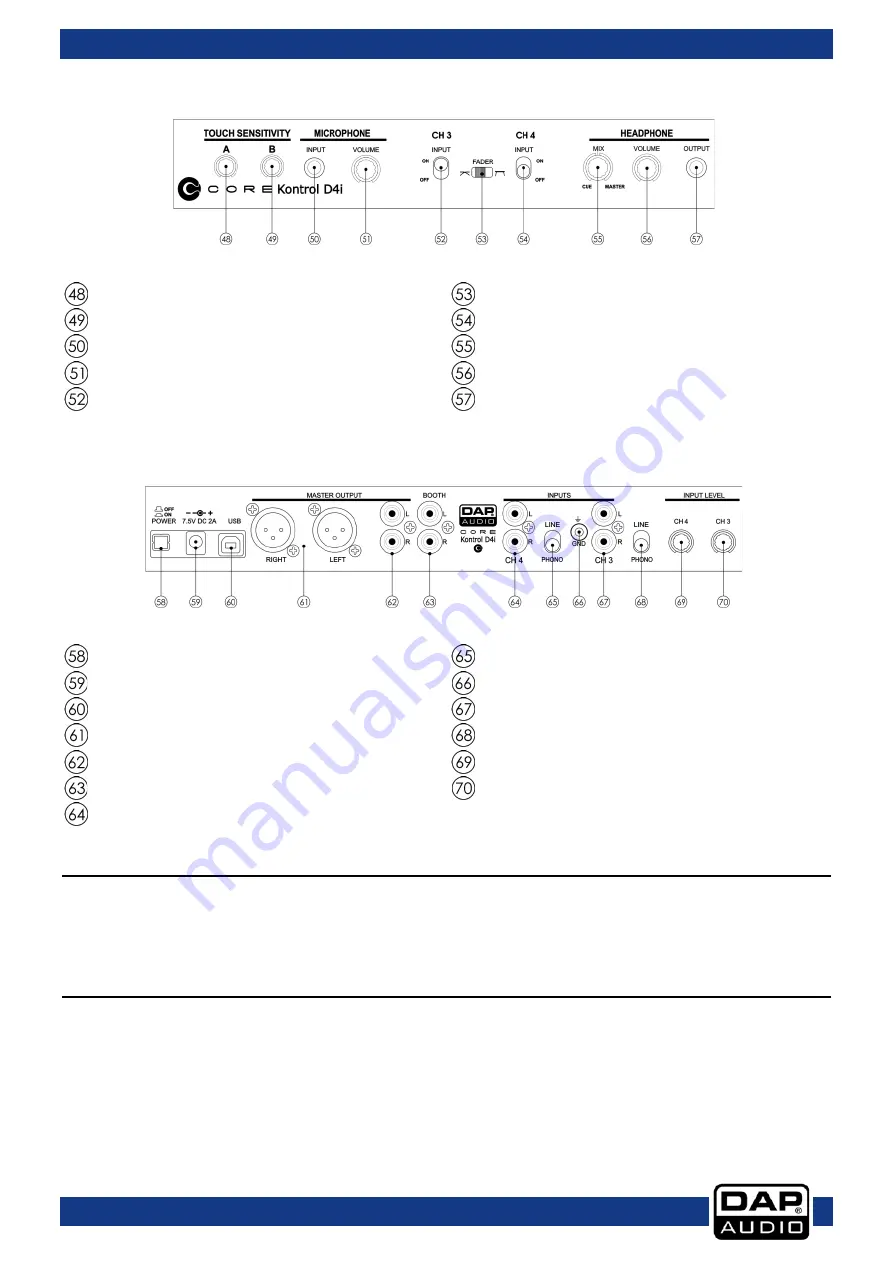
Frontside 


Fig. 04 


 Touch sensitivity control jogwheel A 

 Crossfader  slope switch 

 Touch sensitivity control jogwheel B 

 Channel 3 input switch 

 Mic input jack (6,3 mm) 

 Cue mix control 

 Mic volume control 

 Headphones volume control 

 Channel 3 input switch 

 Headphones output jack (6,3 mm) 


Backside 


Fig. 05 


 Power on/off switch 

 Channel 4 line/phono switch 

 DC In 7,5V 2A 

 GND screw 

 USB connector B 

 Channel 3 RCA input 

 Master XLR out L/R 


 Channel 3 line/phono switch 

 Master RCA out L/R 

 Channel 4  input level control 

 Booth RCA out L/R 


 Channel 3  input level control 

 Channel 4 RCA input 


Installation 

Remove all packing materials from the Kontrol D4i. Check that all foam and plastic padding is removed. 

Connect all cables. 

Always disconnect from electric mains power supply before cleaning or servicing. 

Damages caused by non-observance are not subject to warranty. 


Set Up and Operation 

Before plugging the unit in, always make sure that the power supply matches the product specification 

voltage. The power supply demands are printed on the back of the device. 


Connection: 

01)  Connect the Kontrol D4i to your mixer/amplifier using the proper cables. 

02)  Connect the supplied power adapter. 


CAUTION: Be sure that the mixer/amplifier’s power is off, when connecting the cables. Turn on the Kontrol 

D4i before you turn on your mixer/amplifier. 


Summary of Contents for D1260

Page 1: ...Core Kontrol D4i V1 Highlite International B V Vestastraat 2 6468 EX Kerkrade the Netherlands Ordercode D1260 MANUAL ENGLISH ...

Page 2: ...ng Playback 14 Stop Playback 14 Pausing 14 Setting a Cue Point 14 Setting a hot cue point in pause mode 14 Setting a hot cue point in play mode 15 Deleting a hot cue point 15 Cueing 15 Seek fast forward fast backward 15 Changing pitch of the song 15 Pitch bending 15 Loop play 16 Auto loop play 16 Reloop 16 Recording a sample 16 Sample playback 16 Software Installation 17 Running the setup program ...

Page 3: ...t includes DAP Kontrol D4i USB cable 1 5 m CD with Virtual DJ LE software User manual Power adapter Safety Instructions Every person involved with the installation operation and maintenance of this system has to be qualified follow the instructions of this manual Before you initial start up please make sure that there is no damage caused by transportation Should there be any consult your dealer an...

Page 4: ... you avoid causing the next piece of equipment in your sound path to overdrive You also preserve valuable dynamic reserve headroom Avoid ground loops Always be sure to connect the power amps and the mixing console to the same electrical circuit to ensure the same phase If system is dropped or struck disconnect the power supply or USB cable immediately Have a qualified engineer inspect for safety b...

Page 5: ...number 04 A brief description of the symptoms Claims The client has the obligation to check the delivered goods immediately upon delivery for any short comings and or visible defects or perform this check after our announcement that the goods are at their disposal Damage incurred in shipping is the responsibility of the shipper therefore the damage must be reported to the carrier upon receipt of m...

Page 6: ...log inputs To take full advantage of all functions of your Kontrol D4i you need to buy the Virtual DJ Pro Full version Large 134mm jog wheels with adjustable touch sensitivity 4 Deck controller for any kind of DJ software Booth monitor balanced master output Microphone input 2 analog inputs not supported by the virtual DJ LE software 4 in 4 out audio interface Including Virtual DJ LE Overview Fig ...

Page 7: ... Sample volume control Pitch control fader Sample play button x shift button Sample select up button Loop in smart loop button Sample select down button Key lock pitch button Hotcue 3 8 beats button Jogwheel Hotcue 4 16 beats button Cue button Deck 3 button Sync master button x2 shift button Parameter 1 control Loop out reloop button Auto loop button Scratch button Parameter 2 control Play button ...

Page 8: ... control Crossfader Channel mid control Master control Channel low control Booth control Load view 1 button Track select encoder Filter control Load view 2 button Load view 3 button Load view 4 button Cue button Back button Crossfader assign L switch Shift button Crossfader assign R switch 7 ...

Page 9: ... control Channel 4 RCA input Installation Remove all packing materials from the Kontrol D4i Check that all foam and plastic padding is removed Connect all cables Always disconnect from electric mains power supply before cleaning or servicing Damages caused by non observance are not subject to warranty Set Up and Operation Before plugging the unit in always make sure that the power supply matches t...

Page 10: ... of the loop Tapping this button while pushing and holding the shift 47 button will toggle the smartloop mode on or off In smartloop mode the software makes sure that your loop is always on the beat actually a quantizing function Smartloop mode is indicated in the Virtual DJ software by the lock symbol which turns orange when active 08 Keylock pitch button Tapping this button allows you to toggle ...

Page 11: ...his button allows you to play pause playback of a previously recorded sample 20 Sample select up button Allows you to select a previously recorded sample for playback 21 Sample select down button Allows you to select a previously recorded sample for playback 22 3 8 beats button HOTCUE The Kontrol D4i allows you to store up to four hot cue points per deck See pages 14 15 Setting a hot cue point in ...

Page 12: ...ft button Allows you to assign the corresponding channel to the left crossfader side 38 Assign crossfader side right button Allows you to assign the corresponding channel to the right crossfader side 39 Channel fader The fader controls the volume of the corresponding channel 40 Crossfader The crossfader allows you to mix smoothly from one source to another only when both channel faders are up 41 M...

Page 13: ...pens putting the switch in off position first and the back in on position will solve this problem 53 X Fader slope switch Allows you to select the response cut linear of the crossfader 54 Channel 4 input switch This switch will only be recognized in the virtualdj pro full version Note This switch is only supported by the Virtual DJ Pro Full software This switch is not supported by the included Vir...

Page 14: ...lanced inputs 64 Channel 4 RCA input Use this input to connect a CD player or a turntable 65 Channel 4 line phono switch Depending of the position of the Line Phono switch you can connect a CD player or a turntable to the channel 4 64 input 66 GND screw To attach your turntable s ground wire 67 Channel 3 RCA input Use this input to connect a CD player or a turntable 68 Channel 3 line phono switch ...

Page 15: ...D in the play 28 button lights up Stop Playback There are two ways to stop playback Push the play 28 button during playback to pause at that point Push the cue 10 button during playback to return to the cue point and enter pause condition Pausing Push the play 28 button to pause playback The play 28 button blinks when the pause mode is set Playback resumes when the play 28 button is pushed again S...

Page 16: ...tically it allows you to check the cue point Seek fast forward fast backward Seeking is a function used for for moving quickly forward or backward through a track while pushing and holding the shift 47 button and turning the jogwheel 09 Push and hold the shift 47 button while turning the jogwheel The track will play fast forward or fast backward and the sound is audible Turn the jogwheel clockwise...

Page 17: ...n smart loop 07 button Both the in smart loop 07 button and the out reloop 26 button will blink again indicating loop play is active The 1 2 beats 04 2 4 beats 15 3 8 beats 22 4 16 beats 23 buttons and the x2 shift 25 and x shift 06 buttons allow you to shorten or expand the length of the recorded loop while loop play is active While pushing and holding the shift 47 button the x2 shift 25 and x sh...

Page 18: ... 7 Professional 32 bit Microsoft Windows 95 98 ME or older are not supported Mac Minimum system requirements Intel processor Mac OS X v10 5 x 1024x768 resolution CoreAudio compatible soundcard 1024MB RAM 50MB free on the hard drive Recomended system requirements Intel processor Mac OS X v10 6 x 1440x900 resolution Multi channel CoreAudio compatible soundcard 2048MB 2Gb RAM 200MB free on the hard d...

Page 19: ...plifier active speakers Insert the CD ROM into the computers CD drive and follow the instructions Running the setup program Follow the steps below 01 If the installation program on your CD doesn t start automatically start it manually by double clicking install_virtualdj_le_v7 0 5 rar file on the CD 02 The welcome screen will pop up Press Next when finished reading the screen 03 Now the readme fil...

Page 20: ...Ordercode D1260 Core Kontrol D4i 04 The Setup screen will pop up Click Typical 05 The Installation screen will pop up Click Install 19 ...

Page 21: ...Ordercode D1260 Core Kontrol D4i 06 If the installation is finished the screen below will pop up Press the finish button to complete the installation 20 ...

Page 22: ... DJ icon on the desktop A pop up screen asking you to enter your serial number will pop up 03 Enter the serial number you received with your purchase sticker on inside CD cover flap and click the OK button 04 Virtual DJ will check for the currently latest version this can be disabled in the configuration section The Virtual DJ user interface will appear 05 Click the Config button upper right The f...

Page 23: ...t two channels of the Kontrol D4i s internal soundcard are routed to the master outputs and second two channels are routed to the headphones output If the setup process was carried out correctly press the apply button and then press the OK button Make sure the Kontrol D4i is connected with your computer s USB port and is switched on before setting up your soundcards otherwise you won t be able to ...

Page 24: ... from the browser to this virtual deck Track title beats per minute display counters and transport control 03 Deck 2 Controls Same as Deck 1 04 Deck 3 Controls Deck 3 zone closed in the picture above Open the virtual deck by clicking on the activation button next to number 3 Now the deck 3 zone will open while the deck 1 zone will close 05 Deck 4 Controls Deck 4 zone closed in the picture above Op...

Page 25: ...8 File System Folder Structure 09 File Search Results For more information on the Virtual DJ software we suggest checking the Support Section on http www virtualdj com Here you can find manuals forums etc Sampler panels Effects panels Record panels 24 ...

Page 26: ... Control Panel System Device Manager No sound from controller Incorrect soundcard settings Check the settings in the config menu See page 21 Running the Virtual DJ software for the first time of this manual No sound from the controllers headphone output Incorrect soundcard settings Check the settings in the config menu See page 21 Running the Virtual DJ software for the first time of this manual N...

Page 27: ...ocuments and Settings Username My Documents VirtualDJ Skins contains ME800 zip Mac OS X Make sure that Users Username Documents VirtualDJ Skins contains ME800 zip File can be downloaded from http www highlite nl Sound from controller despite all faders are in minimum position Incorrect soundcard settings Check the settings in the config menu See page 21 Running the Virtual DJ software for the firs...

Page 28: ...Resolution 16 bit Output level 1 2V 0 2V THD N 0 05 S N 80dB Crosstalk 80dB Outputs 1 x Master unbalanced RCA 1 x Master balanced XLR 1 x Booth RCA 1 x Headphone 6 3mm Jack Power supply External adapter 7 5V DC Power consumption 2000mA Dimensions 334 x 475 x 70 mm LxWxH Weight 2 65 Kg Design and product specifications are subject to change without prior notice Website www Dap audio info Email serv...

Page 29: ... number 20 16 75 16 X 1 True voice X X Velocity Note ON O X 00 16 off 7F 16 on Note OFF X X After touch Key s X X Channel X X Pitch bend O X 3 Control change 05 16 3B 16 X 2 Prog Change X X True X X SysEx X X Common Song pos X X Song Sel X X Tune X X System real time Clock X X Commands X X Aux Messages Local ON OFF X X All Notes OFF X X Active Sense X X Reset X X O YES Mode 1 OMNI ON POLY Mode 2 O...

Page 30: ...ample select down 24 FX on off 25 autoloop 26 sample rec 27 sample play 28 1 29 2 2A 3 2B 4 2D in 2E out 2F scratch 30 keylock 31 sync 32 cue 33 play 35 X1 2 shift 36 X2 shift 37 deck switch Mixer MIDI Channel 5 Note number Function 60 track encoder push 66 ch 1 cue 67 ch 2 cue 68 ch 3 cue 69 ch 4 cue 6A ch 1 crossfader assign L 6B ch 1 crossfader assign R 6C ch 2 crossfader assign L 6D ch 2 cross...

Page 31: ...nel 2 Deck 3 MIDI Channel 3 Deck 4 MIDI Channel 4 Control change number Function 10 Jogwheel 11 FX parameter 1 12 FX parameter 2 13 key 14 sample volume Mixer MIDI Channel 5 Control change number Function 5 track encoder 21 ch 1 gain 22 ch 1 hi 23 ch 1 mid 24 ch 1 low 25 ch 1 filter 26 ch 1 fader 27 ch 2 gain 28 ch 2 hi 29 ch 2 mid 2A ch 2 low 2B ch 2 filter 2C ch 2 fader 2D ch 3 gain 2E ch 3 hi 2...

Page 32: ...master volume 3A headphone mix 3B headphone volume Touch sensitivity controls MIDI Channel 6 Control change number Function 10 touch sens A 20 touch sens B 3 pitch bend channels Channel number Function 1 pitch fader deck 1 2 pitch fader deck 2 3 pitch fader deck 3 4 pitch fader deck 4 5 crossfader 31 ...

Page 33: ...Ordercode D1260 Core Kontrol D4i 32 ...

Page 34: ...Ordercode D1260 Core Kontrol D4i 33 ...

Page 35: ...Ordercode D1260 Core Kontrol D4i Notes 34 ...

Page 36: ... 2014 DAP Audio ...

Reviews: