Dante DLV6220-14-21 Installation And Operation Manual Download Page 12


12 


Operating procedures                                                                                                                                                                                                                                                           


Turning-on power 

Before  operating  monitor,  ensure  camera  is  rightly  connected  with 

outside equipment. 

1.


Press the switch of power, when it is on, indicating lamp is green. 

2.


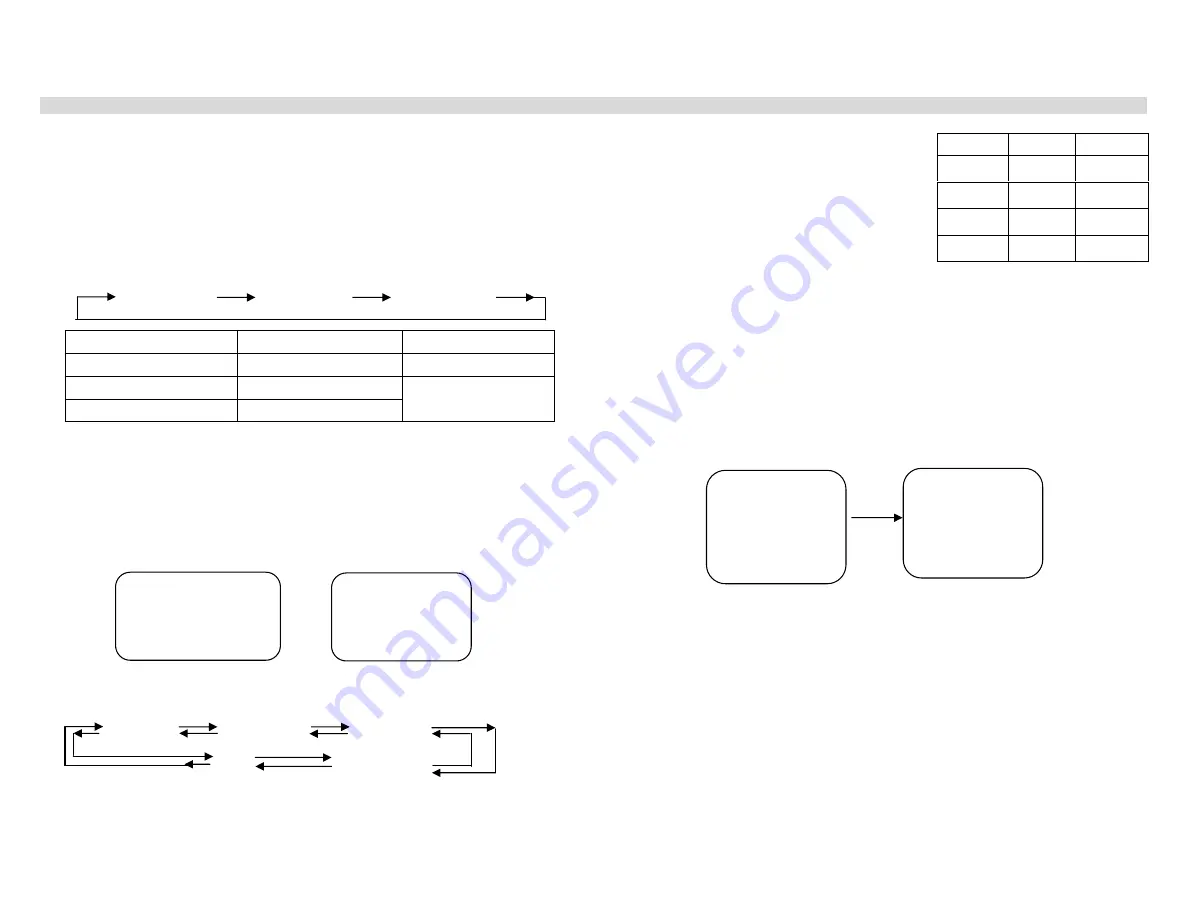
Press selecting key of input signal, and then choose inputs. 

Press the key, and display (audio) input is transferred as the following 

order 


VIDEO IN A          VIDEO IN B            S-VIDEO IN 


Showing in screen 

Video input 

Audio input 

A CH 

VIDEO IN A 

AUDIO IN A 

B CH 

VIDEO IN B 

S-VIDEO 

S-VIDEO IN 

AUDIO IN B 

Selected picture showing in screen of monitor. 


Setting display 

Setting display can be operated in menu as following 

Open the menu as follows 

1.


Press the menu key 

Screen  of  monitor  showing  as  follows.  If  you  don’t  operate  in  10 

seconds, the menu will be withdrawn automatically. 


2.


Press 

▲ 

or 

▼, 

shift cursor to “LANGUAGE”, and then select needed 

language. 
Selected language setting will be transferred as following order. 
         

ENGLISH            FRANCAIS            DEUTSCH


CHINESE


ESPANOL


3.


Press 

▲ 

or 

▼, 

shift cursor to color,   

brightness, contrast, and acutance, and   
press – or + to adjust the   
selected items. When adjusting some   
item, screen will show as follows 


4.


Repeat the procedures and adjust other items 

5.


Press menu key to reset   

6.


Press 

▲ 

or 

▼, 

shift  cursor  to  the  parameter  of  automatic  frequency 

control, and then press – or + to adjust or select “long” or “short”. 

“Long”: for the noise or vibrating signal from video recorder playback or 
TV show 
“Short”: for videocorder output other than above signal. 
Initial setting value is “short” 

7.


Press 

▲ 

or 

▼, 

shift


cursor to factory-setting, press – or +, and it can 

return to initial setting. 


8.


Press 

▲ 

or 

▼, 

shift


cursor to audio parameter, and then press volume key to adjust 

the volume of audio signal. 

“-”: turning down volume            “+”: turning up volume 
9.


Press 

▲ 

or 

▼, 

shift


cursor to “STANDBY ON” and then press “-” or “+” to choose 

needed mode. 

10.


Press 

▲ 

or 

▼, 

shift


cursor to “passage”, and then press “-” or “+” to open or close. 

You can choose whether the No. of input channel is shown or not on left upper of screen. 
11. Press menu key to pull out setting menu and return to previous screen showing. 
 

Volume control of audio signal 

In the normal state, press “-” or “+” to adjust volume of audio signal. 
When adjusting volume, showing on screen is as follows 
“-”: turning down volume          “+”: turning up volume


P1 

Brightness                            0 
Contrast                                0 
Acuity                                  0 
Color                                    0 
Auto frequency control      Short 
                            Factory-setting 

P2 

Audio                            0 
STANDBY ON      mode 1 
Passage display          Off 
LANGUAGE        Chinese 

Items 

Selecting    Parameter   

Brightness 

Dark 
right 

Brightness 

Contrast 

Weak 
strong   

Contrast 

Acuity 

Tend 
acuity   

Acuity 

Color 

Light 
strong   

Color 


P1 

Brightness

                0 

Contrast                    0 
Acuity                        0 
Color                          0 
Automatic 

frequency 

control                    short 

Factory-setting


P1 

Brightness

              -12 

Contrast                  +8 
Acuity                      -16 
Color                          -6 
Automatic 

frequency 

control                    Long 

Factory-setting


Summary of Contents for DLV6220-14-21

Page 1: ...1 DLV6220 NTSC PAL CRT Monitors Installation and Operations Manual Model Number DLV6220 14 21 Description NTSC PAL 14 and 21 CRT Color Monitors...

Page 2: ...tions have not being approved by authorities will make customers cannot operate the monitor 2 In order to according with radiation provision shielded signal line and AC power cord must be used 3 Manuf...

Page 3: ...le With built in loudspeaker maximum RMS power of 1W Two channel AV input output one channel S VHS input output Image freeze available Real time display the clock can maintain over 10 years after powe...

Page 4: ...large or too small Adjust picture with OSD control key It cannot be plugged immediately Whether computer is matched with plug or not Whether display card is matched with plug or not Whether 15 pin typ...

Page 5: ...ameter waiting for adjusting 3 Key Press this key and shift up cursor in order to select monitor parameter waiting for adjusting 4 Key After entering menu press the key and reduce selected parameter v...

Page 6: ...picture Adjusting the picture vertically Picture will be downward when pressing Key picture will be upward when pressing Key Adjusting in vertical amplitude press Key to reduce vertical amplitude of p...

Page 7: ...nning mode Computer standard VGA 640 480 Scanning frequency Field frequency 50Hz 60Hz 100Hz line frequency 31 250KHz Power AC 110V 250V 50Hz 60Hz Power consumption Max 134W 21 180W 29 Color temperatur...

Page 8: ...decreased In setting display or setting menu these keys is also for selecting parameters 6 POWER ON OFF The switch is power on off 7 AC IN Power input 8 VIDEO IN A B Connecting complex video signal wi...

Page 9: ...ll show as follows 3 Repeat the procedures and adjust other items 4 Continue pressing menu key to adjust A or B picture When adjusting some item screen will appear as follows 5 Press or to switch time...

Page 10: ...5C 2V RG 11 U 7C 2V Suggested length 250m 500m 600m connecting with video recorder Recording with video recorder Use coaxial cable to connect video output end A or B of monitor with video recorder If...

Page 11: ...dio signal can be increased or decreased In setting display or setting menu these keys are also for selecting parameters 9 LOUDSPEAKER 10 AC IN Put one of the ends of power cable providing by standard...

Page 12: ...d then press or to adjust or select long or short Long for the noise or vibrating signal from video recorder playback or TV show Short for videocorder output other than above signal Initial setting va...

Page 13: ...the same key again the picture will be frozen which will not be got rid of until the key or other keys are pressed Automatically dwell pressing ENTER AUTO to enter playback and automatic dwelling at...

Page 14: ...TOM LEFT 7 BOTTOM RIGHT DWELL TIME SEC Setting interval time of dwell 1 255 seconds FREEZE TIME SEC Setting time of getting rid of freezing 1 255 seconds Setting title title of every camera can be set...

Page 15: ...and functions of analog monitor Front view Back view Loudspeaker Power control switch Volume Contrast Brightness Color Acuity Video input Video output High resistance High resistance AC input Video i...

Page 16: ...PARABOLA East and west correction 3 11 CORNER Four angles correction 38 12 TRAPEZIUM Trapezium correction 32 13 S CORRECTION S correction 30 14 V LINEARITY Linearity of frame 13 15 ADJRESET Recover 0...

Page 17: ...ecover 16 53 to default OFF 43 1 CHIP TYPE Needn t debugging 1 44 SECAM BYSTEM Needn t debugging OFF 45 DISPLAY Language selecting CHI 46 AV MODE Setting of passage ways 1 47 EW V PULSE Needn t debugg...

Page 18: ...lat monitor 650 TV line SUPER VIDEO INPUT Y 1 0Vp p 75 C 0 3Vp p 75 small DIN plug VIDEO INPUT 1 0Vp p compound 75 BNC 2 VIDEO OUTPUT Looping output automatically terminal BNC 2 AUDIO INPUT 8dB Hi Z R...

Reviews: