background image

Email Messaging

February 12, 2002

T-Mobile Device Owner’s Manual

 87

4

Open the menu and click 

Add to Contacts...

 The Add to Address Book dialog box opens. 

5

If you have only one email recipient

, the dialog box shown in 

Adding Email Senders to the Address Book


on page 86 appears. Complete the information you want to include in the contact information, then click 

Add

.

6

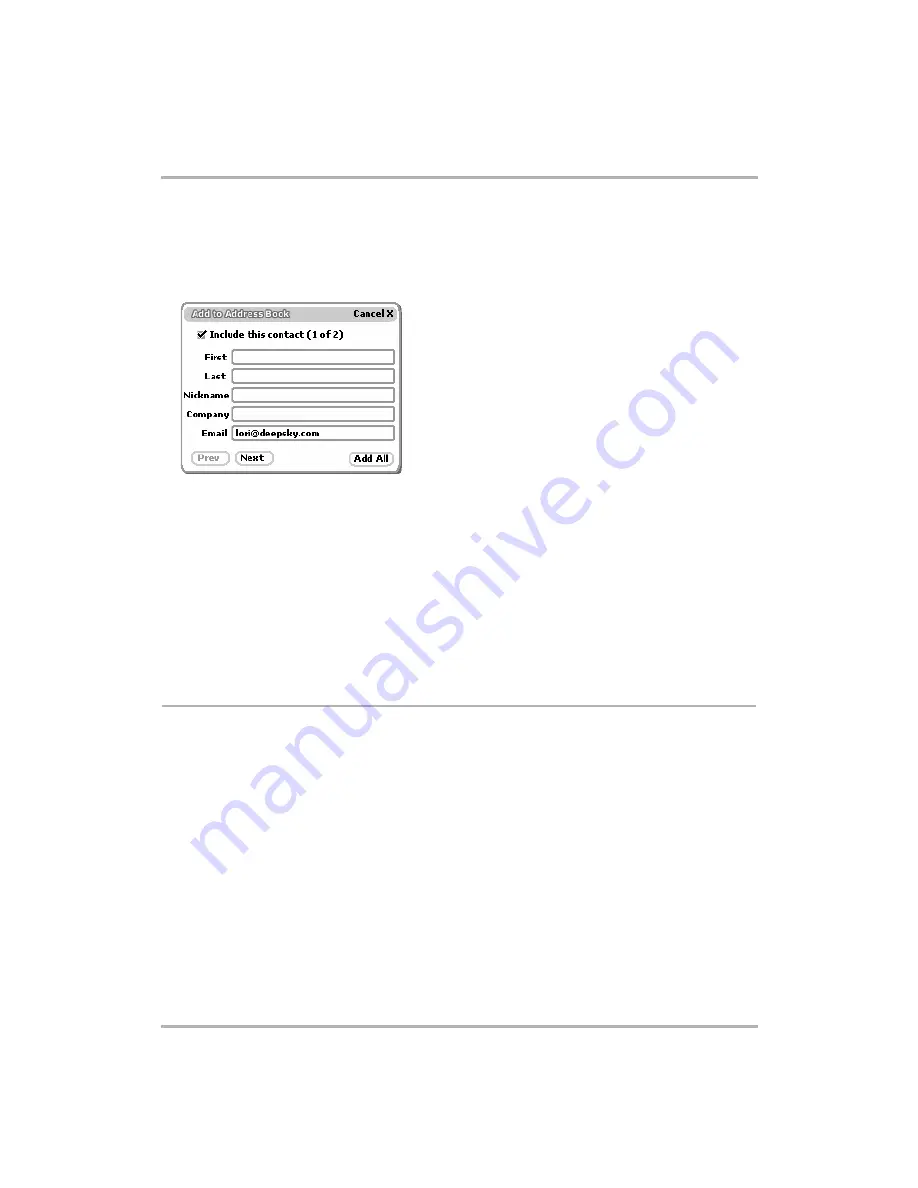
If you have more than one email recipient

, this dialog box appears:

• If you want the first email recipient ([email protected] in the example above) added to your Address 

Book, select the 

Include this contact

 check box (it is selected by default), complete the contact 

information you want to include, and click 

Next

. The next recipient’s blank contact information appears. 

• Continue through recipients until you reach the final recipient. If there are any recipients you do not want 

to include, clear the 

Include this contact

 check box.

• When you’ve progressed through the screens for all recipients, click 

Add All

 to add all the selected 

recipients to your Address Book.

7

If you want to provide more complete information for the added recipient(s), go to the Address Book 
application to edit the contact information. Read more in 

Edit a Contact

 on page 106.

Note!

 If you add an entry that is 

already

 listed as a contact in your Address Book, you will create a duplicate 

entry for that contact.

Discard Email Messages

To delete an email message

, do the following:

1

From the Browse Email screen, highlight the email you want to discard. Open the email if you wish by clicking 
the wheel.

2

From either the Email Read or Browse Email screen, open the menu and click 

Discard Message

.

3

The message is moved to the Trash folder.

4

To restore your discarded message, from the Browse Email screen expand the contents of the Trash folder. 
Use the wheel to highlight the email you want to restore then hold the wheel down. The Move Message to 
Folder pane appears. 

5

Highlight the folder to which you want to restore the email and click.

To empty all messages from the Trash

, from the Browse Email screen open the menu and click 

Empty Trash

The contents of your Trash folder are emptied (without asking you for confirmation).

Summary of Contents for T-Mobile

Page 1: ...ease 1 0 February 12 2002 Copyright Danger Inc 2000 2002 All rights reserved Confidential material of Danger Inc 124 University Avenue Palo Alto CA 94301 May not be duplicated or copied without the pr...

Page 2: ...with Part 15 of the FCC Rules Operation is subject to the following two conditions 1 this device may not cause harmful interference and 2 this device must accept any interference received including in...

Page 3: ...Device 13 Device Display 13 Notifications 15 Keyboard 16 Control Buttons 17 Wheel 19 Headset Camera Jack 19 Charging Outlet 20 USB Mini B Port 20 Typing Text 21 3 About Your Smart Card 22 What Is a S...

Page 4: ...2 View History 42 Refresh a Web Page 43 Stop a Web Page from Loading 43 7 Making Telephone Calls 44 Telephone Preview Screen 44 Telephone Preferences 45 Telephone Keyboard Shortcuts 47 Title Bar Indic...

Page 5: ...ortcuts 92 View Your Text Messages 93 Sort Text Messages 93 Send Text Messages 94 Call Back Sender of a Text Message 95 Discard Text Messages 96 Receive Ringtones 96 11 Keeping Contacts in the Address...

Page 6: ...bout Capture Modes 122 View Your Photo Gallery 123 Email Photos 124 Change the Name of a Photo 125 Sort Photos 125 Delete Photos 126 14 Keeping To Do Lists 127 To Do Preview Screen 127 Keyboard Shortc...

Page 7: ...eb 145 Browse Contacts 145 Address Book Preferences 145 Add a Contact 147 Edit a Contact 148 Discard Retrieve a Contact 148 Import Contacts 149 Open and Edit My Info 149 Communicate with a Contact 149...

Page 8: ...e 158 Discard a Task 158 Discard Completed Tasks 158 Manage Trash 159 22 Keeping Notes on the Web 160 See All Notes 160 Add a Note 160 Edit a Note 160 Discard a Note 160 Manage Your Trash 161 23 Setti...

Page 9: ...Headset USB B cable Wrist strap Carrying holster Quick Reference card Quick Start booklet If you find that anything is missing please contact T Mobile Customer Care by calling 1 800 937 8997 or by go...

Page 10: ...ust be two or more characters in length If your preferred username is already taken the T Mobile service will provide you with alternate suggestions You can either pick one of these or try another one...

Page 11: ...mately four hours Recharging time is the same depending on how discharged the battery has become Use and Standby Times With a fully charged battery you can use your device for one day In power saving...

Page 12: ...nd using the holster clip Remember The best way to protect the screen from scratches and other damage is to always carry the device in the holster Use Your Device Safely While using your device please...

Page 13: ...th a swivel display lid that covers the keyboard in the closed position Even when closed the LCD faces up and the control buttons are exposed so you can use your device When you open the display lid b...

Page 14: ...rse the motion to pivot the lid counter clockwise and lock it into the closed position Standard Display Screen Indicators The display screen is your view into the T Mobile Device applications so what...

Page 15: ...asher or vibration Read more about notifications in the following topics Quiet Mode and Notifications on page 29 Set Up Ringtones on page 46 Select Email Notifications on page 76 Current date and time...

Page 16: ...uickly turn on backlighting for 5 seconds by pressing to open the Controls pane Keyboard Your device keyboard contains five rows of keys including a key for the at symbol and a Directional pad D pad t...

Page 17: ...e key twice Unlock the ALT key by pressing it once again Note You can also lock the Shift key by pressing it twice Unlock by pressing once again Key When you type an email address you use the at symbo...

Page 18: ...n what screen you are viewing These types of menus are often referred to as context menus For example if you are viewing the main screen of the Email application the menu will list options such as New...

Page 19: ...ghlight and click buttons or links on the screen Use your thumb to rotate the wheel away from you up or toward you down moving through selections clickable items You can also click the wheel down More...

Page 20: ...in Powering Your Device on page 10 USB Mini B Port The USB Mini B port is located on the top of your device as shown in the illustration above Use the USB Mini B port with your USB cable to connect yo...

Page 21: ...ectional Pad to navigate within a text box Press the up down and left right arrows to move in those directions among characters in a text box Press the corners of the D pad two adjacent arrows at the...

Page 22: ...International Mobile Subscriber Identity IMSI Number Number that uniquely identifies you as a subscriber on the network The number is made up of three parts a three digit mobile country code a two di...

Page 23: ...ove the end cap covering the SIM slot 2 Press the SIM into its slot with the notch in the upper right corner and the gold contacts facing down away from you When you release the SIM make sure it is lo...

Page 24: ...e your device for your personal use Use the tables below to guide you through the screens For more details on each screen follow the links in the first column Application Wide Preferences Control Pane...

Page 25: ...ng pane Custom search engine in Go To pane selection list Select from Google Yahoo MSN AltaVista Excite Do not download images check box Clear History Clear Cache Clear Cookies buttons Instant Messagi...

Page 26: ...et mode by clicking this button Click again to unmute Contrast slider Adjust your screen image contrast to complement your current lighting environment Rotate the wheel to highlight the slider then cl...

Page 27: ...d to confirm that you really want to remove the rule Click either Cancel or Discard 5 To add a new replacement rule open the menu and click Add Rule The Replacement Rule dialog box opens Type the word...

Page 28: ...orrect month day year for date or hour minutes pm am for time 3 To select a value click the wheel The focus switches to the next selectable field 4 Proceed until all fields are set as you wish 5 Press...

Page 29: ...this setting determines how fast the key repeats Wheel acceleration Rotating the wheel up or down causes some pages to scroll up or down This setting allows you to specify how fast you want the wheel...

Page 30: ...e the wheel to highlight the check box then click the wheel to make the check mark disappear 4 To have quiet mode turn on automatically at a regular time select the AutoSilent every day from check box...

Page 31: ...screen from the main Control Panels screen click Security The Security screen opens Each setting is described in more detail in the topics that follow Turn On Off Privacy Lock If you want to secure yo...

Page 32: ...urity code when attempting to wake your device from sleep mode This is very handy if you lose your device and another person tries to use your device Fill in your Luggage Tag information by doing the...

Page 33: ...will appear on the screen while the device is asleep To set this message do the following 1 From the main Control Panels screen click Sleep Display The Sleep Display screen opens 2 Scroll to highligh...

Page 34: ...open is highlighted Then click to open the application The Jump screen is illustrated below with the Telephone application highlighted Each application has a preview screen that displays to the right...

Page 35: ...w Screen on page 59 The Email Preview Screen on page 71 Text Messages Preview Screen on page 89 How to Select a T Mobile Device Application 1 Press the Jump button to open the Jump screen 2 Rotate the...

Page 36: ...k Web Browser 2 Open the menu and click Preferences 3 The Preferences screen opens From this main Preferences screen you can Set Your Home Page Set Your Search Engine Specify to Not Download Images Cl...

Page 37: ...a check mark to the box Now images will not be downloaded 4 To start having images download again select the check box again so the check mark is removed from the box Clear History History contains a...

Page 38: ...r screen Use the wheel to scroll down the page or use the shortcuts described in Navigation View Shortcuts below Keyboard Shortcuts While you re in the Web Browser you can use the following shortcuts...

Page 39: ...pe the www or com portion of the Web address You can also open the Go To pane from the Web Browser menu 2 Possible matches based on what you ve typed in this Go To pane previously plus the Search pane...

Page 40: ...he Jump screen then 1 Start typing the word s you want to include in the search The Go To pane opens automatically showing the word s you are typing 2 The Search pane appears directly below the word s...

Page 41: ...added Edit and Discard Bookmarks You can change the address URL name or folder of an existing bookmark or discard a bookmark by doing the following while in the Web Browser 1 Open the Web Browser men...

Page 42: ...Back button and the Recent Pages pane opens Scroll to a page you wish to return to and click Notice that the page you are currently viewing is marked with a diamond and its listing is positioned rela...

Page 43: ...either of two ways Press the Menu button to open the Web Browser menu Scroll to highlight Refresh then click Use the keyboard shortcut by pressing R Stop a Web Page from Loading You can stop a Web pag...

Page 44: ...active calls if you have any the time elapsed in each active call and the phone number assuming the caller doesn t have Caller ID blocked You can also see the total talk time elapsed since you last r...

Page 45: ...l Call Timer and Reset If you are keeping track of your calling time and need to reset the time to zero click the Reset button Set Up Call Forwarding Voice Mail If you don t want to answer your phone...

Page 46: ...Out of Range you can select a forwarding number Again you can choose from Voice Mail Current Number if not Voice Mail or Other If you click Other then a dialog box opens in which you must type the ot...

Page 47: ...tions are selected If you want to change this setting click the Customize button on the Phone Preferences screen to open the Customize Ringtone dialog box Select or clear the check boxes as you wish t...

Page 48: ...this number Once you store a speed dial number you can easily dial that number by pressing and holding the shortcut number for at least two seconds Very convenient You can add edit or delete speed di...

Page 49: ...number or any other number that isn t already assigned 4 Type the Name and Number of the contact 5 Click Create Your speed dial number is saved Editing an Existing Speed Dial Number 1 Open the menu an...

Page 50: ...eadset camera jack see Parts of Your T Mobile Device on page 13 for an illustration of location Adjusting Volume While you re on an active call you can adjust the speaker volume by using either of the...

Page 51: ...by mistake use the Delete key or click to erase it Click Send to initiate the call Redialing a Number You can redial a number you just disconnected by clicking the button Note The Redial button is av...

Page 52: ...but in brief here s how to dial using the Call Log Open the menu and click Call Log L Use the wheel to highlight then click the number you want to call The call is initiated Dialing from the Look Up S...

Page 53: ...e portions of the phone number Method 2 Click the button to open the on screen keypad Use the wheel to highlight then click the numbers or symbols you need to enter Click the Back button to dismiss th...

Page 54: ...ng it s active click End Call To end the call on hold without resuming it click End Make a Conference Call You can make a three way conference call using your device To do this first you need to have...

Page 55: ...are already in a call when another call comes in the notification screen will include a button to Switch Calls If you click this button the first call will be put on hold Alternatively you can click...

Page 56: ...r Log at any time read more in Clear Your Call Log on page 58 Views of Your Call Log The Log is convenient because you can view your calls by category if you want Here s how you can set your Log view...

Page 57: ...from the Log 1 View your Call Log by opening the Dialing screen menu and clicking Call Log L The Call Log opens 2 Use the wheel to highlight the number you want to call then open the menu and click A...

Page 58: ...entries in all three Call Log categories incoming outgoing and missed do the following 1 Make sure you have one of the Call Log views on your screen 2 Open the menu and click Clear Call Log All calls...

Page 59: ...ng with the buddy screen name and the conversation number The screen also tells you how many of your buddies are online at the time and the screen name you re currently using Tip If you are out of net...

Page 60: ...at a time just repeat the steps to add others Here s the steps 1 Enter AOL Instant Messenger from the Jump screen If you re not already signed on click New Account from the Screen Name pop up then cli...

Page 61: ...l then click 4 Use the wheel to highlight the screen name you want to use to sign on then click 5 Type your password If you want the device to remember your password click the Save check box 6 Click t...

Page 62: ...names you wish to remove you can select more than one 3 Click Remove The names you ve removed will now not appear on the Screen name pop up menu Tip To put a removed screen name back on the Screen Nam...

Page 63: ...n page 67 No You will not even see the message from the non buddy sender Yes You will see the message from the sender Enable AIM Sound In order for Custom Buddy Alerts to work read more in Edit a Budd...

Page 64: ...marked with a folder icon with the buddies in collapsible lists To open expand a group s list use the wheel to highlight the group name then click The little arrow icon opens To collapse the list clic...

Page 65: ...nge your view when using AIM To open this menu option Use this shortcut Conversations V Add Buddy N Edit E Delete Sign Off Q To make this happen Do this Open a particular conversation number conversat...

Page 66: ...Buddy Name and in the Group pop up menu click the group in which you want to file the buddy 3 Click OK The buddy is added to your list Edit a Buddy Once you ve added a buddy you can change the name us...

Page 67: ...ar buddy you can easily do so 1 On the Buddy List screen use the wheel to highlight the name of the buddy you want to block 2 Open the menu and click Block 3 The buddy s name still appears on your Bud...

Page 68: ...essages Here s an example of a conversation in progress 5 To end a conversation open the menu and click End Conversation From any conversation screen menu you can also Return to the Conversations Mana...

Page 69: ...nu and click Conversations The Conversations Management screen opens 2 This screen lists all your open conversations If you have an unread message from any of your buddies you ll see the little balloo...

Page 70: ...I m Back button Note that whatever message you typed in the I m Away dialog box will also display in the Unavailable dialog box 5 If you click one of the other unavailable messages The Unavailable dia...

Page 71: ...e message received most recently on top This means if you click the wheel to open Email then open any of the unread messages and return to the preview screen you ll see that the message you ve read ha...

Page 72: ...box If you change your mind at some point click the check box to clear the check About POP3 Email Accounts You can receive email on your device from up to three POP3 email accounts that you already h...

Page 73: ...Stop collecting email from account check box to put a check mark in the box The account information is saved in case you want the application to start collecting email from that account later 4 By def...

Page 74: ...the Accounts screen Edit an Email Account To edit a POP3 email account do the following 1 From the Email Preferences screen select Additional Preferences Accounts The Accounts screen appears From this...

Page 75: ...erences screen Then select Additional Preferences Folders The Folders screen appears All user defined folders appear in the lower portion of the folder list Create an Email Folder To create a new fold...

Page 76: ...system folders To discard any other folder do the following 1 From the Email Preferences screen select Additional Preferences Folders The Folders screen appears 2 Highlight the folder you want to dis...

Page 77: ...ng the Customize button The Customize Ringtone dialog box appears 4 Select the Play Sound Flash Light or Vibrate check boxes as you wish to further customize your notification method The options not a...

Page 78: ...ght the folder name then click To collapse the list click again Click again to expand etc To open an individual email highlight the email then click the wheel To learn more about reading your email re...

Page 79: ...nu Shortcuts Each menu s shortcuts are listed in the tables below Browse Email Menu Shortcuts Icons identifying the Sent folder with contents collapsed expanded Icons identifying the Drafts folder wit...

Page 80: ...ces Menu Shortcuts Check for New Email U Sort T Read Email menu options Shortcut Mark Unread K Next L Previous J Compose menu options Shortcut Send Now M Save as Draft S Add CC C Add BCC B Attach Snap...

Page 81: ...der in which you ve stored the email is shown in expanded view Click the folder name to expand collapse the emails contained in the folder 2 Use the wheel to highlight the email then click Your email...

Page 82: ...ail screen open the email message whose status you want to change to read 2 Open the Email Read menu and click Mark Unread K The message appears again on the preview screen and on the Browse Email scr...

Page 83: ...open it and continue Read more in Save an Email Message as a Draft on page 85 Trash Every message you discard from other folders is moved to the Trash folder Discarded emails accumulate in the Trash...

Page 84: ...Sent folders and the folder the email currently is in are shown in the list Highlight the folder into which you want to move the message then click Send Messages Compose a New Message To write a new e...

Page 85: ...ply open the menu and click the message you want to view Note about attachments You cannot attach files to emails you compose on your device except for photos but you can forward emails with attachmen...

Page 86: ...rowse Email screen highlight the email whose sender you want to add as a contact Open the email if you wish by clicking the wheel 2 From either the Email Read or Browse Email screen open the menu and...

Page 87: ...the selected recipients to your Address Book 7 If you want to provide more complete information for the added recipient s go to the Address Book application to edit the contact information Read more...

Page 88: ...Owner s Manual 88 Space Limitations You can store up to 5 MB of email messages using the Email application Once you near your storage space limit you will receive a warning and recommendation that you...

Page 89: ...ion open any of the unread messages then return to the preview screen you ll see that the message you ve opened has disappeared from the preview screen list Note Text Messages messages are SMS message...

Page 90: ...a Text Message Notification Method You can select the way your device lets you know or notifies you when a new Text Messages message has arrived To select a notification method do the following 1 Fro...

Page 91: ...dicating it is unread The Sent folder contents are expanded showing one read message The Trash folder is empty and collapsed empty folders are always shown collapsed of course As shown in the illustra...

Page 92: ...messages in the Sent folder This message is waiting to be sent You will only see this status indicator next to messages in the Sent folder This message is being sent You will only see this status indi...

Page 93: ...t message the message is displayed in the Sent folder expanded view with its status just to the left Possible status indicators include message is being sent message is waiting to be sent and message...

Page 94: ...type a new one Message body Type your message body you can only type 160 characters At the bottom of the screen you ll see a counter that keeps track of how many characters you ve typed Some special...

Page 95: ...individual you would like to include as a contact in your Address Book do the following 1 From the Browse Text Messages screen highlight the message whose sender you want to add as a contact Open the...

Page 96: ...ges from the Trash from the Browse Text Messages screen open the menu and click Empty Trash The contents of your Trash folder are emptied without asking you for confirmation Receive Ringtones Many Web...

Page 97: ...esses Address Book Preferences To open the Address Book Preferences screen do the following 1 Press to open the Jump screen then click Address Book 2 Press to open the menu then click Preferences The...

Page 98: ...ht the category you wish to edit then click The Edit Category dialog box appears 3 Edit the name as you wish then click Done to save the change To cancel your edit click Cancel To create a new categor...

Page 99: ...hen click Discard Category 4 A confirmation dialog appears asking if you want to discard the category Click Discard if you want to otherwise click Cancel Create Edit and Delete Labels All pieces of in...

Page 100: ...t an individual contact for example you could create a label named Social to describe the email addresses your friends use for social type email Each friend could also have an email address labeled Wo...

Page 101: ...s screen is your main view into your Address Book On this screen individual contacts are listed along with the first phone number that appears in the Phone section of their contact information You can...

Page 102: ...acts Menu Shortcuts Contact Info Menu Shortcuts New Contact Menu Shortcuts Trash Menu Shortcuts Browse Contacts Menu Shortcuts Contact Info Menu Shortcuts New Contact Menu Shortcuts Trash Menu Shortcu...

Page 103: ...e contacts in the category you selected Sort Contacts On the Browse Contacts screen individual contacts can be sorted by First Name Last Name In addition you can specify the sort order A to Z ascendin...

Page 104: ...he Browse Contacts screen press to open the menu then click New Contact N The New Contact Identity screen opens 2 The Identity screen holds basic contact information Complete at least one of the field...

Page 105: ...rst or Last name Phone Number Email address Company name 5 To save all the pieces of information you ve added to the contact screen press to open the menu and click Save Tip If you cannot select Save...

Page 106: ...trieve Contact R The contact information is moved back to your Address Book in the category to which it was previously assigned Contact a Contact Using stored contact information you can quickly commu...

Page 107: ...Click the wheel to open the contact information Create Your Own Contact Information My Info When you first received your device and went through the on screen registration process your name and phone...

Page 108: ...octor s appointment a birthday or anniversary a tennis game with a friend a dinner date anything you want to schedule If you want your device can remind of an event by sending you an email or by vibra...

Page 109: ...either Add an Event from Scratch on page 110 or Copy an Existing Event on page 112 The two methods are described below in detail Be patient You have many options when setting up events so these instru...

Page 110: ...s highlighted then click Rotate the wheel until the day you want is highlighted then click again Now pick the year by rotating the wheel until the year you want is highlighted then click You can also...

Page 111: ...n then click The Repetition dialog box opens Select a repeat interval from these choices Every Day Every Sunday 1st Day of Every Month 1st Sunday of Every Month Yearly on May 1st Other 6 Depending on...

Page 112: ...Week view highlight the event you want to duplicate then click to open its Events Details screen 2 Open the menu and click Duplicate Event The screen appears to remain unchanged however you are really...

Page 113: ...hange the series from here on Select the appropriate action and click Save Discard an Event To remove an event completely highlight it then open the menu and click Discard Event The event is moved to...

Page 114: ...l Week View A table showing the current week The days of the week starting with Sunday are shown as column headings and one hour time slots are shown down the left side of the screen Events are grey b...

Page 115: ...iew A grid of the year grouped by month with the current month and day selected Navigate between months by rotating the wheel or by pressing the D pad up down arrows Use the menu to Go to Today Next Y...

Page 116: ...r the current day listed down the screen starting with the earliest event at the top To open the Day view from the Jump screen click Calendar then open the menu and click Views Day 1 Day View Features...

Page 117: ...eek View Features The current day s time slot lines are bold like May 1 in the example above An event you ve highlighted is shown with a black background Events in the past expired events are shown in...

Page 118: ...have at least one event scheduled for a given day that day contains a little square icon in the lower right corner of the day block To drill down to an Event Details screen highlight the day then clic...

Page 119: ...Now you can rotate the wheel to highlight a specific day Once you ve highlighted the day you want click The Day view opens to your selected date From there you can view events Year View Navigation Ti...

Page 120: ...Owner s Manual 120 2 Open the menu and click Empty Trash A message appears on the screen stating The Trash is empty Go To a Specific Day Regardless of where you are in a particular view you can alway...

Page 121: ...cuts You can use the following keyboard shortcuts for performing actions from the Snapshots menu Insert the Camera Your device comes with a Treva camera in the box Here s how to attach the camera to y...

Page 122: ...by the Review mode icon If you d rather capture in Continuous mode then open the Capture menu and click Continuous Note that the currently selected mode is marked with a bullet 4 Position the camera s...

Page 123: ...Use the wheel to scroll through your photo gallery Below the thumbnails you ll see a handy gallery navigation bar You can always see where you are in your sequence of photos since the highlighted ima...

Page 124: ...then click and hold the wheel down while rotating through the gallery After you ve selected the last image you want in the series release the wheel 5 To select all the photos in your gallery highligh...

Page 125: ...e wheel to highlight the image you want to rename 2 Click the wheel to select it 3 From the menu click Rename The Rename Photo dialog box opens 4 The text cursor is located at the end of the current n...

Page 126: ...he dialog box with no changes Delete Photos You can always delete photos you ve stored in your gallery from either the Thumbnail or Full Screen view 1 Use the wheel to select the image you want to del...

Page 127: ...e following The preview screen lists seven of your tasks If you have more tasks a note at the bottom of the screen tells you how many more You can store a total of 50 tasks including the tasks that yo...

Page 128: ...from the Jump screen you ll see a list of all your tasks something like the following Each upcoming task is shown in bold face Overdue tasks are shown in italic font and include the overdue indicator...

Page 129: ...wse Tasks screen The details screens are also editable so when opened you can change the details To open a task s details on the Browse Tasks screen use the wheel to highlight a task then click The de...

Page 130: ...7 To save your new task click the Back button or open the menu and click Save Your new task appears in your Browse Tasks screen Edit a Task You can edit any of your tasks by opening the task s detail...

Page 131: ...n Edit a Task on page 130 Show Tasks Filter You can decide if you want the Browse Tasks screen to show just overdue and upcoming tasks all tasks in date order To set this view preference 1 Open the Br...

Page 132: ...can retrieve until you empty the Trash Empty the To Do Trash To permanently remove all the tasks you ve discarded 1 From the Browse Tasks screen open the menu and click Trash T The Browse Trashed Task...

Page 133: ...Notes highlighted you ll see a screen similar to the following The preview screen lists the first four of your notes as they appear in alphabetical order The total number of notes you have is also sho...

Page 134: ...default the notes are displayed folded This means that only the first line of the note is shown Note The ellipsis indicates there s more to the note than what is shown in the folded view Unfolding is...

Page 135: ...re fold all your notes open the menu and click Fold All All the notes contents collapse The note that was highlighted when you folded all the notes remains highlighted Add a Note Here s some note fact...

Page 136: ...unfolded 2 Open the menu and click Discard Note 3 The note moves to the Trash where you can later retrieve it or delete it for good Manage Your Notes Trash All your notes are displayed either in the...

Page 137: ...that you can store 20 notes including the notes you ve sent to the Trash If you re running out of available notes empty your Trash 1 From the Browse All Notes screen open the menu and click Trash N T...

Page 138: ...amiliar T Mobile Device applications available from the button bar The T Mobile Device applications not available on the Web are Telephone Instant Messaging and Web Browser All the other applications...

Page 139: ...he entire manual or just a portion click the printer icon in the Adobe menu bar In the printer dialog box that opens specify whether you want to print the entire manual or just a range of pages If you...

Page 140: ...al email for reading 1 From your Inbox or another folder click any of the fields displayed for the email You can also open an email directly from the Top Page by clicking the email s From Subject or D...

Page 141: ...os Select the check box es for the photo s you want to attach then click Email selected You are returned to the Compose Message page with the selected photos now attached Message body Type your messag...

Page 142: ...o complete the discard click Discard the Folder You are returned to the Folders page the discarded folder no longer appears If you decide to keep the folder and the messages click Don t Discard Edit A...

Page 143: ...scard Your account information appears in an editable form 3 Click Discard at the bottom of the page Set Up To control automatic saving of sent emails 1 Click Set Up in the Email sidebar This opens th...

Page 144: ...u want to retrieve then either Click Retrieve Selected this will move the message back to your Inbox Highlight a folder from the Move selected to box then click the Go button This will move the messag...

Page 145: ...Z or descending Z to A order by last name Simply click the red arrow at the top of the Last name column This arrow acts as a toggle switch if it is pointing up it means the list is sorted in ascending...

Page 146: ...n editable text boxes edit the category you want to change then click Save Changes at the bottom of the page To cancel your edit click Undo Changes To delete a category 1 In the Address Book sidebar c...

Page 147: ...he Quickview information form displayed Note that you cannot select any of the other information links at the top of the New Contact page until the Quickview form has been completed and saved to add t...

Page 148: ...etrieve a Contact To remove an existing contact from your Address Book 1 From the Browse Contacts page click the contact s name The contact s information displays 2 Click Discard at the bottom of the...

Page 149: ...ted 3 Click Save when you ve completed your edits Communicate with a Contact Using stored contact information you can quickly communicate with a contact by Email 1 From the Browse Contacts page click...

Page 150: ...button at the top of the page to a specific day in the current or next month by selecting the day in the month calendars displayed in the sidebar to the Day view for a specific day in the week curren...

Page 151: ...ebar to the current day by either clicking the day in the month calendar in the sidebar the current day is highlighted or by clicking the Go button opposite the month day year box at the bottom of the...

Page 152: ...S select one or more days of the week Every n month s on the day of month where day of month equals the specific day in the month when the event first occurs e g Every 2 months on the 21st Every n mo...

Page 153: ...your Trash click Trash in the Calendar sidebar All discarded events are displayed on the right side of the page 2 To remove the events from your system completely click the Empty Trash button at the...

Page 154: ...obile Device Owner s Manual 154 6 Day view start time set the time at which the day view will start unless there are earlier events scheduled 7 Day view end time set the time at which the day view wil...

Page 155: ...rder or the most recently saved order the next time you open Snapshots Rename Your Photos When you take a photo it is saved as a color jpg with a default name Since the default names are non intelligi...

Page 156: ...ns the Compose Email page with the selected photos already attached 3 Write your email then send it From the Email Compose page 1 Click the Pick photos to send button this opens the photos thumbnail p...

Page 157: ...Page shows all your tasks that are both upcoming and not completed To view your tasks click the To Do button at the top of your Top Page or click the To Do icon in the To Do section of the Top Page F...

Page 158: ...nges click Cancel Mark a Task as Complete To change the status of a task to complete 1 On the See Incomplete Tasks or See All Tasks page select the check box to the left of the task you want to mark a...

Page 159: ...your Trash click Trash in the sidebar on the To Do page All discarded tasks are displayed on the right side of the page in descending order of due date 2 To remove the tasks from your system completel...

Page 160: ...e your note It can be up to 1 000 characters long including returns and spaces this is about as many words as fit in half a page of text in a paperback Any email addresses in the note will be links to...

Page 161: ...lete it completely remove it from the system or retrieve it move it back into your list of notes 1 To open your Trash click Trash in the Notes sidebar All discarded notes are displayed on the right si...

Page 162: ...Your Device ID To find out your device s Device ID open this page You may need this number if you need to contact Customer Care Time Zone To view your current Time Zone settings click Time Zone in th...

Page 163: ...ook application adding a category 98 adding a label 100 default categories 98 default labels 99 discarding a category 99 discarding a label 100 editing a category 98 editing a label 99 editing existin...

Page 164: ...s 124 status indicator 78 supported 81 AutoText creating rules 27 discarding rules 27 availability icons 64 away messages 69 B Back button using 19 backlighting turning on off 16 balloon indicators 68...

Page 165: ...ice 121 capitalize new sentences AutoText feature 27 capture modes about 122 carrying your device 12 categories Address Book creating 98 creating on the Web 146 discarding 99 discarding on the Web 146...

Page 166: ...settings 27 date picker using 110 Day Calendar view details 116 summary 114 daylight savings time set on device 27 default Address Book categories 98 Address Book labels 99 deleting AIM buddy 67 email...

Page 167: ...Web 160 POP3 accounts 74 To Do task details 130 ellipsis meaning in a folded note 134 Email application adding email recipients to contacts 86 adding email sender to contacts 86 deleting an in progres...

Page 168: ...discarding 113 discarding on the Web 153 editing 113 editing on the Web 152 moving from one time to another 112 retrieving a discarded event on the Web 153 setting an event reminder on the Web 152 vi...

Page 169: ...22 Inbox on the Web 140 Inbox folder about 82 icon 78 included accessories in box with device 9 incoming call icon 57 indicators AIM conversations 68 battery charge 15 current date time 15 network con...

Page 170: ...n Address Book 100 discarding Address Book labels 100 discarding Address Book labels on Web 147 editing Address Book 99 editing Address Book label on Web 147 labels Address Book about 99 creating on t...

Page 171: ...gory Address Book menu option 98 New Contact screen menu shortcuts 102 New Folder Email menu option 75 New Message Browse Text Messages menu item 94 New Message Email menu item 84 New Note keyboard sh...

Page 172: ...uts 81 POP3 email accounts adding to Email Web application 142 Port field Accounts screen 73 ports USB Mini B 20 power adapter attaching to device 11 connection indicator 15 powering the device on off...

Page 173: ...from Web site 96 setting for email 76 setting up 46 S safety while using device 12 Save Folder field Accounts screen 74 saving an email as draft 85 saving outgoing email messages 72 saving outgoing te...

Page 174: ...onalize with message 33 sleep mode about 11 Smart Card about 22 Snapshots application attaching to email 124 capturing a photo 122 changing an image name 125 deleting an image 126 flipping an image 12...

Page 175: ...ewing all on the Web 157 viewing details 129 views in To Do application 131 Task Details screen To Do application about 129 adding a note 130 editing 130 tasks incomplete viewing on the Web 157 Teleph...

Page 176: ...1 using the date picker 130 To Do Web application accessing 157 adding a new task 157 all tasks viewing 157 description of To Do items 157 discarding a task 158 discarding completed tasks 158 editing...

Page 177: ...g summary 114 Week details 117 Week summary 114 Year details 119 Year summary 115 views in Calendar application about 113 views in Calendar Web application about 150 Day view 150 Month view 151 Week v...

Reviews: