powersolutions.danfoss.com
Service Manual and Repair Instructions
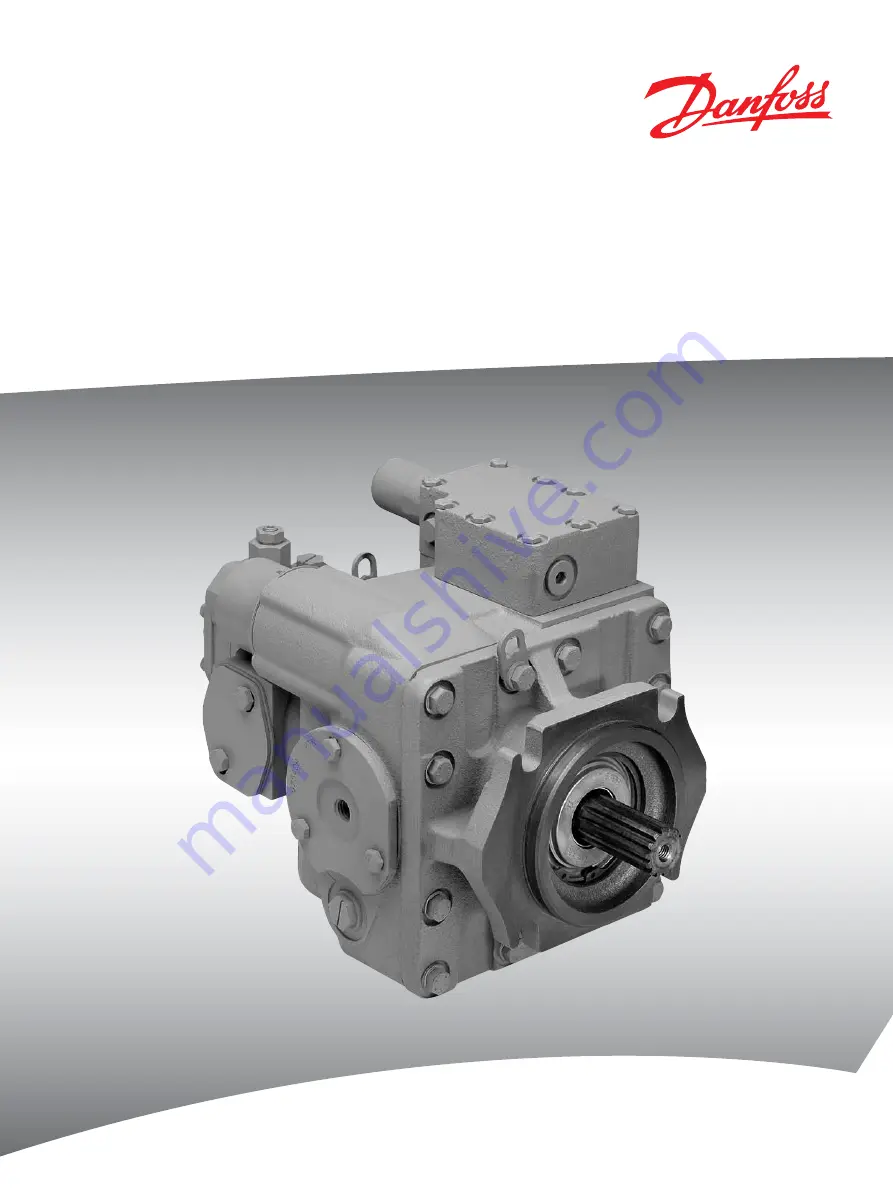
Axial Piston Pumps
Series 20
Hydrostatic Pump Repair
www.hydrostaticpumprepair.net
Phone: 800-361-0028
Email: [email protected]
Page 1: ...ersolutions danfoss com Service Manual and Repair Instructions Axial Piston Pumps Series 20 Hydrostatic Pump Repair www hydrostaticpumprepair net Phone 800 361 0028 Email sales hydrostatic transmission com ...
Page 2: ... repairs but also when putting the unit into operation changing the oil changing filters or any other procedures The following manual will provide you with comprehensive instructions for preventative maintenance and recognition of causes of failure of the axial piston units Danfoss axial piston variable displacement pumps are of swash plate design with variable flow capability suitable for hydrost...
Page 3: ... 11 Transmission Operates in one Direction Only 12 System response is sluggish 12 Neutral Difficult or Impossible to Find 13 System will not Operate in either Direction 13 Inspection Instructions 14 Checking the servo valve control valve 15 Sectional View 16 Axial piston variable displacement pump 16 Exploded View 17 Minor repairs 18 Mounting block 18 Changing the shaft seal disassembly 19 Changin...
Page 4: ...bile automation for frame size 033 119 End cap execution PS With installed charge pump AA 10 Cover plate without gear pump Filling gear pump 2 digits according to size see the table Frame size Optional PS Frame size Optional PS 033 12 18 119 19 33 052 12 18 166 33 66 070 18 12 227 33 66 089 18 12 334 66 3 Designation for setting of charge pressure 13 bar other setting of charge pressure on request...
Page 5: ...or repairs should not be carried out during the warranty period 1 Right angle screw driver 16 mm 1 Set of drifts 2 to 10 mm 1 Plastic hammer large 1 Bearing puller 80 x 120 mm 1 Bearing puller 200 x 250 mm 1 Each fixed spanner for servo cylinder 36 41 46 50 55 60 65 mm 1 Depth gauge 300 mm 1 Set of fixed or open ended spanners 7 16 to 11 4 1 Fitting block see page 14 At last 2 pressure gauges up t...
Page 6: ...allation and Information Recommended Tools and Installation Gauge Information A Charge Pressure 60 bar 870 psi Gauge 7 16 20 UNF O ring Fitting B System pressure 600 bar 8700 psi Gauge 7 16 20 UNF O ring Fitting C Inlet Vacuum Vacuum gauge Tree Into Inlet Line D Case pressure 8 bar 116 psi Gauge Adapt to Bottom Drain Port ...
Page 7: ...ressure of less than 0 5 bar 7 3 psi absolute 0 5 bar 7 3 psi is not permissible The filter requires changing or the operating temperature is too low Venting the pump and motor housing as well as the connection lines and other components The return flow to the oil reservoir must be free of bubbles After venting the system check the fluid level and fill to proper level if necessary Carry out a leak...
Page 8: ...the recommended oil through the drain port 4 Fill the oil reservoir with fluid As soon as oil emerges from the end of the discon nected charge pump inlet line tighten the pipe connector see table to page 35 for the correct tightening torque and continue to fill the reservoir Only use oil reservoirs that are fitted with air filters 5 Disconnect the control linkage from the control handle The pump m...
Page 9: ... Technical Information is achieved 13 Allow the prime mover to turn at 1500 min 1 rpm The charge pressure should now be 15 bar 217 6 psi 14 Slowly move the control handle backwards and forwards If the pump is working properly the charge pressure drops by about 2 bar 29 psi from the value stated in step 13 above as the control handle initiated 15 Allow the system to work under full load with a pump...
Page 10: ...ER BYPASS VALVE RESERVOIR VACUUM GAUGE HEAT EXCHANGER OUTPUT SHAFT MOTOR SWASHPLATE FIXED DISPLACEMENT MOTOR LOOP FLUSHING VALVE PURGE RELIEF VALVE CHARGE PRESSURE RELIEF VALVE SERVO PRESSURE RELIEF VALVES SERVO CONTROL CYLINDER SERVO CONTROL CYLINDER PUMP SWASHPLATE REVERSIBLE VARIABLE DISPLACEMENT PUMP CONTROL HANDLE INPUT SHAFT WORKING LOOP LOW PRESSURE SUCTION LINE CASE DRAIN FLUID CONTROL FLU...
Page 11: ...or by an appropriate institution Important Use only recommended oils See Fluid Manufacturers Technical Information It is not permissible to mix oils Carry out a leak test on the transmission inlet line filter pipe and hose lines and connec tions valves control elements pump and motor giving due consideration to the service life of the transmission environmental protection and reduction of oil cons...
Page 12: ...pair Instruction Check charge pressure see page 14 Inspect control valve see page 15 Inspect motor by pass valve if used Replace control valve see page 23 OK Defective OK OK Repair or replace Defective Replace transmission pump motor OK Inspect charge pressure relief valve see page 14 Repair or replace see page21 22 Inspect purge relief valve at motor see Series 20 Axial Piston Motors Service Manu...
Page 13: ...ct inlet filter Repair or replace see page 21 22 Defective Replace Defective Inspect charge pressure relief valve see page 14 Repair or replace see page 21 22 Clogged Inspect purge relief valve at motor see Series 20 Axial Piston Motors Service Manual and Repair Instruction Repair or replace the valve block see Series 20 Axial Piston Motors Service Manual and Repair Instruction Defective Replace t...
Page 14: ...bly of the charge pump is not permitted 2 Check the spring pressure and for correct operations Check if conta mination may be prohibiting free movement of the ball Inspection Instructions F000 077 F000 078 F000 079 F000 080 Hex plug Spring 3 Shims Valve cone 5 6 10 5 6 Troubleshooting 1 Clean the charge pressure gauge connection on the pump 2 Pressure gauge see recommended measuring instruments to...
Page 15: ...ostatic transmission If operation is not satisfactory with external control linkage disconnec ted from control handle the control may be misadjusted 3 Holding the control in place and swing it away from housing and remove Inspect visible linkages tor sion spring and O rings Inspect for missing plugged or incorrect orifice Checking the servo valve control valve Trouble Shooting 2 Remove the cap scr...
Page 16: ...ns L1003506 Rev BA Jun 2014 16 Disassembly and Assembly Sectional View Input shaft Swash plate Control handle Servo valve control valve Charge pump Charge check valve Servo cylinder Cylinder block assembly Shaft seal P005 121E Axial piston variable displacement pump ...
Page 17: ...Pin 81 Orifice 13 Bearing 47 Locking washer 82 Kit control valve 14 Cylindrical pin 48 Connecting link 85 Spacer control servo 15 Valve plate 49 Shaft 86 Handle control handle 16 Bearing plate 50 Bearing 87 Lock washer tooth 17 Bearing plate pilot ring 51 Gasket 88 Nut hex 18 Ring retaining 52 Cylindrical pin 89 Washer 19 Retainer spring 53 Cover 90 Hexagonal screw 20 Spring guide 54 Washer 102 He...
Page 18: ...pair indicated may be serviced following the procedures in this manual without invalidating the warranty Preparation for assembly When using a lifting device the hooks at the end of the slings are to be fastened in the rings fitted at the front and rear of the motor body It is recommended that an mounting block should be used in order to facilitate a profes sional operation Mounting block Disassem...
Page 19: ...mall O ring with petroleum jelly and insert into the I D of the bronze rotating ring Lubricate the large O ring and place the O D of the seal stationary It is recommended that all shaft seal parts be replaced If parts are to be reused they must be protected from being damaged by the shaft during removal Remove the large retaining ring located on the shaft end of the pump Remove the side opposite t...
Page 20: ... Work the ring into place using hand force only C CAUTION Protect parts from damage by the shaft Compress the seal stationary to expose the retaining ring groove Install the retaining ring with the beveled side out putting the side opposite the tangs into the groove first Be certain that the retaining ring has snapped into the groove completely F000 089 F000 213 F000 091 F000 090 71 Bronze ring Se...
Page 21: ...gn the new gasket so that the small relief valve port is open Be certain the port in the charge pump and the end cap are aligned Rotate the charge pump shaft so its tang aligns approximately with the slot in the end of the main pump drive shaft Hold the idler spacer in place and install the charge pump onto the end cap Rotate the pump slightly until the tang and slot on the shafts engage and the p...
Page 22: ...e in place in plug Torque to 22 24 Nm 195 212 lbf in The removal of the charge check valves requires the use of a draglink socket These check valves are cartridges which are threaded into the end cap The charge check valves are interchange able with each other It is suggested that they be replaced in pairs Use caution when installing these valves to prevent damage to the O ring on the cartridge as...
Page 23: ...on control linkage out of the link attached to the swash plate and remove control The area is sealed with both a gasket and three 3 O rings 89 90 82 F000 064 F000 083 F000 046 89 90 82 86 In preparation for installing the control place a new gasket on the housing Insert the orifice plate and three 3 O rings into the control ports Engage the pin on the control linkage in the mating hole in the link...
Page 24: ...CAUTION Major repairs may affect the unit warranty therefore equipment manufacturer should be consulted prior to undertaking such repairs 3 The end cap can now be removed from the pump body In order to avoid the valve plate being damaged by dropping down when the end cover is removed it must be held firmly as the cover is removed as shown in the illustration Should the valve plate stick to the bea...
Page 25: ...ie beneath the positioning pin of the cylinder block In this way the bearing plate will be retained Now lubricate the bearing plate with clean oil The pump valve plate has two tapered slots running in opposite directions The valve plate illustrated on the left is for left handed counter clockwise operation and the valve plate illustrated on the right is for right handed operation clockwise When re...
Page 26: ...e holes in the end cap The remaining screws can then be inserted and tightened up Install the remaining shaft seal and charge pump as outlined in the minor repair procedure Mount the end cap and the valve plate ensuring that the valve plate is held in such a way that it cannot be dropped during assembly The end cap must be turned so that the two dowel pins of the pump housing are positioned over t...
Page 27: ... charge pump page 21 and 22 and the end cap page 24 and 25 The bearing can then be removed from the shaft with a bearing puller A spacer is required to protect the slot in the end of the pump shaft from the puller screw When doing this great care must be exercised to ensure that the bearing casing is not damaged The cylin der block surfaces must be protected Place the pump horizontally in repara t...
Page 28: ...lled next It is necessary to check alignment of the ball guide and cylinder block splines The undersized tooth in the spline of the cylinder block must line up with the missing tooth in the ball guide spline These in turn line up with a missing tooth on the shaft spline Lubricate the thrust plate slippers pis tons and bores with clean oil Slide the cylinder block assembly onto the shaft and agains...
Page 29: ... then be removed Loosen the screws on the retaining plate of the servo cylinder and remove the plate F000 246 Changing the swash plate and servo piston disassembly 102 51 50 49 53 54 55 Cone bearing Next mark the depth to which the servo cylinder has been screwed in so that reassembly of the swash plate can be correctly effected Mark servo sleeve and housing bore to show the relative position Unsc...
Page 30: ...n Than remove the trunnion Once the trunnions have been removed the swash plate can be removed complete with servo piston F000 114 Take care that the plastic shims are kept together with the respective trunnions Individual parts of the servo piston can if necessary be replaced F000 245 F000 116 135 F000 113 35 36 37 38 135 46 47 48 62 67 67 65 67 69 70 66 68 Cone bearing Disassembly and Assembly ...
Page 31: ...cessary lay the swash plate complete with servo piston in the pump housing and bring the swash plate connecting link into the correct position Then fit the trunnions with new O rings 69 Take care that the plastic shims are replaced in the same position as prior to dismantling Mount the servo cylinder with new O rings lubricate O rings with petro leum jelly before assembly and turn the servo cylind...
Page 32: ...rust plate from the first These measurements must not vary more than 0 03 from each other If adjustment required follow these steps a Back out both servo housings until the spring load is released on the swash plate check by rocking swash plate b Thread in each housing until spring load just starts to be felt on the swash plate c Check measurement as described previously d Thread each housing fart...
Page 33: ...aced under the bearing race in the end cap Disassemble these parts and resume reassembly procedure The tapered bearing can be pressed off the shaft if required Be careful not to damage the seal diameter of the shaft while removing the bearing Remove the thrust plate and set the pump on the servo housings Insert the shaft and bearing assembly through the cast hole in the swash plate allowing the be...
Page 34: ...ng pins are in place in the housing These parts will go on only one way and have all the mounting holes align with the housing Resume reassembly procedure F000 123 F000 069 50 Cone bearing 49 Torque 53 54 55 102 spanner Next loosen the front cover screws and remove the front cover together with the gasket The shaft with bearing can then be removed Should the bearings be damaged the bearing cup in ...
Page 35: ...6 120 14 9 132 13 6 120 14 9 132 Servo piston 18 6 165 18 6 165 18 6 165 18 6 165 Frame size 119 166 227 334 End cap 90 9 805 111 2 984 181 7 1608 223 7 1980 325 4 2880 393 2 3480 325 4 2880 393 2 3480 Charge pump 36 6 324 50 2 444 36 6 324 50 2 444 36 6 324 50 2 444 36 6 324 50 2 444 Charge pump suction port 20 6 182 31 4 278 20 6 182 31 4 278 20 6 182 31 4 278 20 6 182 31 4 278 Servo valve contr...
Page 36: ... Power Solution representative nearest you Products we offer Bent Axis Motors Closed Circuit Axial Piston Pumps and Motors Displays Electrohydraulic Power Steering Electrohydraulics Hydraulic Power Steering Integrated Systems Joysticks and Control Handles Microcontrollers and Software Open Circuit Axial Piston Pumps Orbital Motors PLUS 1 GUIDE Proportional Valves Sensors Steering Transit Mixer Dri...