background image

Service guide | Disassembling and assembling MAH 6.3 - 12.5

9

180R9152 | AX357937856579en-000402 | 07.2021

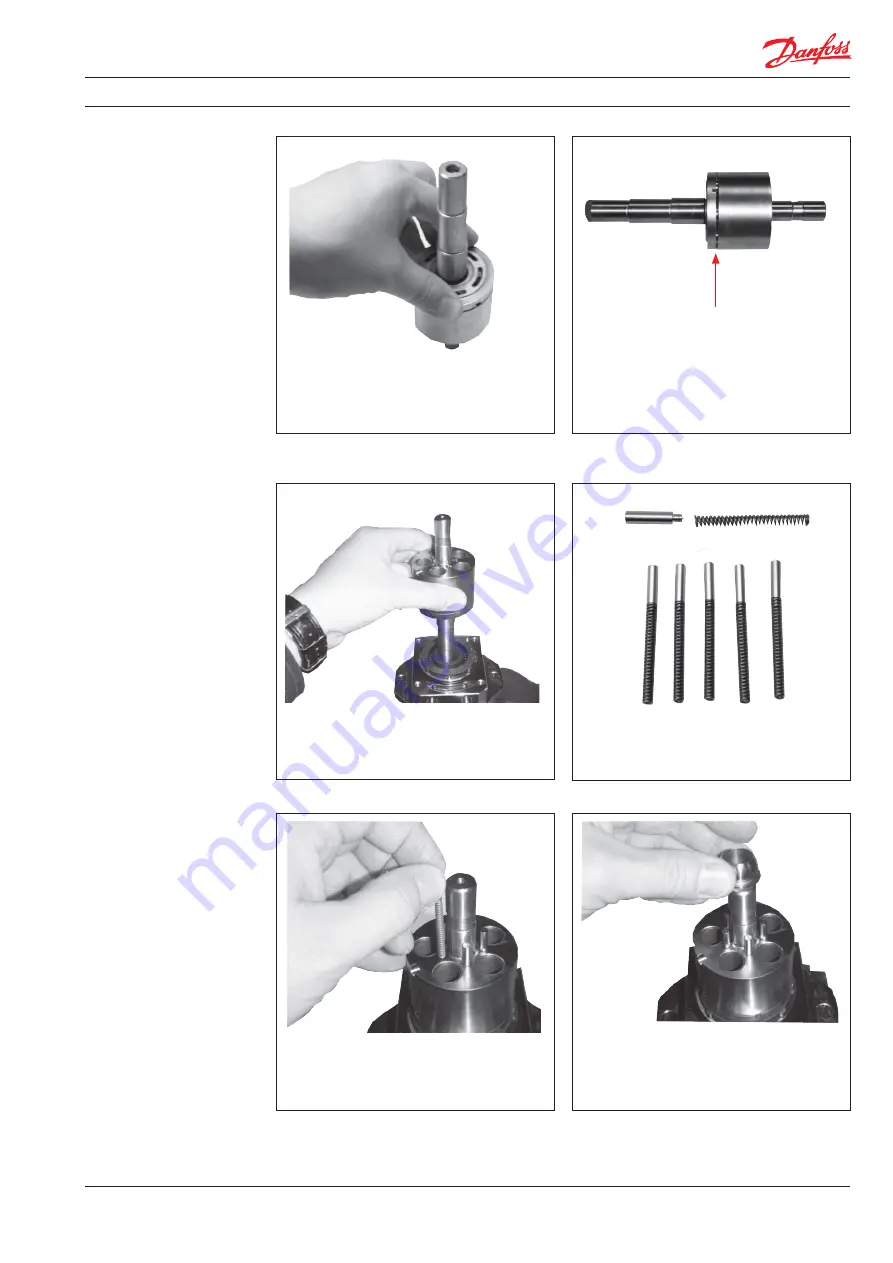
5.  Mount thrust plate with seals on cylinder  

 barrel.

6.  Check that the gap between the cylinder  


barrel and the thrust plate is 1.5-2.5 mm.

1.5 - 2.5 mm

7.  Mount the cylinder barrel in the flange.

8.  Assemble pins and springs.

9.  Mount pin/spring assemblies.

10. Mount the retainer guide.

Summary of Contents for MAH Series

Page 1: ...Service guide MAH motor MAH 6 3 12 5 Disassembling and assembling hpp danfoss com...

Page 2: ...warranty Introduction Table of Contents Introduction 2 1 Disassembling the motor 3 2 Inspection 7 3 Assembling the motor 8 4 Service kit for MAH 6 3 13 4 1 Service kit for MAH 12 5 14 5 Exploeded vie...

Page 3: ...21 1 Disassembling the motor 2 Dismantle front cover using a vice 1 Remove parallel key and unscrew front cover 3 Remove shaft seal using two screwdrivers 4 Remove the two small O rings from flange Re...

Page 4: ...AH 6 3 12 5 4 180R9152 AX357937856579en 000402 07 2021 7 Remove pistons and retaining plate from cylinder barrel 8 Remove retaining guide 10 Remove cylinder barrel 9 Remove pins and springs 12 Remove...

Page 5: ...osen thrust plate using a screwdriver Place screwdriver in slot of thrust plate 16 Remove swash plate from housing 17 Wash all parts and replace all seals inclusive shaft seal Inspectallpartscarefully...

Page 6: ...80R9152 AX357937856579en 000402 07 2021 Thrust plate with sealing Swash plate Housing Cylinder barrel Retaining guide Front cover Pins and springs Seal Flange Pistons Port plate Retaining plate O ring...

Page 7: ...surfaces of the piston shoes to check that the surfaces are even and smooth and without any scratches 2 2 Pistons 1 The thickness of the piston shoes must be at least 3 4 mm The play in the ball and s...

Page 8: ...se silicone when assembling the motor Do not reuse disassembled O rings they might be damaged Always use new O rings 3 Assembling Important It is essential that the motoris serviced in conditions of a...

Page 9: ...0402 07 2021 5 Mount thrust plate with seals on cylinder barrel 6 Check that the gap between the cylinder barrel and the thrust plate is 1 5 2 5 mm 1 5 2 5 mm 7 Mount the cylinder barrel in the flange...

Page 10: ...7937856579en 000402 07 2021 12 Insert the pistons 11 Mount the retaining plate on the retainer guide with plain surface pointing upwards 14 Mount housing using pin as guide 13 Mount swash plate 16 Mou...

Page 11: ...9152 AX357937856579en 000402 07 2021 18 Mount spring 17 Mount washer with edge pointing upwards 19 Fit hollow bush onto shaft 20 Wet shaft seal and mount slide it over bush 21 Use shaft seal tool when...

Page 12: ...021 24 Wet shaft seal with water and mount it in front cover 23 Mount O ring on front cover 26 Mount front cover and align it to screw holes 25 Press shaft seal into front cover using shaft seal tool...

Page 13: ...X 63 5 Pcs Pin for retaining ball Stainless steel 1 4057 X 64 1 Pc Retaining ball Stainless steel 1 4057 X 65 1 Pc Int retaining plate Stainless steel 1 4310 PEEK X 66 5 Pcs Piston with piston shoes...

Page 14: ...X 63 5 Pcs Pin for retaining ball Stainless steel 1 4057 X 64 1 Pc Retaining ball Stainless steel 1 4057 X 65 1 Pc Int retaining plate Stainless steel 1 4310 PEEK X 66 5 Pcs Piston with piston shoes S...

Page 15: ...Service guide Disassembling and assembling MAH 6 3 12 5 15 180R9152 AX357937856579en 000402 07 2021 5 Exploded view MAH 6 3...

Page 16: ...Danfoss DHS im 2021 07 180R9152 AX357937856579en 000402 16 Danfoss A S High Pressure Pumps Nordborgvej 81 DK 6430 Nordborg Denmark 5 1 Exploded view MAH 12 5...

Reviews: