2
A)
USER
PREFERENCES
Before programing the thermostat it is recommended that the user preferences, as regards
clock display and temperature scale, are set. Details of the available user preferences are
shown below:
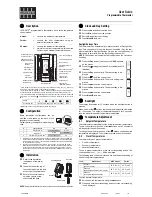
A.1. Display Time: to permanently display time press both NEXT and COPY and hold for
2 seconds. Repeat to return to temperature display
A.2. Clock display: press both NEXT and DAY buttons and hold for 2 seconds to change
display between AM/PM & 24 hour. Repeat to return to original setting
A.3. Temperature scale: press both DAY and COPY buttons and hold for 2 seconds to
change temperature scale between Fahrenheit and Centigrade. Repeat to return to
original setting
NOTE: If Fahrenheit is selected, Days of Week shown as MO, TU, WE, TH, FR, SA & SU
If Centigrade is selected, Days of Week shown as 1-7, with 1 being MONDAY
B)
SETTING
THE
TIME
OF
DAY
AND
DAY
OF
WEEK
B.1. Press PROG button to enter programing mode
B.2. Press + or – buttons to adjust time of day. If in AM/PM mode remember to ensure
that AM/PM setting is correct
B.3. Press DAY button repeatedly until correct day of week is displayed.
Note: If Centigrade scaling has been selected, Day 1 is Monday and Day 7 is Sunday
B.4. Press PROG button to advance to “Programming event times and temperatures”
C)
PROGRAMING
EVENT
TIMES
AND
TEMPERATURES
The thermostat can be set by the installer to provide the following programing options:
C.1. 7-day option: This provides a different program for each day of the week
C.2. 5-day / 2-day option: This provides one set of programs for days 1-5, (Monday to
Friday), and another set of programs for days 6-7, (Saturday and Sunday)
C.3. 24 hour option: This option repeats the same program each day
C.4. 2, 4 or 6 program events per day: In addition to the above, the installer can also set
the thermostat to provide either 2, 4 or 6 events each day
C.5. Non-programable option: The thermostat can also be set up as a regular non-
programable thermostat. (See section J)
D)
SETTING
THE
EVENTS
-
UNIT
IN
7
DAY
MODE
D.1. Press + or – to adjust event time, use
▲
or
▼
to select required heating temperature
and
U
or
V
to select required cooling temperature
D.2. OPTIONAL - Heat or cool not required: If heating is not required, “Off” can be
selected below 43°F, (6°C), or minimum allowable heating set temperature if
restricted. If cooling is not required, “Off” can be selected above 104°F, (40°C), or
maximum allowable cooling set temperature if restricted.
BUTTONS
6:30
68
77
AM
MO
6:30
68
77
AM
+
-
or
▲
▼
6:30
68
77
AM
MO
O
N
LCD
DISPLAYS
Clock in 7-day mode
Clock in 5/2 day mode
Clock in 24 hour mode
then
or
Programming Event 1
time and temperature
NEXT
DAY
plus
NEXT
COPY
plus
DAY
COPY
plus
+
-
or
PROG
DAY
PROG
U
then
or
V
69
A
UTO
F
74
79
6:30
68
77
AM
MO TU WE TH FR


