background image

17

PART

NO

QTY

22

M01

M6

S01

M6X12

20

L01C

2

W01

2

M01

W02

W01

M01

1

1

2

2

2

2

3

3

4

4

4

4

L01D

2

L01C

L01C

L01D

L01D

W02

4

S01

M01

M01

S01

1

2

L01C&D

L01C&D

3

4

M01

S01

L01C&D

5

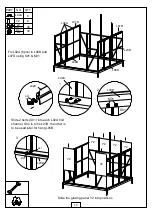
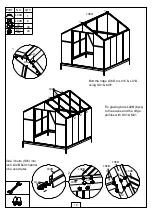
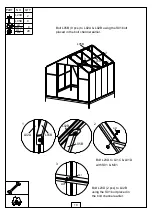
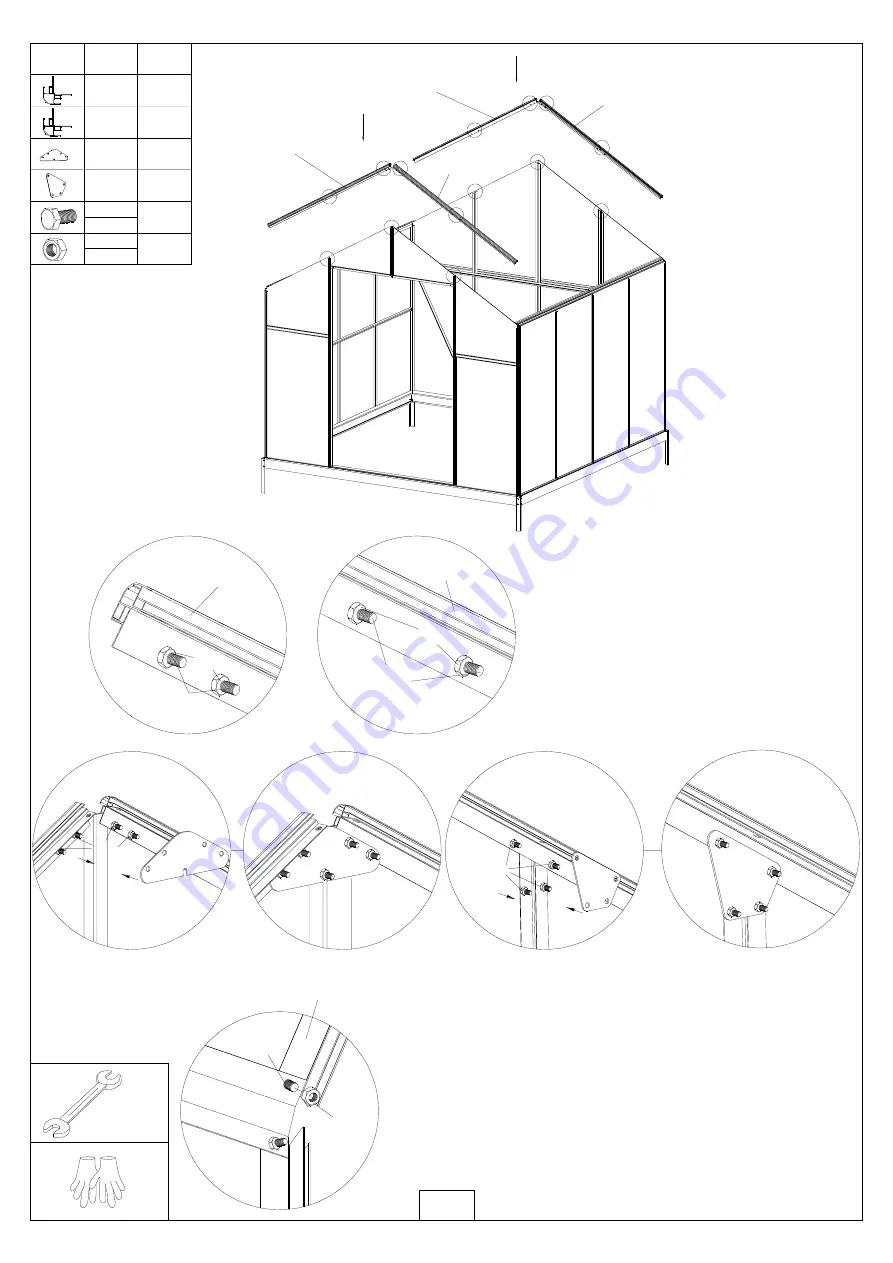
1. Preload S01 & M01 on L01C and L01D before fixing

   them to L01A/L01B. See figue 1 & 2.

2. Bolt L01C and L01D with plate W01, using S01 & M01

   preloaded. And then fix them to L04B and L02G,using
   S01 & M01.

3. Fix L01C & L01D to L02C & L02D/L02E & L02F with

   the plate W02, using the S01 and M01 preloaded
   above.
4. Fix L01C & L01D to L01A & L01B,using S01 & M01.

Summary of Contents for GH152240

Page 1: ...11 05 2021 for Greenhouse 2 5x2 5x2 28m Manual...

Page 2: ...Assembly instruction PRODUCT SIZE LxWxH 250x250x228cm PLEASE READ CAREFULLY BEFORE ASSEMBLY...

Page 3: ...ONTENTS 1 Assembly Advice Page 1 2 Product Features Page 2 3 Parts List Page 3 4 6 Base Assembly Page 9 10 7 Framework Glazing Assembly Page 11 22 5 Roof Vent Assembly Page 7 8 4 Door Assembly Page 5...

Page 4: ...lanket to avoid any scratches or damages 4 DO NOT climb or stand on the roof Heavy articles should not be leaned against the greenhouse 5 Keep the roof and gutter clear of snow dirt leaves Allowing sn...

Page 5: ...move all film immediately after the construction is completed Please ensure that the side with the white lm faces outwards 4 This quality greenhouse features self tapping screws to provide strong join...

Page 6: ...1 L02D 1 L02E 1 L02F 1 L02G 1 5 L23D L05A 4 L05B 9 4 L19 2 L20 2 L21 2 A01 Part NO QTY 2 L11A 2 L12A windowsX2 1 L14 NO Part QTY 3 L16B 2 L15 3 L18A 2 L17 32 4X25 Z01 1 L16A 1 L18B door 8 M4 2X16 Z08...

Page 7: ...Y11 Y1 Y3 Y4 Y5 Y8 Y13 PART NO QTY 6 4 8 6 2 6 2 1 2 1 1 1 4 PC Glass N0 1 PART NO QTY 115M J107 PART NO QTY J107 Rubber for walls roof Provided for glass only Rubber for walls only Provided for glass...

Page 8: ...5 NO Part QTY 1 L15 2 L18A 1 L17 3 Y11 NO Part QTY 16 4X25 Z01 1 L16B 1 L16A L15 L16B L16A L17 L18A Z01 Z01 Z01 L18A Z01 Z01 Z01 Y11 Y11 Y11 Left Door...

Page 9: ...6 NO Part QTY 1 L15 1 L18A 1 L17 3 Y11 NO Part QTY 16 4X25 Z01 2 L16B L15 L16B L16B L17 L18B Z01 Z01 Z01 L18A Z01 Z01 Z01 Y11 Y11 Y11 1 L18B Right Door...

Page 10: ...Y10 Z02 Y10 Z02 Z04 Z04 Z02 A01 Z02 L19 Step 1 Step 2 Step 3 L19 2 L19 1 L20 1 L21 1 A01 4X8 6 2 7 Part NO QTY 1 Y10 Part NO QTY 4X16D Z02 1 L11A 1 L12A M4 2X16 Z04 Z08 2...

Page 11: ...8 L11A L12A Z08 L11A L12A Z02 L11A is factory fitted to L12A already Four windows are standard...

Page 12: ...D1 4 PART NO QTY S01 M6X12 16 M01 M6 16 D70 D1 D1 D1 D1 a b BACK FRONT 511 50 50 511 511 511 100 511 511 511 511 28 M4 2X16 Z08 About 100mm distance between two Z08 a b Fix the base before assembly th...

Page 13: ...NO QTY Y11 Y11 Y11 Y11 Y13 Y1 Y4 Y8 Y2 Y2 Y2 Y2 Y2 Y3 Y6 Y7 Y6 Y7 Y6 Y7 Y6 Y7 Y7 Y9 Y6 Y2 Y10 Y11 Y1 Y3 Y4 Y5 Y8 Y13 Attention If glass is chosen please seal it with rubber J11 provided after the whol...

Page 14: ...Z08 28 M4 2X16 Z08 L08 L10 L08D 3 L10 1 L08D L10 L01A L01A L01B L01B L08D L08D 1 Fix the glazing bars 2 x L01A and 2 x L01B to the cills L10 and 3 x L08D with S01 M01 provided 2 Fix the cills to the...

Page 15: ...12 PART NO QTY 8 M01 M6 S01 M6X12 8 1 S01 M01 2 S01 M01 L07D 2 2 L23D L07D 1 1 L07D L23D L23D 1 1 2 2 2 2 1 Fix 2 x L07D eaves to L01A L01B using S01 M01 2 Fix 2 x L23D to L01A L01B using S01 M01...

Page 16: ...2 L23A L23A L23A L23D 1 1 2 2 2 3 3 4 4 L02C L02D L02E L02F L02G L02C 1 L02D 1 L02E 1 L02F 1 L02G 1 19 M01 M6 S01 M6X12 20 L05A 4 2 2 4 Fix L02C L02D to cill L10 L02E L02F L02G to cill L08D using S01...

Page 17: ...S01 3 S01 M01 L02A 6 1 2 3 Y2 Y2 Y2 Y2 Y2 Y2 Fix L02A 6pcs to L08D and L07D using S01 M01 L02A L07D L07D L08D L08D L23D Slide 2 bolts S01 into each L02A bolt channel One is to fix L23D the other is to...

Page 18: ...2 M01 M6 S01 M6X12 12 Y6 8 6 L04A L04A L04A L04A L04A L04A 1 2 3 L04A S01X2 L04A 3 1 1 3 2 2 Y6 Y6 Y6 Y6 Y6 Y6 Y6 Y6 2 2 2 L04A Fix bracings L04A 6pcs as above using S01 M01 Slide the glazing panel Y6...

Page 19: ...L04B L04B S01 M01 S01 M01 S01 M01 S01 M01 S01 M01 5 S01X2 L13A 2 Y1 1 Y3 2 Y4 1 Y5 1 Y8 1 Y13 Fix L13A to L02C L02D with S01 M01 Preload the bolts S01 M01 to L02E L02F before sliding the panels into p...

Page 20: ...C D 3 4 M01 S01 L01C D 5 1 Preload S01 M01 on L01C and L01D before fixing them to L01A L01B See figue 1 2 2 Bolt L01C and L01D with plate W01 using S01 M01 preloaded And then fix them to L04B and L02G...

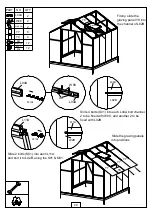
Page 21: ...L02B L02B S01X3 L02B S01 M01 L06D 1 L06D L07D 1 2 3 L02B 2 3 L06D 2 3 2 3 1 1 Fix glazing bars L02B 6pcs to the eaves and the ridge profiles with S01 M01 Bolt the ridge L06D to L01C L01D using S01 M0...

Page 22: ...L05B L05B 1 2 S01 L05B 9 L05B 1 1 2 2 L23D 3 S01 M01 3 Bolt L05B 9 pcs to L02A L02B using the S01 bolt placed in the bolt channel earlier Bolt L23D to L01C L01D with S01 M01 Bolt L23D 2 pcs to L02B u...

Page 23: ...Y7 6 Y9 4 W08 2 Y9 WINDOW Y9 Y7 Y7 Y7 Firstly slide the glazing panel Y9 into the channel of L02B Slide the glazing panels into positions Slide 4 bolts S01 into each L04A bolt channel 2 to be fixed wi...

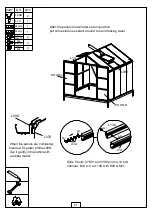
Page 24: ...S02 M6X20 3 L09D 2 L09D After the panels and windows are in position put some silicone sealant around to avoid leaking water When the panels are completely inserted fix gutter profile L09D Tap it gent...

Page 25: ...d to L14 and the other end to L09D through J56L R using the S01 preloaded and M01 Fix the cover caps J90L R carefully with Z04 Fix the cover caps J56L R carefully with Z02 Be careful to ensure that th...

Page 26: ...I For more information please visit www dancovershop com l l l l l l l l l l l Dancover A S Lyngevej 16A N rre Herlev 3400 Hiller d Denmark Head office...

Reviews: