background image

25

1.  Parte superior de la secadora

2.  Panel de control

3.  Puerta de la secadora

4.  Rejillas de ventilación

5.  Ranura de apertura del zócalo

6.  Patas niveladoras

7.  Zócalo

8.  Placa de clasificación

9.  Filtro de pelusa

10. Tapa del cajón

INSTRUCCIONES DE INSTALACIÓN

Kit apilable con cajón/estante

Consulte la guía de instrucciones para más detalles

Summary of Contents for DDY040D4WDB

Page 1: ...oducts Limited Guelph Ontario Canada N1H 6Z9 Danby Products Inc Findlay Ohio U S A 45840 www Danby com Printed in Turkey Imprim en Turquie Impreso en Turqu a MODEL MODELO DDY040D4WDB VENTLESS FRONT LO...

Page 2: ...WARRANTY EXTENSION after filling out a product survey at www danby com support product registration Need Help 1 Read your Owner s Manual for installation help troubleshooting and maintenance assistan...

Page 3: ...milar qualified person in order to avoid hazard SAFETY REQUIREMENTS Ensure that component parts are replaced with like components and that servicing is done by factory authorized service personnel to...

Page 4: ...tlet Do not operate the appliance if it has a damaged power cord or plug If the power cord is damaged it must be replaced by the manufacturer its service agent or similarly qualified persons in order...

Page 5: ...4 1 Dryer Top 2 Control Panel 3 Dryer Door 4 Ventilation Grills 5 Plinth Opening Slot 6 Leveling Legs 7 Plinth 8 Ratings Plate 9 Lint Filter 10 Drawer Cover Stacking Kit with Drawer Shelf See instruct...

Page 6: ...r Once installed the connections must remain stable When installing the dryer make sure that the rear surface is not leaning on anything e g tap socket The operating temperature of the dryer is 41 F t...

Page 7: ...it one end of water drain hose to the slot where you removed the hose Fix the other end of the water drain hose directly to the water oulet or sink NOTE The hose must be connected in a manner that it...

Page 8: ...ply cord must be type SRDT and at least 5 feet 152 4 cm in length 3 WIRE RECEPTACLE Requires UL listed NEMA 10 30P 240V 30A 3 wire supply cord with ring terminals or spade terminals with upturned ends...

Page 9: ...in relief for the connection 1 Remove the screw and terminal box cover 2 Remove the clamp of the strain relief which is attached on the machine Pass the clamp through the supply cord and put the suppl...

Page 10: ...tems in the dryer Woven goods such as t shirts and knit clothes generally shrink in the first drying Use a protective program Do not over dry synthetics This will cause creases Do not add items to the...

Page 11: ...OPERATING INSTRUCTIONS 10 Follow the instructions on the labels of the laundry to be dried Only dry items that have a statement symbol that indicates they can be dried in a dryer...

Page 12: ...11 CONTROL PANEL 1 Program Selection Knob Use the program selection knob to select the desired drying program...

Page 13: ...12 OPERATING INSTRUCTIONS 2 Electronic Indicator Display...

Page 14: ...ur laundry Select Extra Dry for thick and multilayer laundry that takes time to dry Select Regular Dry for regular single layer laundry Select Damp Dry for laundry that you wish to leave damp ready fo...

Page 15: ...s and Anti wrinkle buttons simultaneiously for 3 seconds When the child lock is activated all keys will be deactivated Child lock is not automatically deactivated at the end of the program To deactiva...

Page 16: ...hout heat Time Drying To reach the required drying level at a low temperature you can use the time programs of 10 min to 150 min Regardless of the drying level the program stops at the desired time Ul...

Page 17: ...ng If you have to open the door do not keep it open for a long time Program End At the end of the drying cycle the warning LEDs for Start Pause water tank level filter cleaning and condenser cleaning...

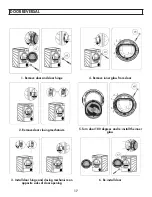
Page 18: ...r and door hinge 2 Remove door closing mechanism 3 Install door hinge and closing mechanism on opposite sides of door opening 4 Remove inner glass from door 5 Turn door 180 degrees and re install the...

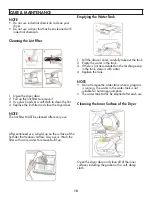
Page 19: ...TE Do not use industrial chemicals to clean your dryer Do not use a dryer that has been cleaned with industrial chemicals Cleaning the Lint Filter 1 Open the dryer door 2 Pull up the lint filter to re...

Page 20: ...completed drying programs or once a month even if the warning has not activated Cleaning the Humidity Sensor Inside the dryer there are humidity sensors that detect whether the laundry is or is not dr...

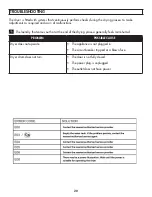
Page 21: ...The door is not fully closed The power plug is unplugged The outlet does not have power TROUBLESHOOTING 20 The dryer is fitted with systems that continuously perform checks during the drying process t...

Page 22: ...pot Any appliance requiring service outside the limited boundaries of In Home Service will be the consumer s responsibility to transport at their own expense to the original point of purchase or a ser...

Page 23: ...2 MESES despu s de completar una encuesta sobre el producto en www danby com support product registration N mero de modelo _______________________________________________ N mero de serie _____________...

Page 24: ...el riesgo de una posible ignici n debida a piezas incorrectas o a un servicio inadecuado Este aparato no est destinado a ser utilizado por personas incluidos ni os cuyas capacidades f sicas sensorial...

Page 25: ...el enchufe est n da ados Si el cable de alimentaci n est da ado debe ser sustituido por el fabricante su agente de servicio o personas con cualificaci n similar con el fin de evitar riesgos No intente...

Page 26: ...secadora 4 Rejillas de ventilaci n 5 Ranura de apertura del z calo 6 Patas niveladoras 7 Z calo 8 Placa de clasificaci n 9 Filtro de pelusa 10 Tapa del caj n INSTRUCCIONES DE INSTALACI N Kit apilable...

Page 27: ...oducto ya que es pesado Utilice siempre guantes de seguridad Instale siempre el producto contra una pared La superficie posterior del producto debe colocarse contra la pared Deje al menos 1 pulgada 3...

Page 28: ...ctamente el agua lo que sustituye la necesidad de vaciar manualmente el dep sito de agua Conexi n de la manguera de desag e Tire y saque el extremo de la manguera de la parte trasera de la secadora No...

Page 29: ...m nima de 5 pies 152 4 cm RECEPT CULO DE 3 CABLES Requiere un cable de alimentaci n de 3 hilos NEMA 10 30P 240 V 30 A homologado por UL con terminales de anillo o terminales de pala con extremos haci...

Page 30: ...ice esta descarga de tracci n para la conexi n 1 Retire el tornillo y la tapa de la caja de 2 Retire la abrazadera de la descarga de tracci n que est fijada en la m quina Pase la abrazadera a trav s d...

Page 31: ...ntes de meter las prendas en la secadora Los productos tejidos como camisetas y prendas de punto suelen encoger en el primer secado Utilice un programa de protecci n No seque en exceso los tejidos sin...

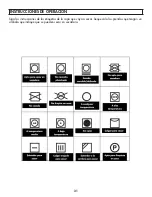
Page 32: ...31 Siga las instrucciones de las etiquetas de la ropa que vaya a secar Seque s lo las prendas que tengan un s mbolo que indique que se pueden secar en secadora INSTRUCCIONES DE OPERACI N...

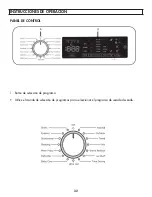
Page 33: ...32 PANEL DE CONTROL 1 Bot n de selecci n de programa Utilice el mando de selecci n de programas para seleccionar el programa de secado deseado INSTRUCCIONES DE OPERACI N...

Page 34: ...33 2 Indicador electr nico INSTRUCCIONES DE OPERACI N...

Page 35: ...ccione Secado Extra para ropa gruesa y de varias capas que tarde en secarse Seleccione Secado Normal para ropa normal de una sola capa Seleccione Secado en h medo para la ropa que desee dejar h meda l...

Page 36: ...nte 3 segundos Cuando se active el bloqueo para ni os se desactivar n todas las teclas El bloqueo para ni os no se desactiva autom ticamente al final del programa Para desactivar el bloqueo para ni os...

Page 37: ...ecado deseado a baja temperatura puede utilizar los programas de tiempo de 10 min a 150 min Independientemente del nivel de secado el programa se detiene a la hora deseada Ultra Calienta Ultra Hot Ade...

Page 38: ...iene que abrir la puerta no la mantenga abierta durante mucho tiempo Fin de Programa Al final del ciclo de secado los indicadores luminosos de Inicio Pausa nivel del dep sito de agua limpieza del filt...

Page 39: ...tirar el cristal interior de la puerta 2 Retirar el mecanismo de cierre de la puerta 5 Gire la puerta 180 grados y vuelva a instalar el cristal interior 3 Instale la bisagra de la puerta y el mecanism...

Page 40: ...superficie del filtro de pelusa que reduzca el flujo de aire Lave el filtro con agua caliente para eliminar la acumulaci n Vaciado del dep sito de agua 1 Tire de la tapa del caj n saque con cuidado e...

Page 41: ...el aviso Limpieza del condensador NOTA El condensador debe limpiarse despu s de cada 30 programas de secado completados o una vez al mes aunque no se haya activado la advertencia 1 Abra la puerta de l...

Page 42: ...avisar en caso de aver a La ropa que sale caliente al final del proceso de secado suele estar m s h meda PROBLEMA POSIBLE CAUSA La secadora no funciona El aparato no est enchufado Se ha disparado el...

Page 43: ...iers vingt quatre 24 mois toutes les pi ces fonctionnelles de ce produit qui s av rent d fectueuses seront r par es ou remplac es selon le choix du garant sans frais l acheteur initial Danby se r serv...

Page 44: ...Limited Guelph ON Canada N1H 6Z9 Danby Products Inc Findlay Ohio USA 45840 Trademarks of Danby Products Limited and or its subsidiaries Marques de commerce de Danby Products Limited et ou de ses filia...

Reviews: