3
4
5
6
7
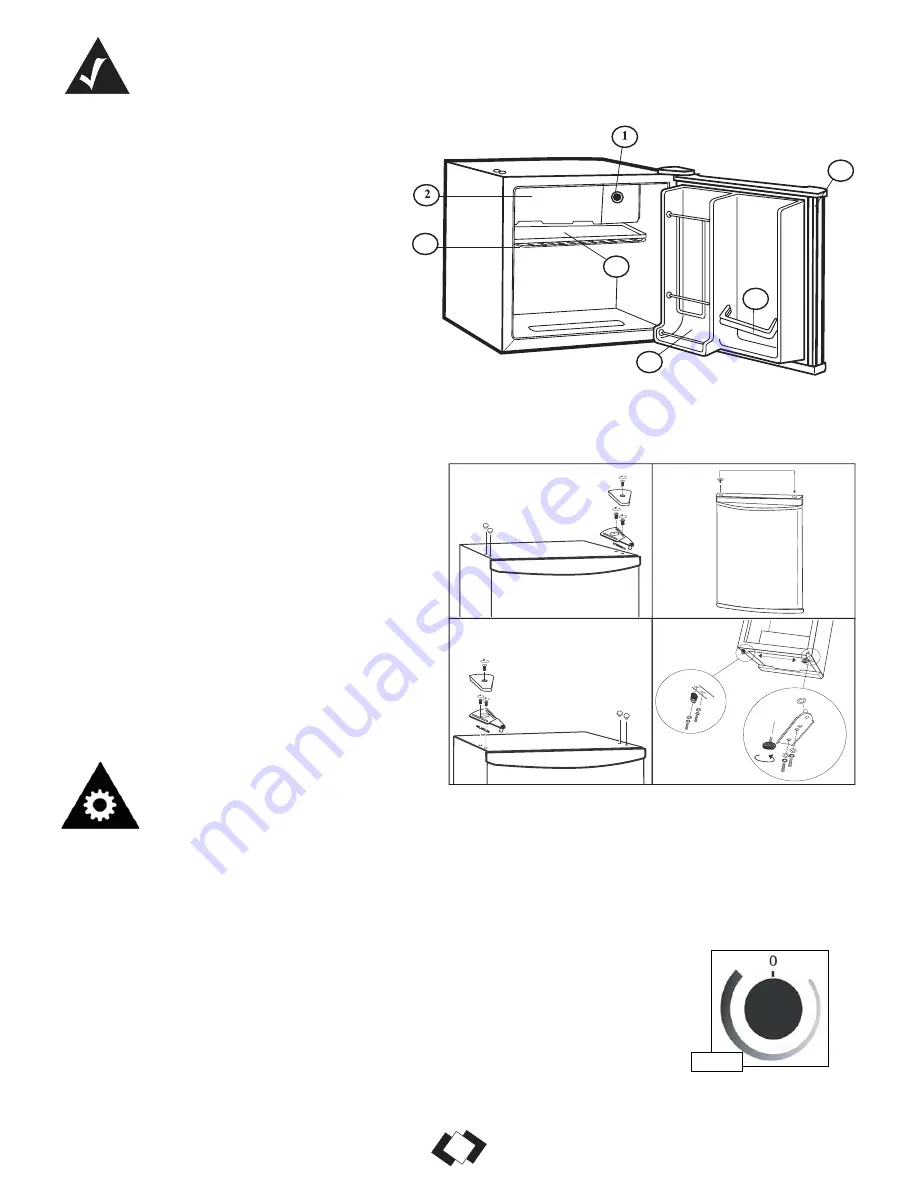
Fig. A
2
1) Thermostat Dial:
For controlling the tempera-
ture inside the refrigerator. Turns the motor on as
soon as the temperature rises above the desired
level.
2) Freezer Compartment with Freezer Door
3) Plastic Coated Shelves:
Odor resistant, rust-
proof, and removable for easy cleaning.
4) Drip Tray:
Catches the water that drips off the
evaporator when defrosting.
5) Magnetic Gasket:
Tight fitting door seal keeps
all the cooling power locked inside. No hooks or
latches.
6) Bottle Rack:
For tall, medium, and large bottles, cans or jars.
7) CANSTORTM Door Liner:
Holds 355mL cans of pop, juice, or beer.
To avoid vibration, the unit must be set level. This is accomplished by adjusting the (1) front
leveling leg located under the refrigerator. The temperature of the refrigerator is controlled by
setting the thermostat knob to a desired setting.
Temperature Selection:
To start the refrigerator, turn the temperature control knob to the position corresponding to the
desired cooling (on the graduated blue dial) in Fig. A. The refrigerator temperature will vary
depending on the quantity of the food stored, and on the frequency with which the door is
opened.
To turn the control to the OFF position, rotate the control knob to “0”. If the refrigerator is not
being used for long periods, disconnect the plug and leave the door partially open. This will
help to reduce mold and mildew from accumulating inside the refrigerator. Changes in ambient
room temperature will affect internal refrigerator temperatures (choose correct setting of the
thermostat knob). In OFF (0) position, the appliance does not operate (cooling system is
switched off) yet power supply is not interrupted (the light is on when you open the refrigerator
door).
Features
Operating Instructions
DOOR REVERSAL
INSTRUCTIONS
CAUTION: To avoid personal injury to yourself
and/or property, we recommend someone assist
you during the door reversal process.
If you find the direction of opening the door on your
appliance inconvenient, you can change it by
following the steps shown in the diagrams.
1
2
3
4


