background image

LIMITED IN-HOME APPLIANCE WARRANTY

This quality product is warranted to be free from manufacturer’s defects in material and workmanship, provided that the unit is

 used under the normal operating

conditions intended by the manufacturer.
This warranty is available only to the person to whom the unit was originally sold by Danby Products Limited (Canada) or Danby 

Products Inc. (U.S.A.) (hereafter

“Danby”) or  by an authorized distributor of Danby, and is non-transferable.

TERMS OF WARRANTY

Plastic parts, are warranted for thirty (30) days only from purchase date, with no extensions provided.

First Year

During the first twelve (12) months, any functional parts of this product found to be defective, will be repaired or replaced, 

at warrantor’s

option, at no charge to the ORIGINAL purchaser.  

To obtain

Danby reserves the right to limit the boundaries of “In Home Service” to the proximity of an Authorized Service Depot.  Any app

liance 

Service

requiring service outside the limited boundaries of “In Home Service” ,

i

t will be the consumer’s responsibility to transport the appliance (at

their own expense) to the original retailer (point of purchase) or a service depot  for repair. See “Boundaries of In Home Serv

ice” below.  

Contact your dealer from whom your unit was purchased, or contact your nearest authorized Danby service depot, where service 
must be performed by a qualified service technician.
If service is performed on the units by anyone other than an authorized service depot, or the unit is used for commercial appli

cation, all 

obligations of Danby under this warranty shall be void.  

Boundaries of

If the appliance is installed in a location that is 100 kilometers (62 miles) or more from the nearest service center your unit

 must be 

In Home Service

delivered to the nearest  authorized Danby Service Depot, as service must only be performed by a technician qualified and certif

ied for 

warranty service by Danby. Transportation charges to and from the service location are not protected by this warranty and are t

he 

responsibility of the purchaser.

Nothing within this warranty shall imply that Danby will be responsible or liable for any spoilage or damage to food or other c

ontents of this appliance, whether due

to any defect of the appliance, or its use, whether proper or improper.

EXCLUSIONS

Save as herein provided, Danby, there are no other warranties, conditions, representations or guarantees, express or implied, m

ade or intended by Danby or its

authorized distributors and all other warranties, conditions, representations or guarantees, including any warranties, conditio

ns, representations or guarantees

under any Sale of Goods Act or like legislation or statue is hereby expressly excluded. Save as herein provided, Danby shall no

t be responsible for any damages

to persons or property, including the unit itself, howsoever caused or any consequential damages arising from the malfunction o

f the unit and by the purchase of

the unit, the purchaser does hereby agree to indemnify and hold harmless Danby from any claim for damages to persons or propert

y caused by the unit.

GENERAL PROVISIONS

No warranty or insurance herein contained or set out shall apply when damage or repair is caused by any of the following: 

1)

Power failure.

2)

Damage in transit or when moving the appliance.

3)

Improper power supply such as low voltage, defective house wiring or inadequate fuses.

4)

Accident, alteration, abuse or misuse of the appliance such as inadequate air circulation in the room or abnormal operating con

ditions

(extremely high or low room temperature).

5)

Use for commercial or industrial purposes (ie. If the appliance is not installed in a domestic residence). 

6)

Fire, water damage, theft, war, riot, hostility, acts of God such as hurricanes, floods etc.

7)

Service calls resulting in customer education.

8)

Improper Installation (ie. Building-in of a free standing appliance or using an appliance outdoors that is not approved for out

door application).

Proof of purchase date will be required for warranty claims; so, please retain bills of sale.  In the event warranty service is

 required, present this document to our

AUTHORIZED SERVICE DEPOT.

Danby Products Limited
PO Box 1778, Guelph, Ontario, Canada  N1H 6Z9
Telephone:  (519) 837-0920  FAX:  (519) 837-0449

Danby Products Inc.

PO Box 669, Findlay, Ohio, U.S.A.  45840

Telephone:  (419) 425-8627  FAX:  (419) 425-8629

04/09

1-800-263-2629

Warranty Service

In-home

If the appliance is installed in a location that is 100 kilometres (62 miles) or more from the nearest 
service centre your unit must be delivered to the nearest authorized Danby Service Depot, as service 
must only be performed by a technician qualified and certified for warranty service by Danby. Transpor-
tation charges to and from the service location are not protected by this warranty and are the responsi-
bility of the purchaser.

During the first twelve (12) months, any functional parts of this product found to be defective, will be 
repaired or replaced, at warrantor’s option, at no charge to the ORIGINAL purchaser.

Danby reserves the right to limit the boundaries of “In Home Service” to the proximity of an Authorized 
Service Depot.  Any appliance requiring service outside the limited boundaries of “In Home Service” ,it 
will be the consumer’s responsibility to transport the appliance (at their own expense) to the original 
retailer (point of purchase) or a service depot  for repair. See “Boundaries of In Home Service” below. 
Contact your dealer from whom your unit was purchased, or contact your nearest authorized Danby 
service depot, where service must be performed by a qualified service technician. If service is performed 
on the units by anyone other than an authorized service depot, or the unit is used for commercial 
application, all obligations of Danby under this warranty shall be void.

First year

To obtain
service 

Boundaries of
in-home service

LIMITED IN-HOME APPLIANCE WARRANTY

This quality product is warranted to be free from manufacturer’s defects in material and workmanship, provided that the unit is 
used under the normal operating conditions intended by the manufacturer.
This warranty is available only to the person to whom the unit was originally sold by Danby Products Limited (Canada) or 
Danby Products Inc. (U.S.A.) (hereafter “Danby”) or  by an authorized distributor of Danby, and is non-transferable.

TERMS OF WARRANTY

Plastic parts, are warranted for thirty (30) days only from purchase date, with no extensions provided.

Nothing within this warranty shall imply that Danby will be responsible or liable for any spoilage or damage to food or other 
contents of this appliance, whether due to any defect of the appliance, or its use, whether proper or improper.

EXCLUSIONS

Save as herein provided, by Danby, there are no other warranties, conditions, representations or guarantees, express or 
implied, made or intended by Danby or its authorized distributors and all other warranties, conditions, representations or 
guarantees, including any warranties, conditions, representations or guarantees under any Sale of Goods Act or like legislation 
or statute is hereby expressly excluded. Save as herein provided, Danby shall not be responsible for any damages to persons 
or property, including the unit itself, howsoever caused or any consequential damages arising from the malfunction of the unit 
and by the purchase of the unit, the purchaser does hereby agree to indemnify and hold harmless Danby from any claim for 
damages to persons or property caused by the unit.

GENERAL PROVISIONS

No warranty or insurance herein contained or set out shall apply when damage or repair is caused by any of the following: 
1) Power failure.
2) Damage in transit or when moving the appliance.
3) Improper power supply such as low voltage, defective house wiring or inadequate fuses.
4) Accident, alteration, abuse or misuse of the appliance such as inadequate air circulation in the room or abnormal operating 
conditions (extremely high or low room temperature).
5) Use for commercial or industrial purposes (i.e., If the appliance is not installed in a domestic residence). 
6) Fire, water damage, theft, war, riot, hostility, acts of God such as hurricanes, floods etc.
7) Service calls resulting in customer education.
8) Improper Installation (i.e., building-in of a free standing appliance or using an appliance outdoors that is not approved for 
outdoor application). Proof of purchase date will be required for warranty claims; so, please retain bills of sale.  In the event 
warranty service is required, present this document to our AUTHORIZED SERVICE DEPOT.

Warranty Service

In-home

Danby Products Limited
PO Box 1778, Guelph, Ontario, Canada  N1H 6Z9
Telephone:  (519) 837-0920  FAX:  (519) 837-0449

Danby Products Inc.

PO Box 669, Findlay, Ohio, U.S.A.  45840

Telephone:  (419) 425-8627  FAX:  (419) 425-8629

1-800-263-2629

07/14

Summary of Contents for DAC100ECB4GDB

Page 1: ...R S USE AND CARE GUIDE GUIDE D UTILISATION ET D ENTRETIEN 02 02 Ê DANBY PRODUCTS LIMITED ONTARIO CANADA N1H 6Z9 DANBY PRODUCTS INC FINDLAY OHIO USA 45840 2015 12 11 AIR CONDITIONER CLIMATISEUR DAC100ECB4GDB ...

Page 2: ...s que votre produit Danby répond à tous vos besoins Votre satisfaction est notre priorité Veuillez nous contacter au numéro gratuit de service après vente si vous avez des questions quelconques à propos de votre nouvel appareil NO DEVUELVA ESTA UNIDAD A LA TIENDA SIN INSTRUCCIONES ADICIONALES Estimado cliente esperamos que el producto Danby que ha comprado satisfaga completamente sus necesidades S...

Page 3: ...ircumstances be cut or removed Never use the cord the plug or the appliance when they show any sign of damage Do not use your appliance with an extension cord unless it has been checked and tested by a qualified electrician or electrical supplier IMPORTANT GROUNDING METHOD Ce produit arrive d origine avec un cordon d alimentation équipé d une prise à trois fiches Il doit être branché dans une pris...

Page 4: ...d utilisation avant l utilisation initiale de ce produit AIR CONDITIONER Owner s Use and Care Guide 1 14 Welcome Important Safety Information Features Installation Instructions Operation Instructions Care and Maintenance Troubleshooting Warranty CLIMATISEUR Guide d utilisation et d entretien 14 28 Bienvenue Consignes de sécurité importantes Caractéristiques Consignes d installation Consignes d uti...

Page 5: ...ovide the original receipt NOTE THIS UNIT IS NOT DESIGNED FOR THROUGH THE WALL INSTALLATION Model No Serial No Date Purchased NEED HELP Before you call for service here are a few things you can do to help us serve you better Read this Owner s Use and Care Guide It contains instructions to help you use and maintain your appliance properly If you received a damaged appliance Immediately contact the ...

Page 6: ...t 4 For your safety and protection this unit is grounded through the powercord plug when plugged into a matching wall outlet If you are not sure whether your wall outlet is properly grounded please consult a qualified electrician 5 The wall outlet must match the 3 prong plug on the service cord supplied with the unit DO NOT use plug adapters See Table 2 for receptacle and fuse information 6 The ra...

Page 7: ...und the unit 4 Start your air conditioner before the outdoor air becomes hot to avoid an initial period of discomfort while the unit is cooling the room 5 When outdoor temperatures are cool enough use the Fan Mode setting This circulates indoor air providing some cooling comfort and uses less electricity than operating on a Cooling setting Important Safety Information READ AND FOLLOW ALL SAFETY IN...

Page 8: ...ng NOTE Your Room Air Conditioner is designed for easy installation in a single or double hung window This unit is NOTdesigned for vertical slider type windows and or through the wall applications Because the compressor is located on the controls side of the unit left side this side will be heavier and more awkward to manipulate Inadequate support on the control side of the unit can result in pers...

Page 9: ...jects within the room should be prevented from blocking the air flow 5 Be certain that the proper electrical outlet is within reach of the installation Use only a single outlet circuit rated at 15 amps All wiring should be in accordance with local and national electrical codes 6 DO NOT install unit where leakage of combustible gas is suspected Your air conditioner may fail to operate in air contai...

Page 10: ...shaped mounting bracket on top positioned in front of the upper window sash The bottom of the cabinet should be positioned on the recessed portion of the window frame Pull the window down until it rests just behind the front flange of the top L shaped mounting bracket See Fig 5 Expand the shutter frames fully on each side and secure the top of the frames to the window sash using one 1 2 in 13 mm s...

Page 11: ...3 5 cm for DAC100ECB4GDB ASSEMBLY AND INSTALLATION cont d Fig 7 Measure the tilt angle from the cabinet s edge WINDOW approximately 3 4 in 19 mm to 1 in 2 5 cm for approximately 1 in 2 5 cm to 1 3 8 in 3 5 cm for DAC080E DAC100E INSTALLATION INSTRUCTIONS 4 Installing the Energy Efficient Foam Insert After the unit is installed in the window measure the width of the side curtain If necessary cut th...

Page 12: ...y and Auto The selected mode will be denoted by the adjacent indicator light Auto mode is a pre set factory program that automatically defines the mode Cool or Dry and fan speed based on the set temperature The unit will automatically launch the Energy Saver function when it is in Cool Dry or Auto modes FAN SPEED Select from four different fan settings Low Medium High and Auto during Cool and Fan ...

Page 13: ...ally selected temperature This ends the Sleep mode and the unit will continue to operate as originally programmed The Sleep mode program can be cancelled at any time during operation by pressing the Sleep button again AUTO TIMER Used to initiate the Auto On Auto Off timer When the air conditioner is off Auto On feature 1 Press the Auto Timer button once and the adjacent Auto On indicator light wil...

Page 14: ...ormation A Remote Control power On OFF and Mode Icons B Clock and Auto Timer settings C Current set temperature D Fan speed setting control buttons 1 Power switch Note The unit will automatically launch the Energy Saver function when it is in Cool Dry and Auto modes 2 Mode 3 Fan Speed 4 Energy Saver default setting which allows the fan to cycle on and off instead of running continuously when the c...

Page 15: ... turning the equipment off and on the user is encouraged to try to correct the interference by one or more of the following measures 1 Reorient or relocate the receiving antenna 2 Increase the separation between the equipment and receiver 3 Connect the equipment into an outlet on a circuit different from that to which the receiver is connected 4 Consult the dealer or an experienced radio TV techni...

Page 16: ...t 2 Wash the filter in lukewarm water below 40 C 104 F To get best results wash with soapy water or a neutral clean ing agent 3 Rinse the filter with clean water and dry thoroughly before re installing 1 Operate the fan alone for half a day to dry out the inside of the unit 2 Turn off power and remove plug from wall socket 3 Clean filter 4 Store covered air conditioner in a dry location CLEANING E...

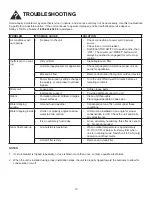
Page 17: ...ait 5 minutes before at tempting to restart Noisy unit Loose parts Tighten loose parts Inadequate support Provide additional support to unit Odors Formation of mold mildew or algae on wet surfaces Clean unit thoroughly Place algaecide tablet in base pan Water dripping outside Hot and humid weather Condensation run off is normal under these conditions Water dripping inside Unit is not properly angl...

Page 18: ... authorized Danby Service Depot as service must only be performed by a technician qualified and certified for warranty service by Danby Transpor tation charges to and from the service location are not protected by this warranty and are the responsi bility of the purchaser During the first twelve 12 months any functional parts of this product found to be defective will be repaired or replaced at wa...

Page 19: ...énéraux Pour bénéficier d une opération de maintenance ou de dépannage le reçu original sera exigé REMARQUE CET APPAREIL N A PAS ÉTÉ CONÇU POUR UNE INSTALLATION À TRAVERS UNE PAROI MURALE Numéro de modèle Numéro de série Date d achat BESOIN D ASSISTANCE Veuillez trouver quelques conseils avant de faire appel à nos services cela nous aidera à mieux vous servir Lisez ce guide Il comprend des instruc...

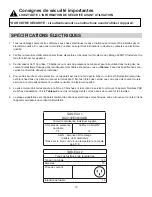
Page 20: ...et votre protection cet appareil est mis à la terre par la fiche du cordon d alimentation lorsqu elle est branchée dans une prise murale qui lui correspond Si vous n êtes pas certain que votre prise de courant murale est mise à la terre adéquatement veuillez consulter un électricien qualifié 5 La prise murale doit correspondre à la fiche à 3 broches sur le cordon de service fourni avec l appareil ...

Page 21: ...ries des rideaux ou des stores pour prévenir la pénétration et le réchauffement de la pièce par les rayons directs du soleil mais ne pas permettre la restriction de la circulation d air autour de l unité par les draperies ou les rideaux 4 Activer le climatiseur avant que la température de l air extérieur ne soit très chaude Ceci évitera une période initiale d inconfort avant que l unité ne puisse ...

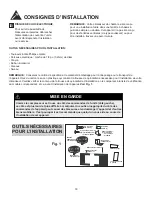
Page 22: ...e le compresseur se trouve du côté des commandes de l unité côté gauche ce côté est plus lourd et plus difficile à manipuler Un soutien inapproprié du côté des commandes de l appareil peut causer des blessures et endommager l appareil et d autres biens mobiliers C est pourquoi il est recommandé que quelqu un vous aide au cours de l installation de cet appareil MISE EN GARDE OUTILS NÉCESSAIRES POUR...

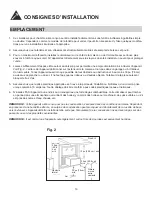
Page 23: ... rideaux ou d autres objets à l intérieur de la pièce puissent bloquer le flux d air 5 Assurez vous que la prise électrique appropriée se trouve à la portée de l installation N utilisez qu un circuit à prise unique calculé à 15 ampères Tout le câblage doit être conforme aux codes électriques locaux et nationaux 6 N insallez PAS l appareil à un endroit où on soupçonne une fuite de gaz combustibles ...

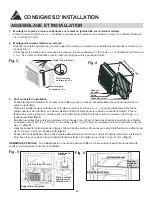
Page 24: ... L en haut positionnée à l avant du cadre supérieur de la fenêtre Le bas du caisson doit être positionné dans le bas du cadre de la fenêtre Tirez la fenêtre vers le bas jusqu à ce qu elle repose juste derrière le rebord frontal de la pièce à rainure en forme de L supérieure Voir Fig 5 Étendez les cadres des volets complètement de chaque côté et fixez le haut des structures au cadre de la fenêtre e...

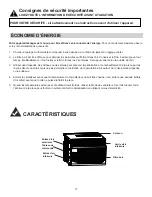
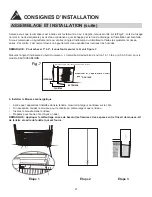
Page 25: ...ison du bord du caisson L intervalle H devrait être d environ 1 à 1 3 8 po 2 5 à 3 5 cm pour le modèle DAC100ECB4GDB Fig 7 pour Mesurez l angle d inclinaison du bord du caisson FENÊTRE EXTÉRIEUR INTÉRIEUR environ 3 4 à 1 po 19 mm à 2 5 cm H environ 1 à 1 3 8 po 2 5 cm à 3 5 cm pour 21 DAC080E DAC100E 4 Installer le Mousse éconergétique Après que l appareil est installée dans la fenêtre mesurer la ...

Page 26: ... Auto est un programme préréglé qui choisit automatiquement le mode frais ou sec et la vitesse du ventilateur selon le réglage de la température L appareil initiera la fonctionne d économiseur d énergie automatiquement lorsque l appareil est en modes frais sec auto auto frais et auto venti lateur modes seulement Ventilateur Choisissez entre quatre réglages de ventilateur différents Bas Moyen Haut ...

Page 27: ...e Cette nouvelle température sera maintenue pendant 6 heures avant le retour à la température initialement sélectionnée Cela met fin au mode Sommeil et l appareil continuera de fonctionner conformément à sa programmation initiale Le programme du mode Sommeil peut être annulé à tout moment pendant son fonctionnement en appuyant à nouveau sur le bouton Sommeil Minuterie Utilisée pour activer le prog...

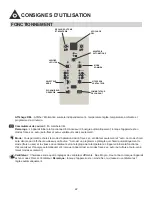
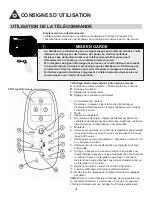
Page 28: ...utateur de courant Remarque l appareil initiera la fonction Économiseur d énergie automatiquement lorsque l appareil est en modes Frais Sec et Auto 2 Mode 3 Vitesse du ventilateur 4 Économiseur d énergie réglage par défaut qui permet au ventilateur de fonctionner par intervalles plutôt que continuel lement lorsque le compresseur n est pas utilisé 5 Minuterie 6 Utilisé pour augmenter ou réduire la ...

Page 29: ...aires pour les éliminer À cette fin il devra 1 Réorienter ou déplacer l antenne réceptrice 2 Accroître la distance entre l appareil et le récepteur 3 Brancher l appareil sur une prise de courant appartenant à un autre circuit que celui du récepteur 4 Chercher de l aide auprès du détaillant ou d un technicien en radio ou en télévision expérimenté Des changements ou modifications non approuvés par l...

Page 30: ...ouce 2 Lavez le filtre dans de l eau tiède de moins de 40 C 104 F Pour obtenir de meilleurs résultants lavez avec une eau savonneuse ou un agent neutre de nettoyage 3 Rincez le filtre avec de l eau propre et séchez le à fond avant de le réinstaller 1 Faites fonctionner uniquement le ventilateur pendant une demi journée pour sécher l intérieur du climatiseur 2 Coupez le courant et enlevez la fiche ...

Page 31: ...errées Support inadéquat Fournissez un support supplémentaire à l appareil Odeurs Formation de moisissure ou d algues sur les surfaces mouillées Nettoyez à fond l appareil Mettez une tablette anti algues dans la cuvette de base De l eau s égoutte à l extérieur L écoulement de la condensation est normal quand le temps est chaud et humide Le ruissellement causé par la condensation est normal sous ce...

Page 32: ...ifié pour effectuer un entretien couvert par la garantie de Danby Les frais de transport entre votre domicile et le lieu de l entretien ne sont pas couverts par la présente garantie et doivent être acquittés par l acheteur Pendant les premiers douze 12 mois toutes les pièces fonctionnelles de ce produit qui s avèrent défectueuses seront réparées ou remplacées selon le choix du garant sans frais à ...

Page 33: ..._________________ __________________________________________________________________________________________ __________________________________________________________________________________________ __________________________________________________________________________________________ __________________________________________________________________________________________ __________________...

Page 34: ..._________________ __________________________________________________________________________________________ __________________________________________________________________________________________ __________________________________________________________________________________________ __________________________________________________________________________________________ __________________...

Page 35: ..._________________ __________________________________________________________________________________________ __________________________________________________________________________________________ __________________________________________________________________________________________ __________________________________________________________________________________________ __________________...

Page 36: ...ou commandes spécia les sont disponibles à votre centre de service régional autorisé Pour obtenir le service et ou la localité de votre centre de service régional signalez le NUMÉRO D APPEL SANS FRAIS Ayez les renseignements suivants à la portée de la main lors de la commande de pièce ou service Type de produit Numéro de modèle Numéro de pièce Description de la pièce MODEL MODÈLE 1 800 26 1 800 26...

Reviews: