Daktronics Sportsound SSR-300 Quick Start Manual Download Page 5

Sportsound SSR-300 Quick Start Guide

5 of 6

DD2222144  Rev 2

05 March 2014

201 Daktronics Drive PO Box 5128, Brookings, SD 57006-5128

Tel: 1-800-DAKTRONICS (1-800-325-8766)  Fax: 605-697-4746

Web: www.daktronics.com/support

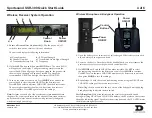
Personal Monitor System Operation

1.

  Flip the transmitter 

POWER

 switch to ON if it is not already on; ensure the RF 

     switch to the left of it is OFF at this time. 

2.

  Power on the handheld receiver using the volume knob. 

3.

  Attach the antenna and earphones to the top of the handheld receiver.  
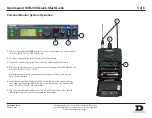
4.

  Flip open the battery cover to expose the control buttons. Press 

SCAN

 and the 

     display will show “SYNC NOW”.


Note:

 Insert new or fully-charged batteries prior to each use, and always 

     have spares on hand. 

4.

  Hold the bodypack up to the transmitter with the sync IR windows facing 

     each other, and press the 

SYNC

 button on the transmitter. The display will 

     show “SYNC SUCCESS” when finished.

5.

  Flip the transmitter RF switch to ON. The blue LED on the receiver should 

     illuminate to indicate that it is detecting the transmitter.


1

3

2

4

5

6

Summary of Contents for Sportsound SSR-300

Page 1: ...he headset microphone may be connected to the announcer s interface via the XLR jack and the HEADPHONES jack on rear 2 Connect the 15 4 6 m XLR cable part W 2074 from MIC 1 AUX 1 on the announcer s interface to Mic 1 Aux 1 on the announcer s plate Powering On Unlock the door of the rack and turn the SOUND SYSTEM key switch to the ON vertical position Note Keep both sets of keys in a safe location ...

Page 2: ...l Monitor System Receiver Wireless Mic Receiver Pro Mixer remotely located with 27 RU Rack Feedback Reducer Storage Drawers Media Distribution Plates up to 4 CD Player 40 RU Rack Distribution Amplifier Announcer s Interface Fiber Box Self Powered Monitor 1 or 2 Crowd Mic High Gain Antennas Announcer s Plate This page shows the most common components and accessories for the 40 RU SSR 300 rack Locat...

Page 3: ...nobs for the channels in use are adjusted so the SIGNAL light is green and the PEAK light is not lit Ensure all source equipment is turned on and operational refer to the appropriate pages of this guide Press the USER DEFINED KEY labeled GAME Custom keys may have been set up during training Press the desired key as needed for a specific application Ensure the ON buttons for the channels in use and...

Page 4: ...re the game If a scan is performed too far ahead of time frequencies set up by the media later on may interfere with previously configured wireless microphone settings a b c e f d Wireless Microphone Bodypack Operation 1 Open the battery cover Insert new or fully charged 9V batteries prior to each use and always have spares on hand 2 Power on the device Note that with the handheld mic you must rem...

Page 5: ...g the volume knob 3 Attach the antenna and earphones to the top of the handheld receiver 4 Flip open the battery cover to expose the control buttons Press SCAN and the display will show SYNC NOW Note Insert new or fully charged batteries prior to each use and always have spares on hand 4 Hold the bodypack up to the transmitter with the sync IR windows facing each other and press the SYNC button on...

Page 6: ... channel 3 Plug the earphones into the jack on top of the handheld receiver 4 Rotate the volume dial counterclockwise to power on the handheld receiver 5 Flip open the battery cover to expose the control buttons Use the CHANNEL SELECT buttons to select the same channel that was set on the transmitter or press SEEK to locate the active channel Note Insert new or fully charged batteries prior to eac...

Reviews: