5 Preparation
Installer and user reference guide
13
SERHQ020~0 SEHVX20~64BAW
Split packaged air-cooled water chiller
4P508020-1B – 2018.04
Indoor unit
G/G1
L/L1
G2
L2
SEHVX20BAW
Ø28.6 mm Ø9.52 mm —
—
SEHVX32BAW
Ø28.6 mm Ø12.7 mm —
—
SEHVX40BAW
Ø28.6 mm Ø9.52 mm Ø28.6 mm Ø9.52 mm
SEHVX64BAW
Ø28.6 mm Ø12.7 mm Ø28.6 mm Ø12.7 mm
If the indoor unit connections do not match the diameter of the
specified piping requirements, the piping diameter requirements
must be met using reducers/expanders (field supply) on the indoor
unit connections.
Other diameters (mm sizes) can also be used if the required pipe
sizes (inch sizes) are not available, taking the following into account:
▪ select the pipe size nearest to the required size,
▪ use the suitable adapters for the change-over from inch to mm
pipes (field supply).
5.3.3
About the piping length
Maximum piping length and height difference
Maximum allowable piping length
30 m
Height difference between indoor and outdoor unit
<10 m
Height difference between outdoor unit 1 and outdoor
unit 2 (if applicable)
0 m
5.4
Preparing water piping
5.4.1
Water circuit requirements
INFORMATION
Also read the precautions and requirements in the
"General safety precautions" chapter.
NOTICE
In case of plastic pipes, make sure they are fully oxygen
diffusion tight according to DIN 4726. The diffusion of
oxygen into the piping can lead to excessive corrosion.
▪
Connecting piping – Legislation.
Make all piping connections in
accordance with the applicable legislation and the instructions in
the "Installation" chapter, respecting the water inlet and outlet.
▪
Connecting piping – Force.
Do NOT use excessive force when
connecting the piping. Deformation of the piping can cause
malfunctioning of the unit.
▪
Connecting piping – Tools.
Only use appropriate tooling to
handle brass, which is a soft material. If NOT, pipes will get
damaged.
▪
Connecting piping – Air, moisture, dust.
If air, moisture or dust
gets into the circuit, problems may occur. To prevent this:
▪ Only use clean pipes
▪ Hold the pipe end downwards when removing burrs.
▪ Cover the pipe end when inserting it through a wall, to prevent
dust and/or particles entering the pipe.
▪ Use a decent thread sealant to seal connections.
Capacity class
Minimum required flow rate
20
23 l/min
32
36 l/min
40
46 l/min
64
72 l/min
▪
Field supply components – Water pressure and temperature.
Check that all components in the field piping can withstand the
water pressure and water temperature.
▪
Drainage – Low points.
Provide drain taps at all low points of the
system in order to allow complete drainage of the water circuit.
▪
Non-brass metallic piping.
When using non-brass metallic
piping, insulate the brass and non-brass properly so that they do
NOT make contact with each other. This to prevent galvanic
corrosion.
▪
Shut-off valves.
Two shut-off valves are delivered with the unit.
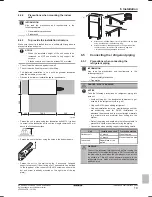
Install them as shown in the following figure.
a
b
a
c
d
b
a
Adapter piece (on the inlet only in case of
64BAW)
b
Shut-off valve
c
Bend
d
Filter
NOTICE
Before mounting the bend, attach the filter to it.
NOTICE
If the bend is not used during installation, replace it with an
extension (5 cm long for a 1¼" filter, and 6 cm long for a
2" filter) to ensure proper cleaning operation of the filter.
NOTICE
Be sure to install the filter properly. Failure to install or
incorrect installation will damage the plate heat exchanger
permanently.
▪
Drain taps.
Drain taps must be provided at all low points of the
system to permit complete drainage of the circuit. A drain valve is
provided inside the unit.
▪
Air vents.
Provide air vents at all high points of the system, which
must also be easily accessible for servicing. An automatic air
purge valve is provided inside the unit. Check that this air purge
valve is NOT tightened too much, so that automatic release of air
from the water circuit is possible. Refer to field setting [E‑04] in
"7.2.9 Field settings on the user interface" on page 35
.
▪
Water pressure.
Take care that the components installed in the
field piping can withstand the water pressure (maximum 3 bar +
static pressure of the pump). Refer to
"12.11 ESP curve: Indoor
unit" on page 55
.
WARNING
▪ For correct operation of the system, a regulating valve
must be installed in the water system. The regulating
valve is to be used to regulate the water flow in the
system (field supply).
▪ Selecting a flow outside the curves can cause
malfunction or damage to the unit. Also refer to the
Technical specifications.


