background image

Installation  Manual   3P291714-2B

DCM601A71   intelligent Touch Manager

25

English

Secure installation of intelligent Touch Manager

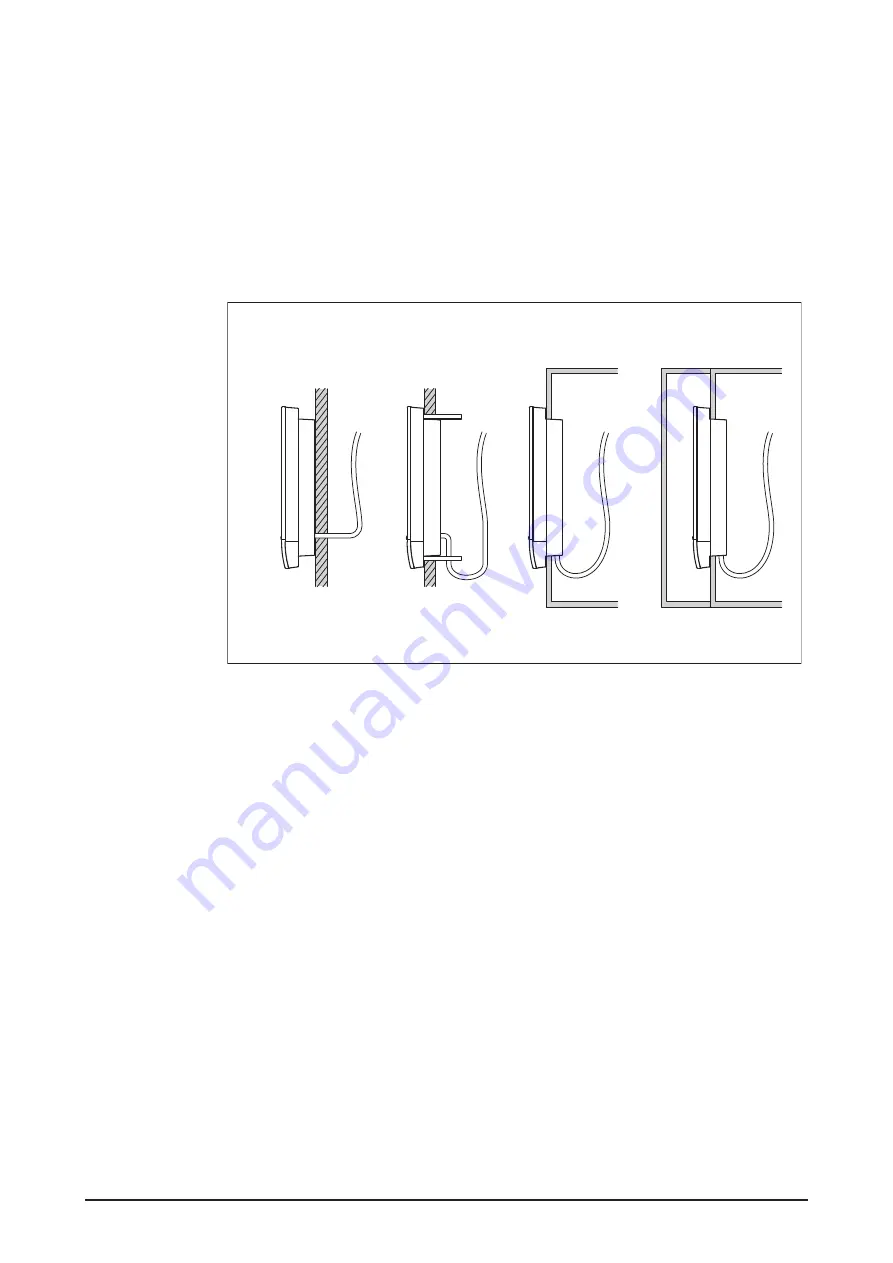
There are the following three ways to install the intelligent Touch Manager.


Wall mounting: Fix the intelligent Touch Manager to the metal plate which is attached to 
the wall.


Flush wall mounting: Embed the back of the intelligent Touch Manager into the wall 
using the frame bracket and angle brackets.


Direct mounting to control enclosure: Fix the intelligent Touch Manager directly to the 
control enclosure using screws only (with no brackets).

<Ways of installation>

Wall mounting

Flush wall mounting

Direct mounting to control enclosure

3.1 

Wall mounting

3.1.1 

Parts to be used

To wall-mount the intelligent Touch Manager, use the following accessory mounting parts:


Wall mounting metal plate, 1 pc.


Round-head wood screw (

φ

4.1×25), 4 pcs.


P-tight screw (

φ

3×8), 1 pc. 


(Check that there are all accessories listed in section 1.1: see the accessories included 
with intelligent Touch Manager B.)

Summary of Contents for Intelligent Touch Manager DCM601A71

Page 1: ...intelligent Touch Manager Model DCM601A71 Installation Manual 3P291714 2B ...

Page 2: ...ful interference to radio or television reception which can be determined by turning the equipment off and on the user is encouraged to try to correct the interference by one or more of the following measures Reorient or relocate the receiving antenna Increase the separation between the equipment and receiver Connect the equipment into an outlet on a circuit different from that to which the receiv...

Page 3: ...ould result in death or serious injury CAUTION Indicates a potentially hazardous situation which if not avoided may result in minor or moderate injury It may also be used to alert against unsafe practices NOTE Indicates situations that may result in equipment or prop erty damage accidents only WARNING Only qualified personnel must carry out the installation work Consult your Daikin dealer regardin...

Page 4: ...ed c Near machinery emitting electromagnetic waves Electromagnetic waves may disturb the operation of the control system and cause the unit to malfunction d Where flammable gas may leak where there is carbon fiber or ignitable dust suspensions in the air or where volatile flammables such as thinner or gaso line are handled Operating the unit in such conditions can cause a fire e High temperature a...

Page 5: ... Wiring specifications 16 2 2 3 Precautions for using multiple centralized controllers 16 2 3 Connecting a LAN cable 17 2 3 1 Terminal location and schematic connection diagram 18 2 3 2 Wiring specifications 18 2 4 Connecting I O module 19 2 4 1 Terminal location and schematic connection diagram 19 2 4 2 Wiring specifications 19 2 4 3 Address setup 20 2 5 Connecting an emergency stop input device ...

Page 6: ...rs 32 4 3 Setting up locale 33 4 4 Setting time zone 33 4 5 Setting current time and daylight saving time 34 4 6 Confirming air conditioner auto registration results 34 4 7 Setting DIII NET address for each air conditioner 35 4 7 1 Names of buttons and display areas 35 4 7 2 Setting address with wired remote controller 36 4 7 3 Setting address with navigation remote controller 38 4 7 4 Setting an ...

Page 7: ...cluded If there is any missing or defective part contact your DAIKIN dealer where you purchased the product Accessories included with intelligent Touch Manager A B E D F C b 1 a 1 b 2 b 3 e 2 e 1 d 1 d 2 c 4 c 3 f 2 f 1 c 2 c 1 A a 1 intelligent Touch Manager body 1 pc B Wall mounting parts b 1 Round head wood screw φ4 1 25 4 pcs b 2 P tight screw φ3 8 1 pc b 3 Wall mounting metal plate 1 pc C Flu...

Page 8: ...anager English 1 2 Understanding external dimensions intelligent Touch Manager body 9 9 16 5 31 32 1 5 32 8 5 32 11 13 32 3 16 3 16 3 16 3 16 31 32 31 32 5 16 5 16 5 16 5 16 10 3 32 10 23 32 in Wall mounting metal plate 7 17 32 9 7 32 2 3 8 1 9 16 Thickness 1 32 in ...

Page 9: ... DCM601A71 intelligent Touch Manager 9 English Frame bracket 11 3 32 8 3 16 9 7 32 2 7 16 Φ1 17 32 9 1 2 8 27 32 9 32 8 13 16 in Thickness 1 16 Angle bracket 9 29 32 8 13 16 4 13 32 8 5 16 1 1 8 25 32 1 23 32 15 32 in Thickness 1 16 ...

Page 10: ...l block there is a blue resin cable mount for securing the power supply cable with the clamp B DIII The communication line connection terminals for DIII NET which enables communications with DAIKIN s air conditioning equipment C LINE PHONE The port used when subscribing to the DAIKIN Air Conditioning Network Service System online monitoring service for air conditioning systems To use the Air Condi...

Page 11: ...e current settings D DIII MASTER The switch for setting MASTER or SLAVE when there are multiple DIII NET centralized controllers such as intelligent Touch Manager E CPU ALIVE LED Green The LED that indicates that the CPU is operating nor mally The CPU is operating normally when this LED is blinking and malfunctioning when it is on or off It takes about 10 seconds for detection of the abnormality O...

Page 12: ...connect to this port from the front direction if there is not enough space on the side 1 3 4 Wiring of cables To flush mount the intelligent Touch Manager to the wall you need to route in advance the cables through the cable hole of the frame bracket The following pictorial wiring diagram example shows the state after connections to the intelligent Touch Manager rear face are completed Pictorial c...

Page 13: ...heck that the installation environment meets the following conditions The ambient temperature 32 to 104 F The ambient humidity 85 RH or less without condensation The electromagnetic wave does not affect the operation of the intelligent Touch Man ager 1 4 3 Required space The figure shown below indicates the space required for installation The following condi tions must be met Make sure that there ...

Page 14: ...nstalled on the circuit make sure that the circuit is securely interrupted Otherwise an electric shock may result After the wiring is completed double check that all wires are connected cor rectly before turning on the power supply All field supplied parts and materials electric works must conform to local codes All wiring must be performed by an authorized electrician 2 1 Removing wiring cover fr...

Page 15: ...the wires you are connecting to the F1 and F2 terminals are not power wires Inadvertently connecting power wires to these terminals results in a failure of the air conditioner or intelligent Touch Manager Conceptual connection diagram with air conditioning equipment N P N P N P N P N P N P N P N P N P N P A Outdoor unit B OUT OUT communication terminal C IN OUT communication terminal D Indoor unit...

Page 16: ...561 ft or less When using a shielded wire the total wiring length is limited to 4921 ft or less 2 2 3 Precautions for using multiple centralized controllers The centralized controller refers to the equipment e g the intelligent Touch Manager that controls multiple air conditioners Besides the intelligent Touch Manager the DAIKIN s product portfolio includes a wide range of centralized controllers ...

Page 17: ...oller Main 5 intelligent Touch Manager Sub iTM plus adaptor Sub 6 Central Remote Controller Sub 7 ON OFF Controller Main 8 ON OFF Controller Sub Priority Low Centralized controllers that cannot be connected to the same network as the intel ligent Touch Manager CALCULATE UNIT intelligent Processing Unit Parallel Interface intelligent Touch Controller DIII NET Plus Adapter Residential Central Remote...

Page 18: ...ations Applicable cable standard 100Base TX or 10Base T Connector standard RJ 45 SERVICE LAN socket and LAN SW switch NOTE When you connect the intelligent Touch Man ager to the LAN temporarily during installation or maintenance use the SERVICE LAN port located on the front face The SERVICE LAN port is enabled by chang ing the position of the LAN SW switch beside the SERVICE LAN to the FRONT posit...

Page 19: ...with high current lines such as a power cable 2 4 1 Terminal location and schematic connection diagram Schematic drawing of I O module connection MONITOR RS 485 The number of contacts per node is up to 120 The maximum number of nodes is 30 Fan Lighting Wattmeter Connect to the RS 485 terminals located on the rear face As the terminals have polarity be sure to connect the positive core wire to the ...

Page 20: ...peration during power off conditions Not doing so may cause an electric shock Do not clamp high current cables together with low current cables 2 5 1 Terminal location and schematic connection diagram Connect the contact input signal wire or pulse signal wire to Di1 Di2 Di3 Di4 or COM terminal on the orange connector on the rear face Each of these terminals has different function Di1 Emergency sto...

Page 21: ... the manual reset is specified for the resetting method you need to clear the emergency stop using the intelligent Touch Manager 2 6 Connecting iTM plus adaptors If you have many air conditioners use iTM plus adaptors to connect them It is a fact that the number of indoor groups you can control using a single intelligent Touch Manager is limited to 64 By using iTM plus adaptors you can add 64 indo...

Page 22: ...am A intelligent Touch Manager B iTM plus adaptor C plus ADP IF intelligent Touch Manager D plus ADP IF iTM plus adaptor E iTM plus adaptor on which termination resistor must be enabled For details refer to the iTM plus adaptor installation manual EM11A030 2 6 2 Wiring specifications Cable type CPEV or FCPEV cable Core thickness AWG 22 19 Cable length The overall cable length between the intellige...

Page 23: ...he operation during power off conditions Do not turn the power supply on until all connections are made Not doing so may cause an electric shock 2 7 1 Terminal location and schematic connection diagram Schematic power connection dia gram Connect the power supply to the three terminals L Live N Neutral and ground in the POWER sec tion A Earth B Earth leakage breaker C Power supply 24VAC 60 Hz ...

Page 24: ...f the earth leakage breaker turns on off the power supply to the intelligent Touch Manager When using an earth leakage breaker make sure to select one useful for to protection against overcurrent and short circuit When using an earth leakage breaker only for earth device make sure to use a wiring interrupter together The power supply requires earth leakage breaker installation and earth wire conne...

Page 25: ...e bracket and angle brackets Direct mounting to control enclosure Fix the intelligent Touch Manager directly to the control enclosure using screws only with no brackets Ways of installation Wall mounting Flush wall mounting Direct mounting to control enclosure 3 1 Wall mounting 3 1 1 Parts to be used To wall mount the intelligent Touch Manager use the following accessory mounting parts Wall mounti...

Page 26: ...s to fix the plate we recommend you to use ones closer to the edge in order to prevent wobbling Secure the round head wood screws at four points Wall mounting installation MONI TO R B A D C C C C NOTE How to use the P tight screw Screw in from the bottom of the intelligent Touch Manager Remove the rear cover before starting installation B E D A Wall B P tight screw C Round head wood screw D Wall m...

Page 27: ...heck that there are all accessories listed in section 1 1 see the accessories included with intelligent Touch Manager C 3 2 2 Wall opening dimensions Use the following dimensional drawing to provide a sufficient opening NOTE The supplied paper template helps you mark the dimensions of the required wall opening Use the supplied paper template Flush wall mounting Wall opening dimensions for flush wa...

Page 28: ...cted to the rear face of the intelligent Touch Manager through the cable hole provided at the bottom of the frame bracket Install the rear face terminal cover while the intelligent Touch Manager is removed Securing frame bracket and angle brackets B B B B A D C A Wall B Flat head screw C Frame bracket D Angle bracket NOTE When securing the frame bracket be careful not to drop the angle brackets in...

Page 29: ...telligent Touch Manager into the frame bracket attached to the wall and fix the intelligent Touch Manager to the frame bracket using four screw holes around the monitor screen and the pan head screws Installing intelligent Touch Manager body A A A A A Pan head screw 4 Attach the front panel of the intelligent Touch Manager back to its original position ...

Page 30: ...direct mounting to control enclosure 10 1 8 8 5 32 10 23 32 2 3 8 3 5 8 4 in E D A B C A Control enclosure face plate B Control enclosure bottom board C intelligent Touch Manager D 31 32 in min E Opening 3 3 3 Installation procedure 1 Remove the front panel of the intelligent Touch Manager referring to Removing front panel in section 3 2 3 Installation procedure This frame is snapped into the edge...

Page 31: ...B Nut CAUTION If the intelligent Touch Manager is directly mounted to the control enclosure you will be exposed to the power line connection terminals when opening the control enclosure door Touching electrical junctions by hand may result in an electric shock Attach the terminal cover to the rear face for your safety A B C A Terminal cover B Control enclosure C intelligent Touch Manager ...

Page 32: ...f the power supply is left off for a long period of time six months or more turn OFF the BACKUP switch 4 2 Turning on power supply for intelligent Touch Manager and air conditioners Turn on the power supply for the intelligent Touch Manager and devices that are con nected to the intelligent Touch Manager 1 First turn on the power supply for the air conditioners and then for intelligent Touch Manag...

Page 33: ...enheit Select the temperature display unit Celsius or Fahrenheit Decimal point CSV separate Select the marks used as the decimal point and CSV separator For details refer to the User s Manual EM11A017 Icon Color Select the icon color 2 When setup is done touch OK The Time Zone Settings screen appears 4 4 Setting time zone Set up the local standard time zone you want to use for the system clock Tim...

Page 34: ...ration results On the A C Auto Register screen the message Below connected A C units are found Do you want to register into Management Points Reboot after registering appears 1 Check that the number of all air conditioners that are set in section 4 7 Setting DIII NET address for each air conditioner is correctly displayed If you see any problem touch the Refresh button to reload the up to data inf...

Page 35: ... as examples NOTE For how to set the address for the Ventilator Heat Reclaim Ventilator or different adapt ers such as a universal adapter refer to the manuals supplied with those devices 4 7 1 Names of buttons and display areas The followings are the names of buttons and display areas of the wired remote controller Wired Remote Controller A Address display area B Parameter number display area C P...

Page 36: ...roller display Using the Temperature Setting buttons change the value shown in the parameter num ber display area to 00 In the address display area the current address setting is displayed This area will show if no address is set Step 2 SETTING GROUP NOTE The parameter number cannot be changed to 00 when the intelligent Touch Manager is not powered on Power on the intelligent Touch Manager and wai...

Page 37: ...s select the address you want to set Step 4 SETTING GROUP 5 Press the SCHEDULE button to make the GROUP indicator stay lit The DIII NET address has been set Step 5 SETTING GROUP 6 Press the Inspection Test Operation button You are now brought back to the screen shown in Step 6 2 Step 6 1 SETTING GROUP Step 6 2 HH F ...

Page 38: ...d Fan ON Setting Service Settings Error History Outdoor Unit Status Indoor Unit Status 2 3 NOTE The Group Address menu is not displayed when the intelligent Touch Manager is not powered on Power on the intelligent Touch Manager and wait for a while before trying to operate the remote controller The Group Address menu is not displayed also when the intelligent Touch Manager is not communicating wit...

Page 39: ...Release Group Address Group 7 Press the Cancel button three times You are now brought back to the screen shown in Step 7 2 Step 7 1 Gr Addr Set 1 03 Release Group Address Group Step 7 2 Cool Room Thu 82 86 F Set to 35P 5 F 4 7 4 Setting an unique address to each unit when Power Proportional Dis tribution option is used When power distribution is enabled you need to set a unique address for each un...

Page 40: ...ist format A List Icon A C C B A Touch the List button B The screen changes to the list view where selecting Indoor in the Type combo box causes the name operation mode setpoint and fan speed of all areas and indoor units to be listed C Touch the Icon button to return the Icon view screen 5 2 Displaying areas and management points Down Up A B B C C A The level of the current area and management po...

Page 41: ...ng an area or management point A On A B B A Select the area or management point you want to start or stop B Select Start or Stop in the On Off buttons When operation is started the icon color changes to green or red depending on the system setting When operation is stopped the color changes to grey ...

Page 42: ......

Page 43: ......

Page 44: ...3P291714 2B EM11A018A 1306 HT ...

Reviews: