


46
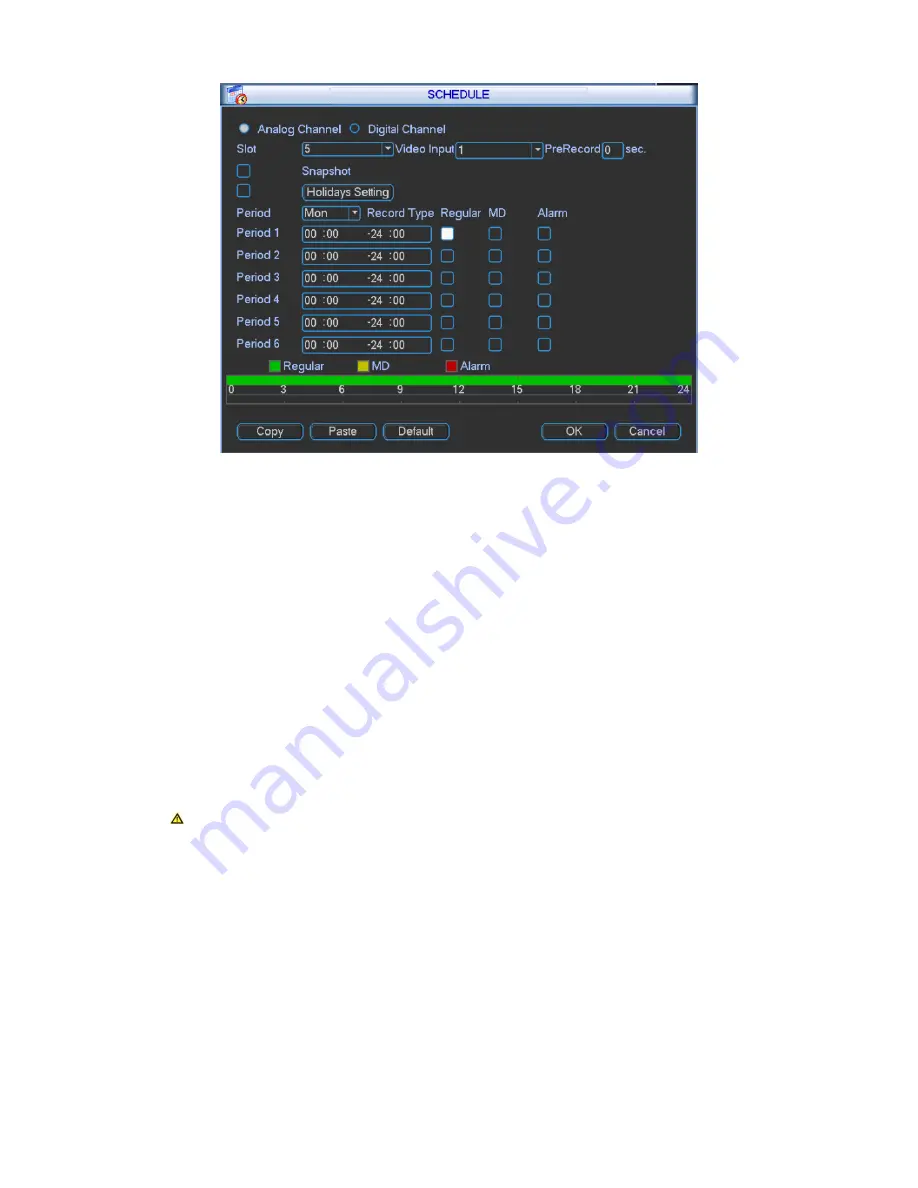
Figure 3- 36
Analog channel: Please select the channel number first.
Slot: Please select the slot
l number first. You can select “all” if you want to set for the whole
slots.
Video input: Please select the channel number first. You can select “all” if you want to set for
the whole channels.
Snapshot: Enable it by checking
and then you may schedule snapshot. It snapshots 1/s
by default. You can modify it in encode setup.
Holidays: Enable it by checking
. You may set vacation mode up to one month.
Period: You may set period for general recording as video recording is operating within this
time period. You may set by day of week while each day has setting in six periods. You can
select “all” if you want to set all days at once.
Pre-record: System can pre-record the video before the event occurs into the file. The value
ranges from 0 to 30 seconds depending on the bit stream.
Note: Pre-record time depends on its bit stream as pre-record time may not be
reached in case of large bit stream.
Record types: There are three types: regular, motion detect (MD) and alarm.
At the bottom of the menu, there are color bars for your reference. Green col or stands for
regular recording; yellow color stands for motion detect.
Note: Settings in analog and digital channels are similar.
Summary of Contents for VEC0404HD-M70
Page 1: ...Video Matrix Platform User s Manual V 1 0 0 Dahua Technology CO LTD ...
Page 29: ...24 Figure 3 9 Switch to input device list Please see Figure 3 9 ...
Page 32: ...27 Figure 3 12 Step 2 Click add You will see Figure 3 13 Figure 3 13 ...
Page 65: ...60 Figure 3 54 Buzzer Buzzer rings when motion detection alarms 3 2 4 6 2 Video Loss ...
Page 69: ...64 Display is shown below as in Figure 3 59 Figure 3 60 and Figure 3 61 Figure 3 59 ...
Page 70: ...65 Figure 3 60 ...
Page 83: ...78 Figure 3 80 Click Add to add new Raid Select corresponding level Figure 3 81 ...
Page 91: ...86 Figure 4 7 Hide PTZ Console ...
Page 101: ...96 Figure 4 23 4 2 2 5 Sub Card Status View sub card fan and power status ...
Page 102: ...97 Figure 4 24 4 2 3 System Config 4 2 3 1 General ...
Page 110: ...105 Figure 4 33 4 2 3 8 NTP ...
Page 122: ...117 Figure 4 45 ...
Page 131: ...126 Figure 4 56 Group setting is as follows please see Figure 4 57 and Figure 4 58 ...
Page 137: ...132 Figure 4 65 ...
Page 140: ...135 Figure 4 69 4 2 4 7 Snapshot ...
Page 143: ...138 Figure 4 72 Figure 4 73 ...
Page 149: ...144 Figure 4 82 Step 4 Click Add See Figure 4 83 Figure 4 83 ...


