10
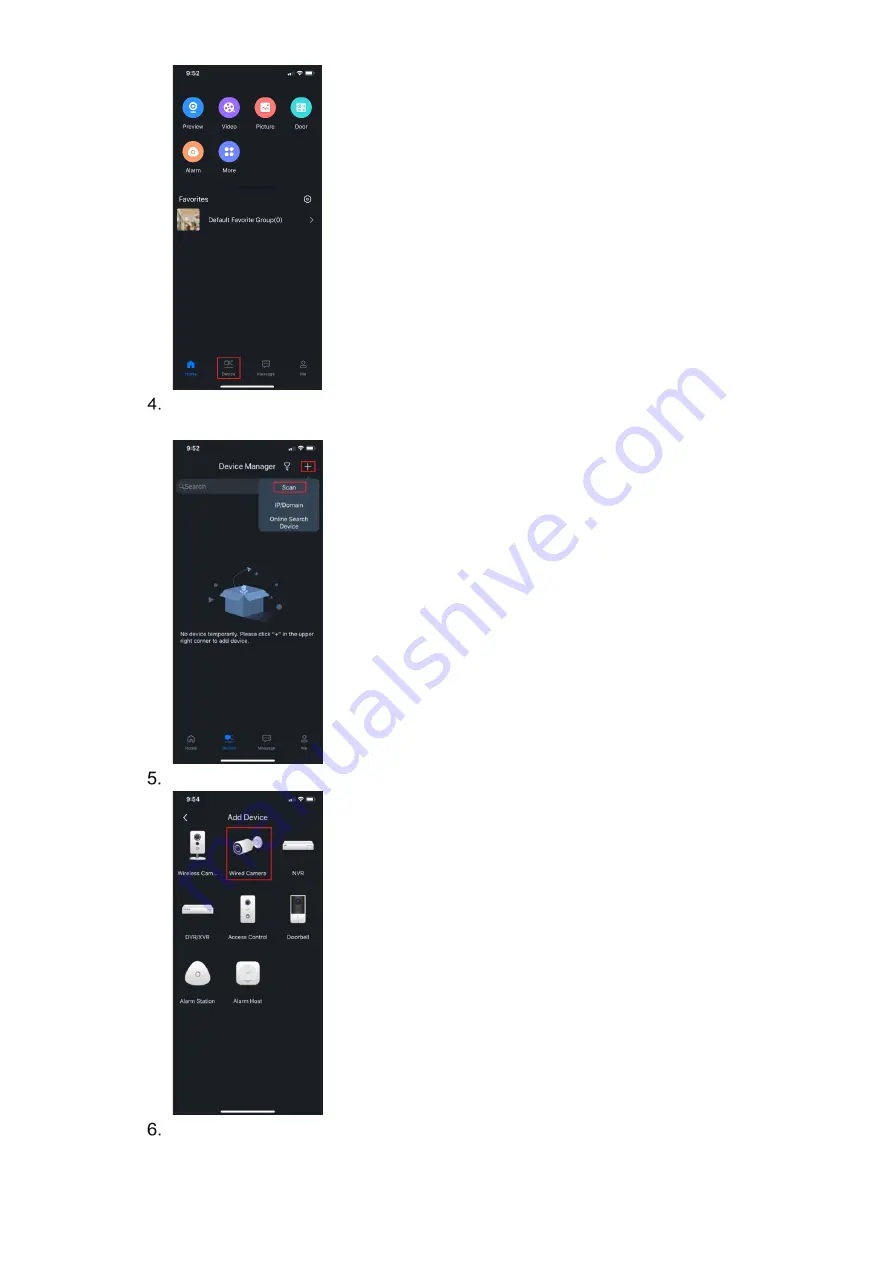
Tap the “+” icon at the upper-left corner of the screen and then tap SN/Scan to add the
device.
Select Wired Camera.
Scan the QR code on the the back or bottom of the device. If the QR code does not work,
tap Manually enter SN.
Page 1: ...N42BJ62 4MP Fixed Network Eyeball Camera Quick Installation Guide V1 0 1 Dahua Technology USA Inc...
Page 2: ...damage data loss lower performance or unpredictable result NOTE Provides additional information as the emphasis and supplement to the text Revision History No Version Revision Content Release Time 1...
Page 3: ...enance inconsistent with the information in this guide All the designs and software are subject to change without prior written notice The product updates may cause some differences between the actual...
Page 4: ...arantee that interference will not occur in a particular installation If this equipment does cause harmful interference to radio or television reception which can be determined by turning the equipmen...
Page 5: ...accordance with applicable local codes All installation and operation must conform to your local electrical safety codes Do not overload outlets and extension cords which may cause fire or electrical...
Page 6: ...ny fire or electrical shock caused by improper handling or installation Application Environment Requirements Please use the device within the allowed humidity 95 RH and altitude 3000m Transport use an...
Page 7: ...amage the surface coating or reduce the working performance of the unit Do not touch or wipe a dome cover during installation this cover is an optical device Refer to the following methods clean the d...
Page 8: ...count name or the account name in reverse order Do not use sequential characters such as 123 abc etc Do not use repeated characters such as 111 aaa etc Change Default HTTP and TCP Ports Change default...
Page 9: ...o perform their job Disable Unnecessary Services and Choose Secure Modes Turn off specific services such as SNMP SMTP and UPnP to reduce network compromise from unused services It is recommended to us...
Page 10: ...d IP Camera Network Ensure that the network for the NVR and IP cameras should not be the same network as a public computer network Separate networks prevent unauthorized users accessing the same netwo...
Page 11: ...Installing the Camera 3 Preparing for Installation 3 Unpacking 3 Installing an SD Card 4 Using the Waterproof Ethernet Connector 4 Mounting the Camera 5 2 5 1 Mounting to a Wall Cables through Surface...
Page 12: ...The cameras feature Smart H 265 video compression reducing bandwidth and storage requirements without sacrificing video quality The camera s elegant blend of aesthetics combined with a range of easy m...
Page 13: ...f Port Name Connector Description 1 Network Port RJ 45 Connect to standard Ethernet cable Note Certain devices support Power over Ethernet Check the specific device to determine if the device accepts...
Page 14: ...ies Branch circuit protection incorporating a 20 A 2 pole Listed Circuit Breaker or Branch Rated Fuses are required as part of the building installation A readily accessible 2 pole disconnect device w...
Page 15: ...to the slot until it clicks in place Replace the panel Press the Reset button for 10 seconds to reset the device Using the Waterproof Ethernet Connector Attach the waterproof network connector if the...
Page 16: ...re package from the box Apply the mounting template to the installation medium Pre drill the three 3 perimeter holes for the expansion bolts using a drill bit that is no wider than the expansion bolt...
Page 17: ...6 2 5 1 Mounting to a Wall Cables through Surface...
Page 18: ...7 2 5 2 Mounting to a Wall Cables through Camera Base Conduit 2 5 3 Adjusting the Lens Angle...
Page 19: ...lowing figures and interfaces are for reference only and the actual product shall prevail Initializing the Device Double click the ConfigTool Icon on a PC to open the tool Click the IP Icon Click Sear...
Page 20: ...segment Ensure the username and password are the same as set during the device initialization Select the devices whose IP addresses need to be modified and then click Modify IP Select Static mode and...
Page 21: ...icon at the upper left corner of the screen and then tap SN Scan to add the device Select Wired Camera Scan the QR code on the the back or bottom of the device If the QR code does not work tap Manuall...
Page 22: ...11 Input the device for easy identification It s required to input the password for the added device then select the save icon located on the top right corner...
Page 23: ...CA 92618 Tel 949 679 7777 Fax 949 679 5760 Support 877 606 1590 Sales sales usa dahuatech com Support support usa dahuatech com 2020 Dahua Technology USA All rights reserved Design and specifications...