background image

Basic  Operations    28 


The 29-inch and 37-inch devices do not support the face attendance function. 

Preparation 


Your camera can do the face detection and face comparison and its face database is 
ready. 


You Signage, your camera and the DSS (or PSS, or IVSS) have been connected to each 
other. 


When you choose to connect your camera to the Signage by DSS or PSS, you need to 
operate DSS or PSS to give out a registration code to your Signage to achieve the 
connection between the DSS or PSS and your Signage. 

Procedure 

  In the main menu, select 

Local Release > Special

Step 1

The

 Special

 interface is displayed. 

  Click 

Face Attendance

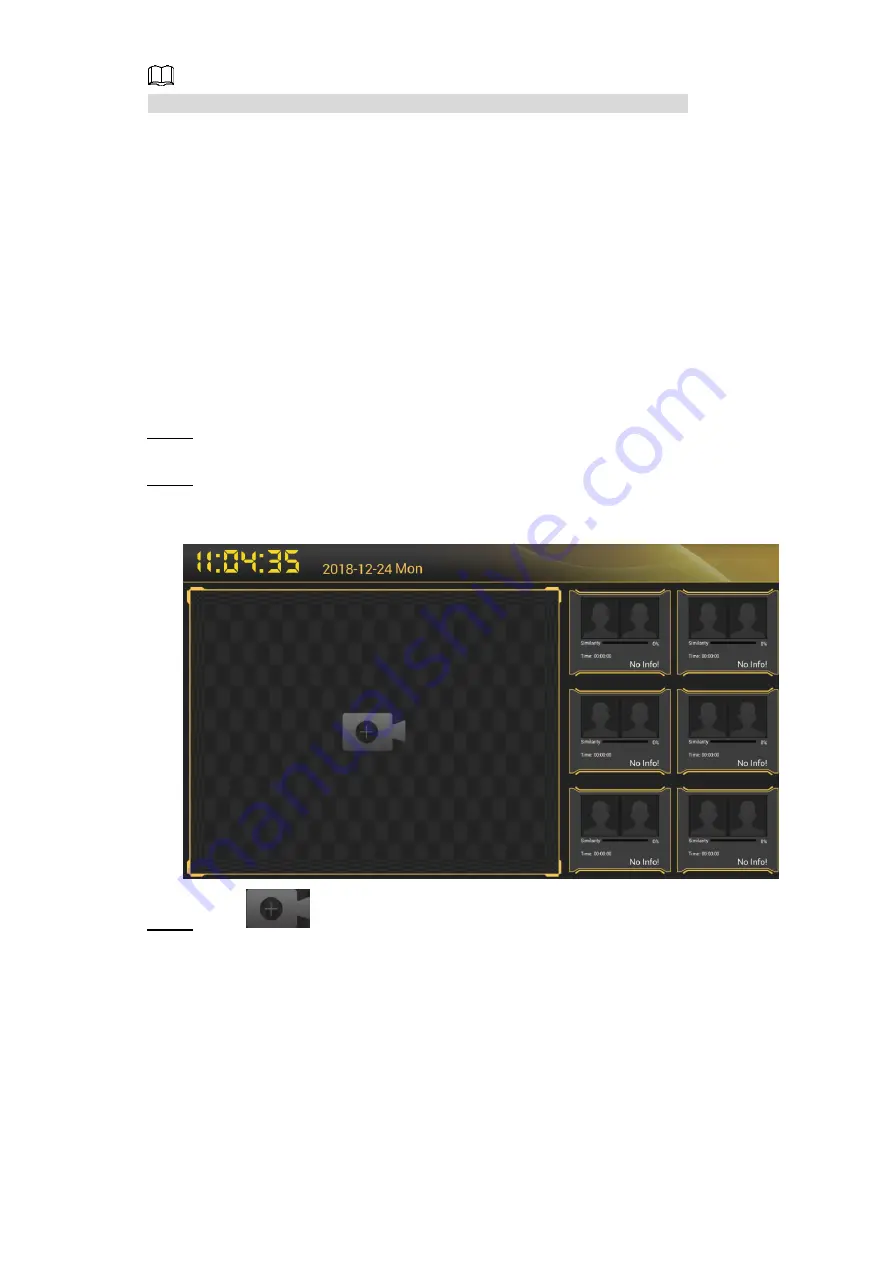
, and the face attendance template is displayed. See Figure 

Step 2

4-13. 

 Configuring face attendance template 

Figure 4-13


  Click 

Step 3

The 

Add


Device

 interface is displayed. See Figure 4-14. 

Summary of Contents for LDH SAI200 Series

Page 1: ...Digital Signage Quick Start Guide V1 0 0 ...

Page 2: ... we recommend keeping NVR DVR and IP camera firmware up to date to ensure the system is current with the latest security patches and fixes Nice to have recommendations to improve your network security 1 Change Passwords Regularly Regularly change the credentials to your devices to help ensure that only authorized users are able to access the system 2 Check the Log If you suspect that someone has g...

Page 3: ... Indicates a potential risk which if not avoided could result in property damage data loss lower performance or unpredictable result TIPS Provides methods to help you solve a problem or save you time NOTE Provides additional information as the emphasis and supplement to the text Revision History No Version Revision Content Release Time 1 V1 0 0 First Release December 24 2018 Privacy Protection Not...

Page 4: ...r written notice The product updates might cause some differences between the actual product and the Manual Please contact the customer service for the latest program and supplementary documentation There still might be deviation in technical data functions and operations description or errors in print If there is any doubt or dispute please refer to our final explanation Upgrade the reader softwa...

Page 5: ... guide may cause harmful interference to radio communication For class A device these limits are designed to provide reasonable protection against harmful interference in a commercial environment Operation of this equipment in a residential area is likely to cause harmful interference in which case the user will be required to correct the interference at his own expense For class B device these li...

Page 6: ...he Device Make sure the device is in good ventilation condition Do not block the air vents of the device Operate the device within the rated range of power input and output Do not dismantle the device Use the device within the limited temperature and humidity range Temperature ranges from 10 C to 55 C Electrical Safety Improper battery use might result in fire explosion or inflammation When replac...

Page 7: ...1 Appearance 4 2 2 2 Ports 5 2 2 3 Dimensions 6 32 inch 6 2 3 2 3 1 Appearance 6 2 3 2 Ports 7 2 3 3 Dimensions 8 37 inch 8 2 4 2 4 1 Appearance 8 2 4 2 Ports 9 2 4 3 Dimensions 10 43 inch 10 2 5 2 5 1 Appearance 10 2 5 2 Ports 11 2 5 3 Dimensions 12 49 inch 12 2 6 2 6 1 Appearance 12 2 6 2 Ports 13 2 6 3 Dimensions 14 55 inch 14 2 7 2 7 1 Appearance 14 2 7 2 Ports 15 2 7 3 Dimensions 16 3 Install...

Page 8: ...Installing an App 32 4 7 2 Operating File Manager 32 Viewing Terminal Information 32 4 8 5 Configuring System Settings 34 Configuring Visual Audio Parameters 34 5 1 Selecting Input Source 35 5 2 Selecting System Language 35 5 3 6 System Maintenance 36 Maintenance Requirements 36 6 1 Modifying Password 36 6 2 Rebooting Your Signage 36 6 3 Configuring Auto Reboot Time 37 6 4 Upgrading System 37 6 5 ...

Page 9: ...nage or send programs to it Supports release of information imported from the USB drive Acts as a hotspot for other devices after connected to network by Ethernet Wi Fi 4G or VPN The main media formats such as MP3 MP4 can all be played in this Signage Picture video and scroll text can be displayed in a full screen split screens You can set loop timer insert cut and gasket in the platform connected...

Page 10: ...s Figure 2 1 Table 2 1 Appearance description No Name Description 1 Wi Fi antenna Receives Wi Fi signals and connect the Signage to the network in a wireless way 2 TFT LCD display Releases information 3 Signal indicator of remote control Receives signals from remote control 4 Light sensor indicator Adjusts screen brightness automatically according to the environment lighting condition 5 Power inpu...

Page 11: ...drive or mouse SD card slot Supports maximum 256G expansion storage space Reset hole Use this button to reinstall the Signage s Android operating system when the system crushes or you cannot boot up the Signage 1 Contact the after sales to get and uncompress the upgrade files Save files such as bootargs bin fastboot bin recovery img and update zip under the USB drive s root directory Insert the US...

Page 12: ...29 inches Figure 2 4 No Name Description 1 TFT LCD display Releases information 2 Wi Fi antenna Receives Wi Fi signals and connect the Signage to the network in a wireless way 3 Ports See 2 2 2 Ports for details 4 Power switch Connect or disconnect the Signage to from power source 5 Power input port Inputs 220V AC power ...

Page 13: ...ive s root directory Insert the USB drive into the Signage s USB2 0 port 2 In the reset hole hold the button with a needle like thing 3 Power your Signage After 3nds loosen the button and an interface guiding you to reinstall the Android operating system is displayed 4 Follow the guides SD card slot Supports maximum 256G expansion storage space Ethernet port Connects to the Ethernet cable USB port...

Page 14: ... inch Figure 2 6 32 inch 2 3 2 3 1 Appearance Appearance 32 inches Figure 2 7 Table 2 4 Appearance description No Name Description 1 Wi Fi antenna Receives Wi Fi signals and connect the Signage to the network in a wireless way 2 TFT LCD display Releases information ...

Page 15: ...Ports description Icon Name Description Serial port Use this port for transparent pass through or IP configuration USB port Connects to USB drive or mouse SD card slot Supports maximum 256G expansion storage space Reset hole Use this button to reinstall the Signage s Android operating system when the system runs terrible or you cannot boot up the Signage 1 Contact the after sales to get and uncomp...

Page 16: ...2 10 Table 2 6 Appearance description No Name Description 1 TFT LCD display Releases information 2 Wi Fi antenna Receives Wi Fi signals and connect the Signage to the network in a wireless way 3 Ports See 2 4 2 Ports for details 4 Power switch Connect or disconnect the Signage to from power source 5 Power input port Inputs 220V AC power ...

Page 17: ...ive s root directory Insert the USB driver into the Signage s USB2 0 port 2 In the reset hole hold the button with a needle like thing 3 Power your Signage After 3nds loosen the button and an interface guiding you to reinstall the Android operating system is displayed 4 Follow the guides SD card slot Supports maximum 256G expansion storage space Ethernet port Connects to the Ethernet cable USB por...

Page 18: ... 13 Table 2 8 Appearance description No Name Description 1 TFT LCD display Releases information 2 Wi Fi antenna Receives Wi Fi signals and connects the Signage to the network in a wireless way 3 Light sensor indicator Adjusts screen brightness automatically according to the environment lighting condition 4 Ports See 2 5 2 Ports for details ...

Page 19: ...s such as bootargs bin fastboot bin recovery img and update zip under the USB drive s root directory Insert the USB driver into the Signage s USB2 0 port 2 In the reset hole hold the button with a needle like thing 3 Power your Signage After 3 seconds loosen the button and an interface guiding you to reinstall the Android operating system is displayed 4 Follow the guides SD card slot Supports maxi...

Page 20: ... inches mm inch Figure 2 15 49 inch 2 6 2 6 1 Appearance Appearance 49 inches Figure 2 16 Table 2 10 Appearance description No Name Description 1 TFT LCD display Releases information 2 Signal indicator of remote control Receives signals from remote control ...

Page 21: ...ge 1 Contact the after sales to get and uncompress the upgrade files Save files such as bootargs bin fastboot bin recovery img and update zip under the USB drive s root directory Insert the USB driver into the Signage s USB2 0 port 2 In the reset hole hold the button with a needle like thing 3 Power your Signage After 3nds loosen the button and an interface guiding you to reinstall the Android ope...

Page 22: ...rts 14 2 6 3 Dimensions Dimensions 49 inches mm inch Figure 2 18 55 inch 2 7 2 7 1 Appearance Appearance 55 inches Figure 2 19 Table 2 12 Appearance description No Name Description 1 TFT LCD display Releases information ...

Page 23: ... or you cannot boot up the Signage 1 Contact the after sales to get and uncompress the upgrade files Save files such as bootargs bin fastboot bin recovery img and update zip under the USB drive s root directory Insert the USB driver into the Signage s USB2 0 port 2 In the reset hole hold the button with a needle like thing 3 Power your Signage After 3nds loosen the button and an interface guiding ...

Page 24: ...Appearance and Ports 16 2 7 3 Dimensions Dimensions 55 inches mm inch Figure 2 21 ...

Page 25: ...nnection Contact the after sale service staff immediately if these cables or lines are loose Installation 3 2 The following figures are for reference only and the actual product shall prevail We suggest that the height from the Signage to the ground should be 1 5m 2m The final installation height depends on your installation environment The installation surface is required to sustain at least 3 ti...

Page 26: ... Component 1 Mounting surface 3 Wall mount plate 2 Expansion pipe 4 Self tapping screw Fix the wall mount bracket into the installation holes of the Signage with four M5 Step 2 screws spring washers and flat gaskets included in the accessory bag Fixing bracket Figure 3 2 Table 3 2 Components description 2 ...

Page 27: ...l mount bracket 3 Device 2 M5 screws spring washers and flat gaskets included Hang the wall mount bracket onto the wall mount board Step 3 Installing Signage Figure 3 3 Fix position of the Signage with two M4 screws Step 4 Fixing Signage Figure 3 4 ...

Page 28: ...ue and less interference to ensure the device works stably and prolong its service life To boot up the Signage Plug the power line into a socket To shut down Unplug the line Initializing Signage 4 2 When you are opening the Signage for the first time or you have allowed your system to be restored the factory settings you need to initialize the Signage Only after that can you operate and configure ...

Page 29: ...lly You need to type your password to unlock the system Click any position on the screen Step 1 The Login interface is displayed See Figure 4 3 The login interface Figure 4 3 Type your password Step 2 Click Save Step 3 The main menu or the interface before the system is locked is displayed Operating Quick Tool Bar 4 4 Move your pointer to the bottom of any an interface to display the quick tool ba...

Page 30: ...me zone based on where the device lies In the main menu select Settings Date Time Step 1 The Date Time interface is displayed See Figure 4 5 The date time interface Figure 4 5 Set date time and time zone You can also enable the 24 hour display format here Step 2 Your settings will take effect at once Displaying Programs 4 6 Connect the Signage to the platform and then you use the platform to send ...

Page 31: ...Network Setting interface is displayed See Figure 4 7 The network setting interface Figure 4 7 Select and configure the network type you want to use See Table 4 3 for details Step 2 Table 4 3 Network types description Network Type Description Ethernet Connect your Signage to network by Ethernet and there are two kinds of methods for you to give an IP to your Signage DHCP When there is a DHCP serve...

Page 32: ...ng Whitelist Configure the IP that are allowed to access the Signage and only IP addresses in the whitelist can access the Signage This is to enhance data security In main menu click Settings Network Setting Whitelist Step 1 The Whitelist interface is displayed Click to enable whitelist and make it take effect officially Step 2 Add an IP address to your whitelist Step 3 1 Click The Add Whitelist i...

Page 33: ... The platform address interface Figure 4 9 Type the platform s IP address or domain name Step 2 Click OK Step 3 Receive programs from the platform Step 4 4 6 2 Displaying Programs from USB Drive 4 6 2 1 Releasing Programs by General Templates 4 6 2 1 1 Quick Play Use the given templates to quickly release information Preparation You have inserted your USB into the Signage You need to previously pr...

Page 34: ...ne your own templates to release information In the main menu select Local Release General Customized Play Step 1 The Customized Play interface is displayed See Figure 4 11 The customized play interface Figure 4 11 Click a template you want to define Step 2 The template s interface ready for configuration is displayed Define the template Step 3 1 Click a to configure this region s display sequence...

Page 35: ... upper right corner of the current Step 4 interface Click Preview to preview your template Click Save to save your template You can view and use the template in Local Release My Program then Click Publish to play your template immediately 4 6 2 2 Releasing Programs by Special Use Templates There are six special use templates including Face Attendance Catering Life Special Offer Promotion Brand Pub...

Page 36: ...o connect your camera to the Signage by DSS or PSS you need to operate DSS or PSS to give out a registration code to your Signage to achieve the connection between the DSS or PSS and your Signage Procedure In the main menu select Local Release Special Step 1 The Special interface is displayed Click Face Attendance and the face attendance template is displayed See Figure Step 2 4 13 Configuring fac...

Page 37: ...ssword Port Port number when you log in your camera or the platform Channel You need to configure this parameter only when you select IPC or IVSS as the Protocol When you select IPC as the Protocol you directly connect only one IPC to the device Fill 1 in the Channel box When you select IVSS as the Protocol to determine the channel number you want 1 Type http XXX cgi bin LogicDeviceManager cgi act...

Page 38: ...lete a camera shooting window 4 6 2 2 2 Configuring Other Five Templates The other five templates are similar in configuration and Supermarket Hotel template is taken as an example In the main menu select Local Release Custom Step 1 The Custom interface is displayed Click a template you want to define Step 2 The template s interface ready for configuration is displayed Configure the template Step ...

Page 39: ... play your template immediately 4 6 2 3 Managing My Program In main menu select Local Release My Program and the My Program interface is displayed See Figure 4 16 You can view the programs that have been played and the templates you have saved You can also Click an item to start playing Click and select one or several items to delete Click and click Select All to delete all items The my program in...

Page 40: ... and view the app you have installed in App Center 4 7 2 Operating File Manager View and operate files In main menu select App Manager App Center Step 1 The App Center interface is displayed Click File Manager Step 2 The File Manager interface is displayed Select a storage path for example Internal Storage Step 3 Files in different classifications are displayed See Figure 4 19 Click a file classif...

Page 41: ...Basic Operations 33 The terminal info interface Figure 4 20 ...

Page 42: ...djust its value It s set by default that the auto adjustment of background brightness is enabled and the background brightness will be adjusted according to the surrounding lighting condition You can drag the brightness bar to adjust the background brightness manually and the auto adjustment of background brightness is disabled in the meanwhile 2 Click OK to finish configuration Output Resolution ...

Page 43: ...ace is displayed See Figure 5 2 The input source setting interface Figure 5 2 Select from local and HDMI Step 2 If there is no HDMI input source your PC for example but you still select HDMI the screen will turn blank for certain time and exits the blank interface automatically After you select from Local and HDMI the configuration takes effect immediately Selecting System Language 5 3 In the main...

Page 44: ...n main menu select Settings Password Setting Step 1 The password setting interface is displayed See Figure 6 1 The password setting interface Figure 6 1 Type old password new password Then type your new password again to confirm it Step 2 Click Save Step 3 Rebooting Your Signage 6 3 Manually reboot your device to handle problems such as system non fluency In main menu select Settings Maintenance a...

Page 45: ...nterface is displayed See Figure 6 3 The auto maintenance time setting interface Figure 6 3 Drag your mouse up and down to select a time Click any position out of the Auto Step 3 Maintenance Time Setting interface to finish configuration Upgrading System 6 5 Preparation Insert an USB with the upgrade package into your device Contact our customer service center to get an upgrade package Procedure I...

Page 46: ... problems such as storage insufficiency and system error Be cautious because this may cause data lose In main menu select Settings Maintenance and Upgrade Step 1 The Maintenance and Upgrade interface is displayed Click Restore Factory Defaults Step 2 The Restore Factory Defaults interface is displayed See Figure 6 5 The restore factory defaults interface Figure 6 5 Click Confirm to begin this oper...

Page 47: ...dels you can use remote controls to operate them There are two kinds of remote controls Refer to one of them according to the remote control you have received See Appendix figure 1 1 Appendix figure 1 2 and Appendix table 1 1 Appendix figure 1 1 Remote control appearance 1 ...

Page 48: ...ghtness up Press Fn and press 2 Background brightness down Press Fn and press 5 Typing password to log 1 When you find the screen is locked you can use your remote control to type the password Press Enter on your remote control The Login interface is displayed 2 Operate arrow keys and move pointer to password box and type password 3 Move pointer to Done on virtual keyboard 4 Move pointer to OK and...

Reviews: