1
1 Overview
1.1 Appearance
Figure 1-1 ITC439-PW1H-Z
Figure 1-2 ITC439-PW1H-Z1050
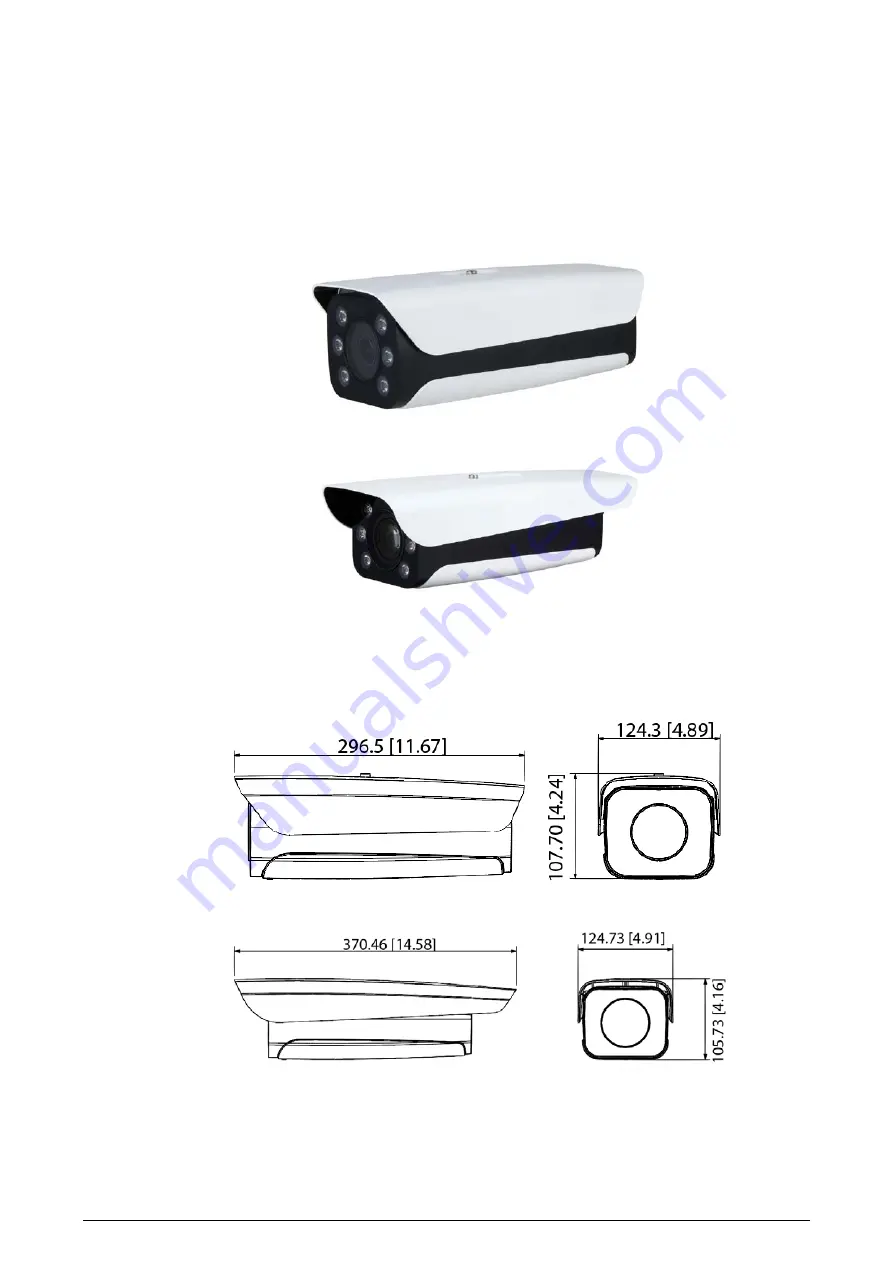
1.2 Dimensions
Figure 1-3 ITC439-PW1H-Z (mm [inch])
Figure 1-4 ITC439-PW1H-Z1050 (mm [inch])
1.3 Structure
Page 1: ...Outdoor Parking Space Detector Quick Start Guide V1 0 0...
Page 2: ...ve time Provides additional information as a supplement to the text Revision History Version Revision Content Release Time V1 0 0 First release January 2022 Privacy Protection Notice As the device use...
Page 3: ...atest program and supplementary documentation There might be errors in the print or deviations in the description of the functions operations and technical data If there is any doubt or dispute we res...
Page 4: ...d safety belts Do not place the device in a place exposed to sunlight or near heat sources Keep the device away from dampness dust and soot Put the device in a well ventilated place and do not block i...
Page 5: ...nce Make sure that the power supply of the device is connected to a power socket with protective earthing The device must be used with the protective cover for outdoor scenarios to avoid the risk of w...
Page 6: ...1 4 Cables 2 2 Installation 4 2 1 Installation Requirements 4 2 2 Installing the Camera 4 3 Camera Configurations 6 3 1 Initialization 6 3 2 Changing IP Address 6 3 3 Login 7 3 4 Parking Space Config...
Page 7: ...1 1 Overview 1 1 Appearance Figure 1 1 ITC439 PW1H Z Figure 1 2 ITC439 PW1H Z1050 1 2 Dimensions Figure 1 3 ITC439 PW1H Z mm inch Figure 1 4 ITC439 PW1H Z1050 mm inch 1 3 Structure...
Page 8: ...2 Figure 1 5 Structure Figure 1 6 Rear panel 1 4 Cables Figure 1 7 External cables...
Page 9: ...d pink ALARM_NO2 Light green ALARM_COM2 Red ALARM_NO3 Black ALARM_COM3 Alarm input Blue ALARM_IN1 White ALARM_IN2 Yellow ALARM_IN3 5 24 VAC Inputs 24 VAC power supply Make sure to supply power to the...
Page 10: ...is blocked by other vehicles make sure the blockage is less than 40 The Camera can only recognize small vehicles Large vehicles such as a truck might not be recognized The recognition is ensured only...
Page 11: ...cket Step 1 Use M6 14 screws to fix the universal joint on the bracket Step 2 Use two 1 4 20 14UNC screws to fix the camera on the universal bracket Figure 2 4 Universal bracket installation Step 3 Ad...
Page 12: ...ep 2 Open browser enter the IP address of the Camera in the address bar and then press the Enter key Figure 3 1 Device Initialization Step 3 Enter and confirm the password The password must consist of...
Page 13: ...rd and then click Login Step 3 For first time login click Please click here to download and install the plug in and then install the plug in according to system prompt Before installing the plug in ma...
Page 14: ...e Spaces Set a parking zone and divide parking areas inside the zone so the Camera can monitor parking spaces in each area and output available spaces in real time Step 1 Select Setting ITC Park Space...
Page 15: ...ured parking area 1 Click on the video image draw a parking area according to the actual site and then right click to finish 2 On the left side set the parking region name the number of vehicles that...
Page 16: ...pages might vary depending on the device model Figure 4 1 Upgrade Step 3 Click Import to select the update file and then click Upgrade to update the system Do not disconnect the power or network or r...
Page 17: ...room and cabinet and implement well done access control permission and key management to prevent unauthorized personnel from carrying out physical contacts such as damaging hardware unauthorized conn...
Page 18: ...we suggest that you check online users regularly to see if the device is logged in without authorization Check equipment log By viewing the logs you can know the IP addresses that were used to log in...