background image

  II 

someone  collecting  those  passwords  and  trying  them  out  on  your  video  surveillance  system.  Using  a 

different  username  and  password  for  your  security  system  will  make  it  more  difficult  for  someone  to 

guess their way into your system. 

9. Limit Features of Guest Accounts:


If your system is set up for multiple users, ensure that each user only has rights to features and functions 

they need to use to perform their job. 

10. UPnP:


● UPnP will automatically try to forward ports in your router or modem. Normally this would be a good 

thing. However, if your system automatically forwards the ports and you leave the credentials defaulted, 

you may end up with unwanted visitors. 
●  If  you  manually  forwarded  the  HTTP  and  TCP  ports  in  your  router/modem,  this  feature  should  be 

turned  off  regardless.  Disabling  UPnP  is  recommended  when  the  function  is  not  used  in  real 

applications. 

11. SNMP:


Disable  SNMP  if  you  are  not  using  it.  If  you  are  using  SNMP,  you  should  do  so  only  temporarily,  for 

tracing and testing purposes only. 

12. Multicast:


Multicast is used to share video streams between two recorders. Currently there are no known issues 

involving Multicast, but if you are not using this feature, deactivation can enhance your network security. 

13. Check the Log:


If you suspect that someone has gained unauthorized access to your system, you can check the system 

log. The system log will show you which IP addresses were used to login to your system and what was 

accessed. 

14. Physically Lock Down the Device:


Ideally, you want to prevent any unauthorized physical access to your system. The best way to achieve 

this is to install the recorder in a lockbox, locking server rack, or in a room that is behind a lock and key. 

15. Connect IP Cameras to the PoE Ports on the Back of an NVR:


Cameras connected to the PoE ports on the back of an NVR are isolated from the outside world and 

cannot be accessed directly. 

16. Isolate NVR and IP Camera Network


The  network  your  NVR  and  IP  camera  resides  on  should  not  be  the  same  network  as  your  public 

computer  network.  This  will  prevent  any  visitors  or unwanted guests  from getting  access  to  the  same 

network the security system needs in order to function properly. 

Summary of Contents for DHI-ASM202

Page 1: ...Fingerprint Enrollment Reader User s Manual V1 0 0...

Page 2: ...he default ports reduces the risk of outsiders being able to guess which ports you are using 3 Enable HTTPS SSL Set up an SSL Certificate to enable HTTPS This will encrypt all communication between yo...

Page 3: ...ng purposes only 12 Multicast Multicast is used to share video streams between two recorders Currently there are no known issues involving Multicast but if you are not using this feature deactivation...

Page 4: ...data controller you might collect personal data of others such as face fingerprints car plate number Email address phone number GPS and so on You need to be in compliance with the local privacy prote...

Page 5: ...s description or errors in print If there is any doubt or dispute please refer to our final explanation Upgrade the reader software or try other mainstream reader software if the Guide in PDF format c...

Page 6: ...se don t dismantle the device arbitrarily Please transport use and store the device within allowed humidity and temperature range Power Requirement Please make sure to use batteries according to requi...

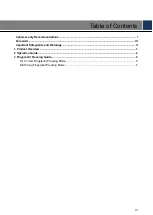
Page 7: ...security Recommendations I Foreword III Important Safeguards and Warnings V 1 Product Overview 1 2 Operation Guide 2 3 Fingerprint Pressing Guide 5 3 1 Correct Fingerprint Pressing Mode 5 3 2 Wrong Fi...

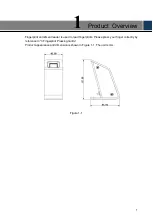
Page 8: ...Fingerprint enrollment reader is used to read fingerprints Please press your finger correctly by reference to 3 Fingerprint Pressing Guide Product appearance and dimension is shown in Figure 1 1 The u...

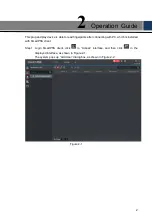
Page 9: ...erprints after connecting with PC which is installed with SmartPSS client Login SmartPSS client click in Access interface and then click in the Step 1 displayed interface as shown in Figure 2 1 The sy...

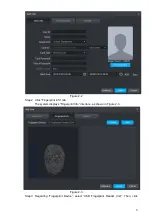
Page 10: ...gure 2 2 Click Fingerprint Info tab Step 2 The system displays Fingerprint Info interface as shown in Figure 2 3 Figure 2 3 Regarding Fingerprint Device select USB Fingerprint Reader V2 Then click Ste...

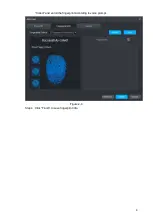
Page 11: ...4 Collect and enroll the fingerprint according to voice prompt Figure 2 4 Click Finish to save fingerprint info Step 4...

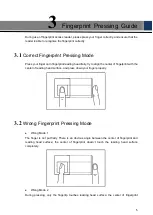
Page 12: ...flatly try to align the center of fingerprint with the center of reading head surface and press down your finger properly 3 2 Wrong Fingerprint Pressing Mode Wrong Mode 1 The finger is not put flatly...

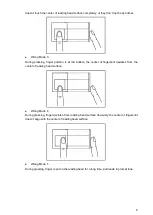
Page 13: ...bottom the center of fingerprint deviates from the center of reading head surface Wrong Mode 4 During pressing finger deviates from reading head surface obviously the center of fingerprint doesn t al...

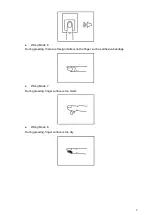
Page 14: ...ong Mode 6 During pressing there are foreign matters on the finger such as adhesive bandage Wrong Mode 7 During pressing finger surface is too moist Wrong Mode 8 During pressing finger surface is too...

Reviews: