Dahua C200 Series User Manual Download Page 15

User’s Manual 

7


Operation Menu (OSD) Function Descriptions 

Functions of the monitor vary with models, and the functions in this manual are for reference only. 
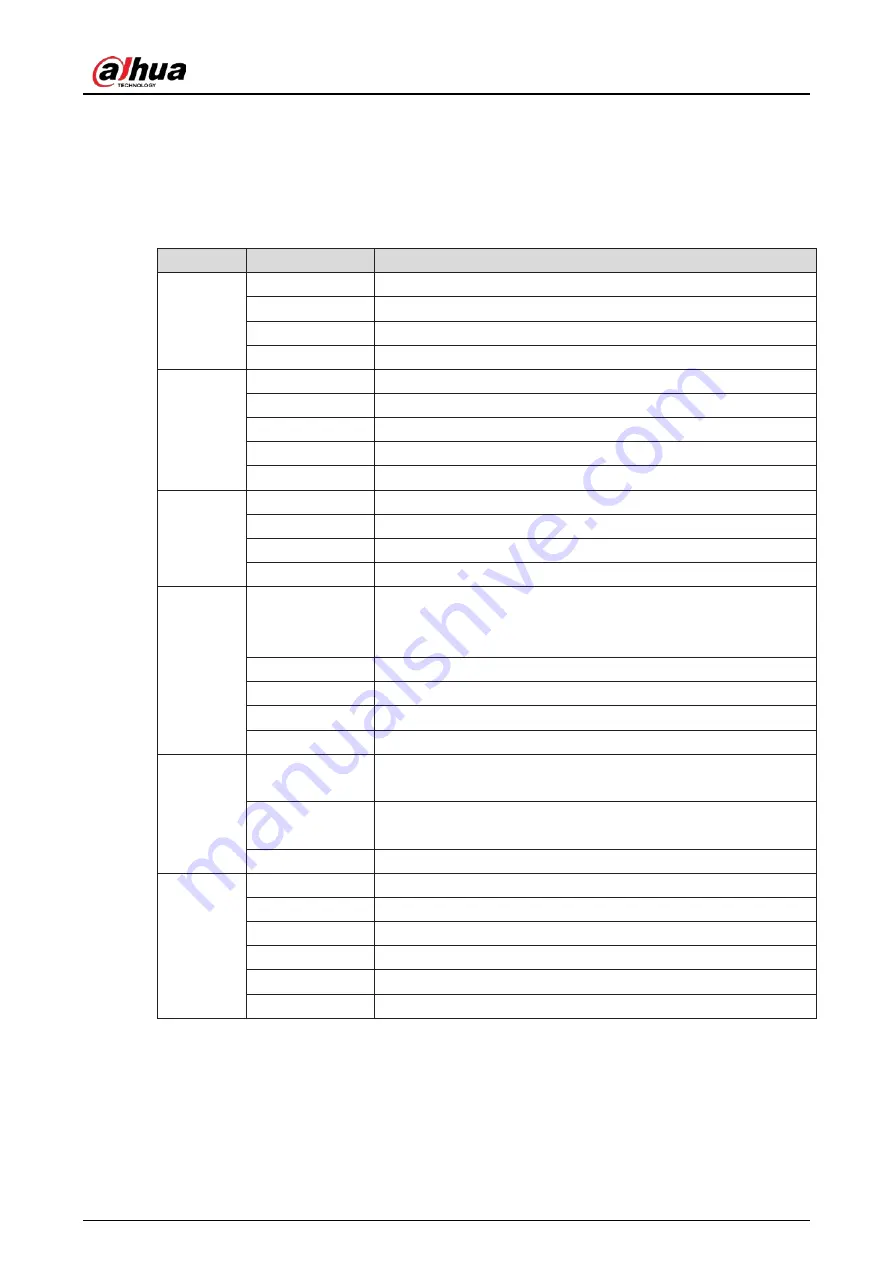
Table 7-1


Menu description 

Menu 

Sub Menu 

Value Range 

BRIGHTNESS


BRIGHTNESS


0-100


CONTRAST


0-100


ECO


STANDARD/GAME/RTS/FPS/MOVIE/TEXT


DCR


ON/OFF


IMAGE


H. POSITION


0-100


V.POSITION


0-100


CLOCK


0-100


PHASE


0-100


ASPECT


WIDE/AUTO/4:3


COLOR 
TEMP.


COLOR TEMP.


WIDE/AUTO/4:3


RED


0-100


BLUE


0-100


GREEN


0-100


OSD SETTING


LANGUAGE


ENGLISH/TÜRKÇE/

日本語

/

简体中文

/

한국

/PУССКИЙ/ESPAÑOL/ 

PORTUGUÊS/POLSKI/ITALIANO/NEDERLANDS/DEUTSCH/FRANÇAIS


OSD H. POS.


0-100


OSD V. POS.


0-100


OSD TIMEOUT


5-100


TRANSPARENCY

  — 

RESET


IMAGE AUTO 
ADJUST


— 

COLOR AUTO 
ADJUST


— 

RESET


None


MISC


SIGNAL SOURCE


HDMI/VGA


MUTE


ON/OFF


VOLUME


0-100


LOW BLUE RAY


0-100


OVERDRIVE


ON/OFF


Adaptive-Sync


ON/OFF


Summary of Contents for C200 Series

Page 1: ...C200 Series Displays User s Manual V1 0 0 ZHEJIANG DAHUA VISION TECHNOLOGY CO LTD...

Page 2: ...y CAUTION Indicates a potential risk which if not avoided could result in property damage data loss reductions in performance or unpredictable results TIPS Provides methods to help you solve a problem...

Page 3: ...ge without prior written notice Product updates might result in some differences appearing between the actual product and the manual Please contact customer service for the latest program and suppleme...

Page 4: ...e under allowed humidity and temperature conditions Prevent liquids from splashing or dripping on thedevice Make sure that there are noobjects filled with liquid on top of the device to avoid liquids...

Page 5: ...not block the ventilation opening Install the product according to this handbook Do not place any items on the product The product may be damaged if foreign objects enter the internal unit Failure to...

Page 6: ...plug foreign matter or liquid into the unit exposure to rain or humidity loss of function or dropped please contact dealer or after sales service center Be careful during maintenance of product even...

Page 7: ...ant Safeguards and Warnings III 1 Packing List 1 2 Angle Adjustment 2 3 Button Description 3 4 Cable Connection 4 5 Menu Description 5 6 ECO Modes and Gameplus 7 7 Operation Menu OSD Function Descript...

Page 8: ...st Packing list Table 1 1 Packing list No Name 1 Power adapter 2 Base Stand 3 Signal cable 4 Screws 5 User s manual 6 Mount stud 7 Mount adapter The above figure is for illustration only and the physi...

Page 9: ...ic model of the device Generally it may be inclined 5 2 forward and 20 2 backward Angle adjustment When adjusting the angle of the monitor be sure not to touch or press the area of the screen The abov...

Page 10: ...2 OSD Power button Press the button to turn on the monitor Table 3 2 OSD Buttons OSD Button Function Up rocker button The rocker is used to quick enter the Monitor Control panel Rocker switch button p...

Page 11: ...OUT interface of a PC Use the HDMI DVI cable to connect the HDMI IN interface of the product to the DVI OUT interface of a PC Use a VGA cable to connect the VGA interface of the product to the VGA in...

Page 12: ...yed on the screen after turning on the monitor and pressing the button Press one of the buttons to activate the browser screen Browser screen Table 5 1 Browser screen description Icon Function Confirm...

Page 13: ...User s Manual 6 Press or to select an option then press to confirm the setting and exit the current menu Press to exit the menu interface...

Page 14: ...RD MOVIE RTS FPS GAME and TEXT can be used to optimize settings according to your activity Standard mode is suitable for most activities Standard mode Press to select to switch Gameplus modes Choose t...

Page 15: ...DCR ON OFF IMAGE H POSITION 0 100 V POSITION 0 100 CLOCK 0 100 PHASE 0 100 ASPECT WIDE AUTO 4 3 COLOR TEMP COLOR TEMP WIDE AUTO 4 3 RED 0 100 BLUE 0 100 GREEN 0 100 OSD SETTING LANGUAGE ENGLISH T RK E...

Page 16: ...fting base Without base 495 8 286 3 36 7 mm 542 4 323 1 38 5mm 616 3 364 3 38 7 mm With base 495 8 376 3 160 9 mm 542 4 402 8 160 9 mm 616 3 442 8 161mm Speaker N A N A N A Height range N A N A N A Ro...

Page 17: ...eck if the PC power is on Check if the PC display card is inserted properly Check if the signal cable of the monitor iscorrectly connected with the PC Check the signal cable plug of the monitor and ma...

Page 18: ...User s Manual...

Reviews: