Dahua ARD323-W2 User Manual Download Page 11

User's Manual 

5 Installation 

Prior to installation, connect the door detector to the hub and check the signal level at the 
installation location. We recommend installing the door detector in a place with the signal strength 
of at least 2 bars. 


  We recommend installing the door detector with expansion screws. 

  Make sure to align    of the magnet with that of the door detector during installation, otherwise 

normal use of the door detector might be affected. 

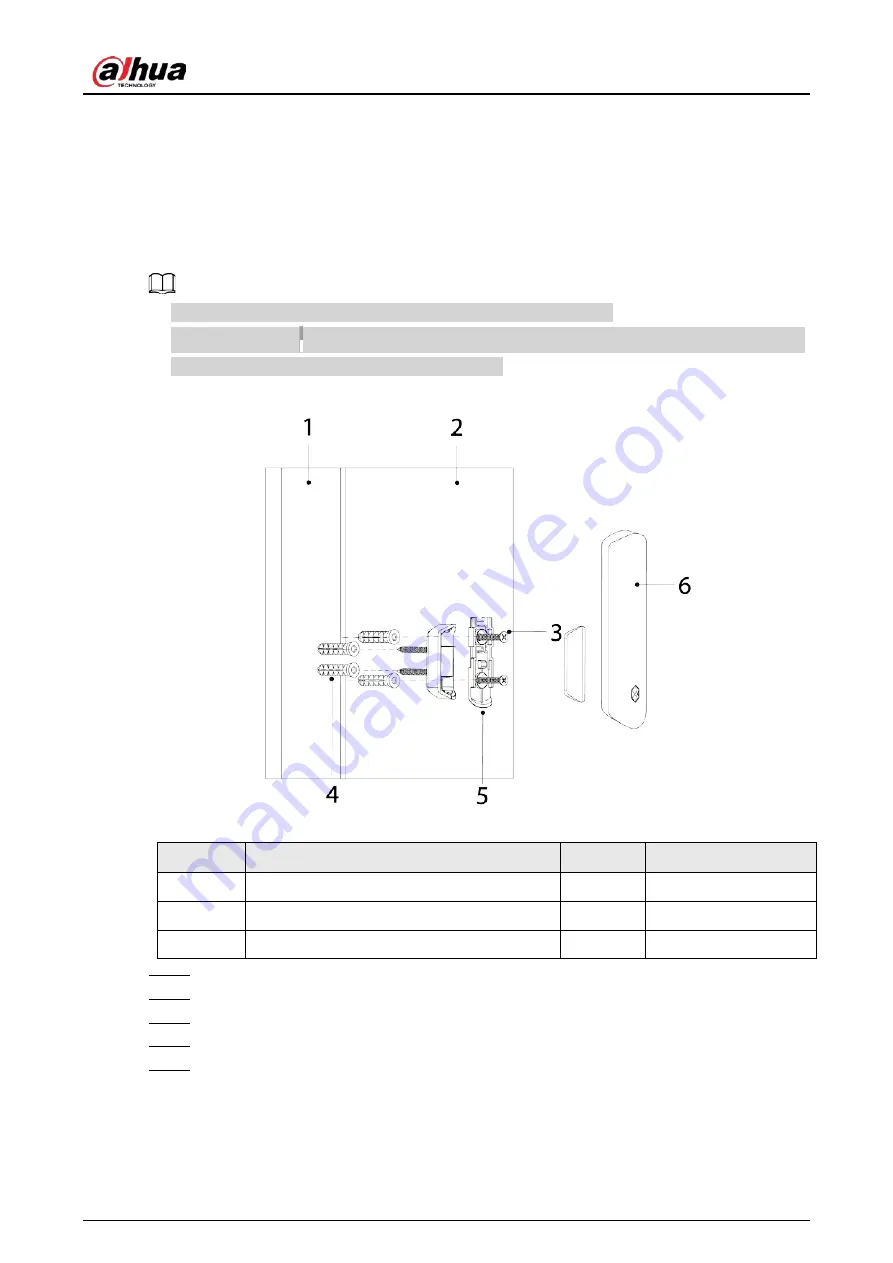
Figure 5-1 Installation 


Table 5-1 Installation items 

No. 

Item name 

No. 

Item name 

Door 1 

Expansion bolt 

Door 2 

Attachment panel 

ST3 × 18 mm self-tapping screw 

Magnet 

Step 1 

Drill 4 holes in door 1 and door 2 according to the hole positions of the attachment panels. 

Step 2 

Put the expansion bolts into the holes. 

Step 3 

Align the screw holes on the plate with the expansion bolts. 

Step 4 

Fix the attachment panels with ST3 × 18 mm self-tapping screws. 

Step 5 

Put the door detector into the attachment panel from top to bottom. 

Summary of Contents for ARD323-W2

Page 1: ...Wireless Door Detector User s Manual ZHEJIANG DAHUA VISION TECHNOLOGY CO LTD V1 0 0 ...

Page 2: ... Notice As the device user or data controller you might collect the personal data of others such as their face fingerprints and car plate number You need to be in compliance with your local privacy protection laws and regulations to protect the legitimate rights and interests of other people by implementing measures which include but are not limited Providing clear and visible identification to in...

Page 3: ...tion of the functions operations and technical data If there is any doubt or dispute we reserve the right of final explanation Upgrade the reader software or try other mainstream reader software if the manual in PDF format cannot be opened All trademarks registered trademarks and company names in the manual are properties of their respective owners Please visit our website contact the supplier or ...

Page 4: ...ce Installation Requirements Connect the device to the adapter before power on Strictly abide by local electrical safety standards and make sure that the voltage in the area is steady and conforms to the power requirements of the device Do not connect the device to more than one power supply Otherwise the device might become damaged Observe all safety procedures and wear required protective equipm...

Page 5: ...rd I Important Safeguards and Warnings III 1 Introduction 1 2 Checklist 2 3 Design 3 3 1 Appearance 3 3 2 Dimensions 4 4 Connecting to the Hub 5 5 Installation 6 6 Door Detector Configuration 7 6 1 Configuring the Door Detector 7 6 2 Status 8 ...

Page 6: ...duction Door detector is a wireless detector consisting of a sensor and a magnet that can send a signal to the hub and trigger an alarm when an armed door is opened It can be set up via the DMSS app for iOS and Android phones ...

Page 7: ...cklist Figure 2 1 Checklist Table 2 1 Checklist No Item Name Quantity No Item Name Quantity 1 Door detector 1 4 User s manual 1 2 Double sided adhesive tape 1 5 Legal and regulatory information 1 3 Cable 1 6 Screw package 2 ...

Page 8: ... green quickly Pairing mode Solid green Alarm event is triggered 2 Peripheral port Connect the peripheral with the alarm cable 3 On Off button Turn on or turn off the door detector 4 Tamper button When the tamper button is released the tamper alarm will be triggered 5 Lid Normal status Lid closed Abnormal status Lid open ...

Page 9: ...User s Manual 4 3 2 Dimensions Figure 3 2 Dimensions mm inch ...

Page 10: ...re that the hub has stable internet connection Make sure that the hub is disarmed Step 1 Go to the hub interface and then tap to add the detector Step 2 Tap to scan the QR code at the bottom of the door detector and then tap Next Step 3 Tap Next after the door detector has been found Step 4 Follow on screen instructions and switch the door detector to on and then tap Next Step 5 Wait for the pairi...

Page 11: ...on otherwise normal use of the door detector might be affected Figure 5 1 Installation Table 5 1 Installation items No Item name No Item name 1 Door 1 4 Expansion bolt 2 Door 2 5 Attachment panel 3 ST3 18 mm self tapping screw 6 Magnet Step 1 Drill 4 holes in door 1 and door 2 according to the hole positions of the attachment panels Step 2 Put the expansion bolts into the holes Step 3 Align the sc...

Page 12: ...s under the hub will be armed Delay Mode under Home Mode Enable the Delay Mode under Home Mode the selected accessory under the hub will be armed and the alarm will not be triggered until the end of customized delay time Only enable Home Mode first can Delay Mode under Home Mode take effect Delay Time The system provides you with time to leave or enter the armed zone without alarm Select from 0 s ...

Page 13: ...he accessory list and then tap to view the status of the door detector Table 6 2 Status Parameter Value Temperature The temperature of the environment Signal Strength The signal strength between the hub and the door detector Low Weak Good Excellent No Battery Level The battery level of the detector Fully charged Sufficient Moderate Insufficient Low Anti tampering Status Anti tampering status of th...

Page 14: ...User s Manual 9 Parameter Value 24 H Protection Zone Status Active status of the 24 h protection zone Enabled Disabled Program Version The program version of the door detector ...

Page 15: ...User s Manual ...

Reviews: