background image


53 


button becomes hidden.   


Figure 3-47 

Click OK button to save current setup.   


3.7.2.2  Schedule Snapshot   

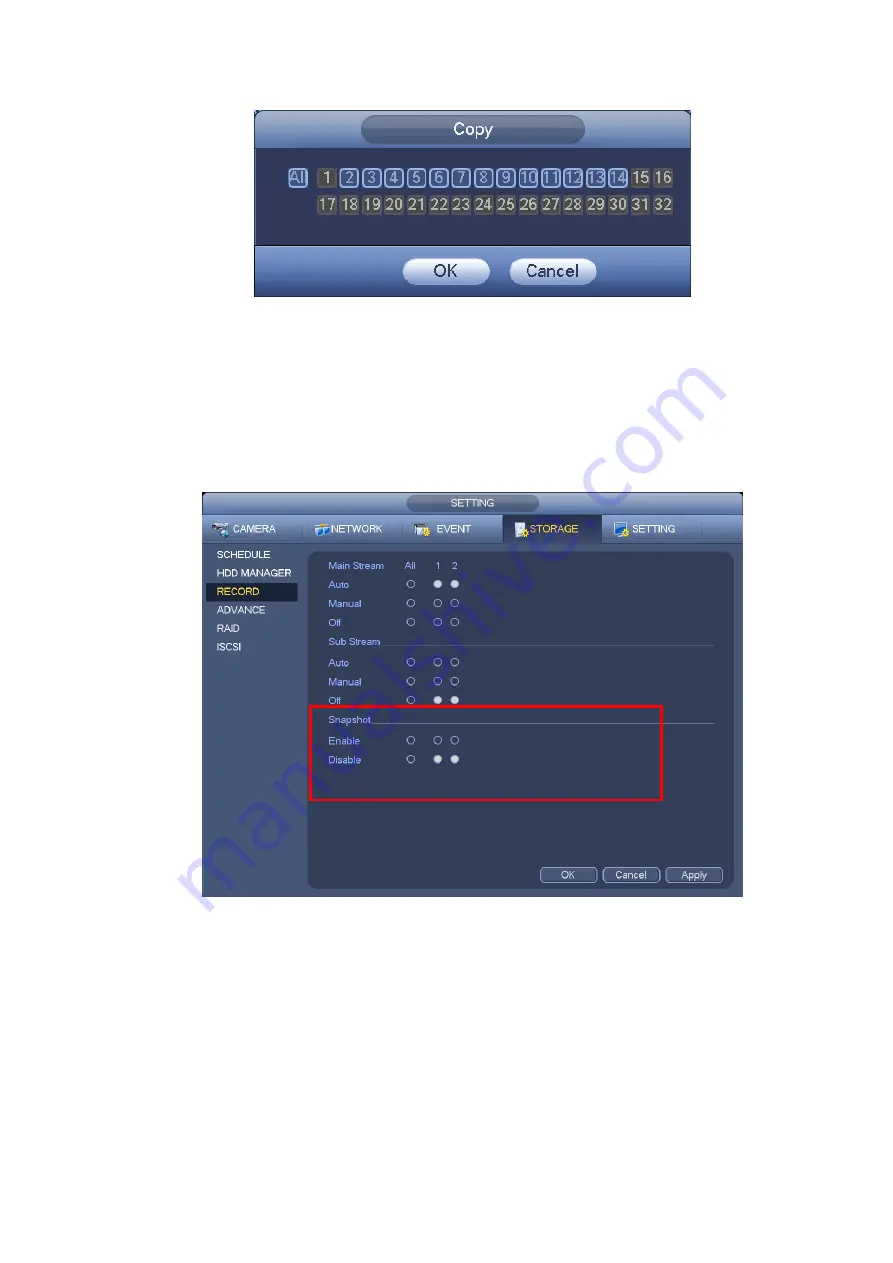
From  Main  menu->Setting->Storage->Record  or  on  the  preview  interface,  right  click  mouse  and  then 

select record item, you can see Figure 3-48. 

Select snapshot channel and enable snapshot function. Click Save button.   


Figure 3-48 

From Main menu->Setting->Camera->Encode->Snapshot, you can go to snapshot interface. See Figure 

3-49. 

Select the snapshot channel from the dropdown list and then select snapshot mode as Timing (Schedule) 

from the dropdown list and then set picture size, quality and snapshot frequency.   

Summary of Contents for 600 Series

Page 1: ...Network Video Recorder User s Manual V 5 0 0 ...

Page 2: ...n 18 2 3 1 Alarm input and output details 18 2 3 1 1 NVR 6000 6064 Series 18 2 3 1 2 NVR 608 Series 19 2 3 1 3 NVR 724 Series 19 2 3 2 Alarm input and output port 20 2 3 3 Alarm Output Port 20 2 3 4 Alarm relay specifications 21 2 4 Mouse Operation 21 3 Local Basic Operation 23 3 1 Boot up and Shutdown 23 3 1 1 Boot up 23 3 1 2 Shutdown 23 3 2 Startup Wizard 23 3 3 Navigation Bar 27 3 3 1 Main Men...

Page 3: ... and Snapshot 48 3 7 1 Encode 48 3 7 1 1 Encode 48 3 7 1 2 Overlay 49 3 7 2 Schedule 50 3 7 2 1 Schedule Record 50 3 7 2 2 Schedule Snapshot 53 3 7 3 Motion detect record snapshot 55 3 7 3 1 Motion detect record 55 3 7 3 2 Motion Detect Snapshot 57 3 7 4 Alarm Record Snapshot 58 3 7 4 1 Alarm Record 58 3 7 4 2 Alarm Snapshot 59 3 7 5 Manual Record Snapshot 59 3 7 5 1 Manual Record 59 3 7 5 2 Manua...

Page 4: ...P IP 89 3 11 1 1 Connection 91 3 11 1 2 PPPoE 92 3 11 1 3 DDNS Setup 93 3 11 1 4 UPnP 95 3 11 1 5 IP Filter 96 3 11 1 6 Email 98 3 11 1 7 FTP 99 3 11 1 8 SNMP 100 3 11 1 9 Multicast 101 3 11 1 10 Alarm Centre 103 3 11 1 11 Auto register 103 3 11 1 12 Cluster IP 104 3 11 2 Network Test 105 3 11 2 1 Network Test 105 3 11 2 2 Network Load 106 3 12 HDD Setup 107 3 12 1 Format 107 3 12 2 HDD Informatio...

Page 5: ... 8 Logout Shutdown Restart 128 4 Web Operation 129 4 1 General Introduction 129 4 1 1 Preparation 129 4 1 2 Log in 129 4 2 LAN Mode 130 4 3 Real time Monitor 132 4 4 PTZ 133 4 5 Image Alarm out 134 4 5 1 Image 135 4 5 2 Alarm output 135 4 6 Zero channel Encode 135 4 7 WAN Login 136 4 8 Setup 137 4 8 1 Camera 137 4 8 1 1 Remote Device 137 4 8 1 1 1 Remote Device 137 4 8 1 1 2 Upgrade 139 4 8 1 2 Im...

Page 6: ...ing 165 4 8 3 1 4 Video diagnosis 165 4 8 3 2 Face Detect 166 4 8 3 3 Audio Detect 167 4 8 3 4 Alarm 168 4 8 3 4 1 Local Alarm 168 4 8 3 4 2 Net Alarm 171 4 8 3 4 3 IPC external alarm 172 4 8 3 4 4 IPC Offline Alarm 172 4 8 3 5 Abnormality 173 4 8 3 6 Alarm Output 175 4 8 4 Storage 175 4 8 4 1 Schedule 175 4 8 4 2 HDD Manager 177 4 8 4 3 Record Control 178 4 8 4 4 Advanced 179 4 8 4 4 1 HDD 179 4 ...

Page 7: ...ort 193 4 8 5 8 Default 193 4 8 5 9 Upgrade 194 4 8 6 Cluster Service 194 4 8 6 1 Master Device 194 4 8 6 2 Slave Device 196 4 8 6 3 Record Transfer 196 4 8 6 4 Cluster control 197 4 8 6 5 DCS Log 197 4 9 Info 198 4 9 1 Version 198 4 9 2 Log 198 4 9 3 Online User 199 4 9 4 HDD 200 4 10 Playback 200 4 11 Alarm 204 4 12 Log out 205 4 13 Un install Web Control 205 5 Appendix A HDD Capacity Calculatio...

Page 8: ...eo recorder This user s manual is designed to be a reference tool for your system Please open the accessory bag to check the items one by one in accordance with the list below Contact your local retailer ASAP if something is missing or damaged in the bag ...

Page 9: ...e explosive substances and etc This series product shall be transported storage and used in the specified environments Environment which needs to comply with the following conditions The function of the ITE being investigated to IEC 60950 1 is considered not likely to require connection to an Ethernet network with outside plant routing including campus environment The installation instructions cle...

Page 10: ...ep away from extreme humid places Avoid violent vibration Do not put other devices on the top of the NVR Be installed in well ventilated place do not block the vent Accessories Check the following accessories after opening the box Please refer to the packing list in the box ...

Page 11: ...eries support TV VGA HDMI output at the same time Short cut menu when preview Support popular PTZ decoder control protocols Support preset tour and pattern Playback Support each channel real time record independently and at the same time it can support search forward play network monitor record search download and etc Support various playback modes slow play fast play backward play and frame by fr...

Page 12: ...e NVR configuration and control power via Ethernet Support management via WEB Peripheral Equipment Management Support peripheral equipment management such as protocol setup and port connection Support transparent data transmission such as RS232 RS 422 RS485 RS 485 Auxiliary Support switch between NTSC and PAL Support real time system resources information and running statistics display Support log...

Page 13: ...D1 RAID5 HDD Installation Additional HDD bracket support HDD hot swap Disk Array Enclosure Backup Mini SAS port 3Gbps Optional HDD Hotspare Support global hotspare Network Interface Network Amount 4 100 1000Mbps Ethernet ports Network Port Feature 4 Ethernet port load balance or 4 independent 1000Mbps Ethernet port Others Power 100V 240V 47 63Hz Total Power Consumption 10W 200W Including HDD Worki...

Page 14: ... only video output at the same time Monitor Tour Support monitor tour functions such as motion detection and schedule auto control Resolution Real time monitor VGA 1280 1024 1920 1080 1024 768 HDMI 1280 1024 1920 1080 Image Information Channel information time information Color Configuration Hue brightness contrast saturation and gain setup for each channel Audio Audio Input 1 chanel audio input A...

Page 15: ...e Flash disk portable disk and etc Support peripheral eSATA device Support network download and save Network Function Network control View monitor channel remotely NVR configuration through client end and web browser Upgrade via client or browser to realize remote maintenance View alarm information such as motion detection and video loss via client Support network PTZ lens control File remote down...

Page 16: ...device Login Logout and Shutdown Password login protection to guarantee safety User friendly interface when login Provide the following options Logout shutdown restart Right authentication when shut down to make sure only those proper people can turn off NVR General Parameters Power 100V 240V 47 63Hz Power Consumption 200 400W With HDD Working Temperature 0 40 Working Humidity 10 80 No condensatio...

Page 17: ...al recording card number recording alarm recording motion detection recording schedule recording Multi Channel Playback Max support 128M playback at the same time Motion Detect Each screen supports 396 330 PAL 22 18 NTSC 22 15 detection zones Various sensitivity levels Privacy Mask Each channel supports 4 privacy mask zones Record Mode Overwrite Backup Mode Flash disk eSATA DVD burner Network Func...

Page 18: ...ndicator light 1 remote control indicator light General Parameters Power AC110 240V 50 60Hz AC100 240V 50 60Hz Power Consumption 40W Without HDD 40W Without HDD Working Temperature 10 55 Working Humidity 10 90 No condensation Dimensions 486mm with ear 454 9mm 91mm 486mm with ear 471 8mm 91mm Weight 9Kg No HDD Installation Mode Rack desktop ...

Page 19: ...may result in device auto restart 2 System HDD Indicator light The blue light flashes when system is reading or writing the system HDD In the system HDD there are device important configuration file factory default configuration file and device initial boot up data 3 Alarm indicator light The alarm indicator light becomes on once an alarm occurred It becomes on via the software detection The alarm...

Page 20: ...dicator light The alarm indicator light becomes on once an alarm occurred It becomes on via the software detection The alarm includes local alarm no disk and etc 4 Network indicator light The network indicator light is blue and it flashes when you connect the device to the network 5 USB port 6 16 HDD slot After you remove the front panel you can see there are 16 HDDs From the left to the right and...

Page 21: ... recording working with direction keys or numeral keys to select the recording channel Input number more than 10 If you want to input a number more than 10 please click this button and then input ESC ESC Go to previous menu or cancel current operation When playback click it to restore real time monitor mode Assistant Fn One window monitor mode click this button to display assistant function PTZ co...

Page 22: ...as PTZ menu Left Right Shift current activated control and then move left and right When playback click these buttons to control playback bar Slow play Multiple slow play speeds or normal playback Fast play Various fast speeds and normal playback Play previous In playback mode playback the previous video Reverse Pause In normal playback or pause mode click this button to reverse playback In revers...

Page 23: ...indicator light 1 16 It becomes on when system is recording IR Receiver IR It is to receive the signal from the remote control Power indicator light POWER Power indicator light Remote control indicator light ACT Remote control indicator light Status indicator light STATUS If there is Fn indicator light current status indicator light is null HDD abnormal indicator light HDD The indicator light is o...

Page 24: ...ration file device initial boot up data 6 Power button Press it once to turn on the device Press it for a long time to turn off the device Usually we do not recommend Press power button for a long time or pull out the power cable may result in device auto restart After you remove the front panel you can see there are 24 HDDs From the left to the right and from the top to the bottom it ranges from ...

Page 25: ...ion SN Function 1 Power socket 6 Video VGA output 2 Audio Input 7 eSATA port 3 Audio output 8 USB port 4 Bidirectional talk input 9 HDMI port 5 Network port 10 Alarm input alarm output RS485 port Important Right now system does not support audio input port System supports HDMI1 HDMI2 port by default You need to purchase HDMI interface board if you want to use HDMI3 HDMI6 port 2 2 2 NVR 600 Series ...

Page 26: ...he following sheet for detailed information SN Function SN Function 1 Power socket 7 Ethernet port 2 Alarm input alarm output RS485 port 8 HDMI port 3 RS232 port 9 USB 2 0 port 4 Audio output 10 USB 3 0 port 5 Audio input 11 eSATA port 6 VGA port 2 2 3 NVR 724 Series The general rear panel is shown as in Figure 2 11 ...

Page 27: ...wn as in Figure 2 12 Figure 2 12 Please refer to the following sheet for detailed information SN Name SN Name 1 Alarm input alarm output 2 HDMI port Reserved port Right now system does not support HD decode card 3 Power port 4 HDMI port 5 eSATA port 6 USB port ...

Page 28: ...either NC normal Open or NO Normal Close e When you are connecting two NVRs or you are connecting one NVR and one other device please use a relay to separate them 2 Alarm output The alarm output port should not be connected to high power load directly It shall be less than 1A to avoid high current which may result in relay damage Please use the co contactor to realize the connection between the al...

Page 29: ... data input cable 2 3 1 2 NVR 608 Series You can refer to the following sheet X for alarm input and output information See Figure 2 14 Figure 2 14 Icon Note 1 2 3 4 5 6 7 8 9 10 11 12 13 14 15 16 ALARM 1 to ALARM 16 The alarm becomes active in low voltage 1 ON C 2 ON C 3 ON C 4 ON C 5 ON C 6 ON C 7 ON C 8 ON C Eight groups of normal open activation output on off button GND cable A B The A B cable ...

Page 30: ...nect COM end and GND end of the alarm detector Provide external power to the alarm detector Please parallel connect the Ground of the NVR and the ground of the alarm detector Please connect the NC port of the alarm sensor to the NVR alarm input ALARM Use the same ground with that of NVR if you use external power to the alarm device Figure 2 16 2 3 3 Alarm Output Port Provide power to peripheral al...

Page 31: ...polarity 1000VAC 1minute Between touch and winding 1000VAC 1minute Surge voltage Between touches with same polarity 1500V 10 160us Length of open time 3ms max Length of close time 3ms max Longevity Mechanical 50 106 MIN 3Hz Electrical 200 103 MIN 0 5Hz Temperature 40 70 2 4 Mouse Operation Please refer to the following sheet for mouse operation instruction Left click mouse When you have selected o...

Page 32: ...Implement special control operation such as double click one item in the file list to playback the video In multiple window mode double left click one channel to view in full window Double left click current video again to go back to previous multiple window mode Right click mouse In real time monitor mode pops up shortcut menu Exit current menu without saving the modification Press middle button ...

Page 33: ...power on off button directly Do not unplug the power cable or click power on off button to shutdown device directly when device is running especially when it is recording There are three ways for you to log out a Main menu RECOMMENDED From Main Menu Shutdown select shutdown from dropdown list Click OK button you can see device shuts down b From power on off button on the front panel or remote cont...

Page 34: ...dden user Hidden user default is for system interior use only and can not be deleted When there is no login user hidden user default automatically login You can set some rights such as monitor for this user so that you can view some channel view without login Figure 3 2 Note For security reason please modify password after you first login Within 30 minutes three times login failure will result in ...

Page 35: ...ou can go to network interface See Figure 3 4 For detailed information please refer to chapter 3 11 Figure 3 4 Click Next button you can go to remote device interface See Figure 3 5 For detailed information please refer to chapter 3 4 ...

Page 36: ...Figure 3 5 Click Next button you can go to RAID interface See Figure 3 6 For detailed information please refer to chapter 3 12 4 Figure 3 6 Click Next button you can go to Schedule interface See Figure 3 7 ...

Page 37: ...ialogue box Click the OK button the startup wizard is complete See Figure 3 8 Figure 3 8 3 3 Navigation Bar You need to go to the Main menu Setting System General to enable navigation bar function otherwise you can not see the following interface The navigation bar is shown as below See Figure 3 9 Figure 3 9 ...

Page 38: ... disable tour function first Right now the screen 2 operation can only be realized on the navigation bard The operations on the right click menu are for screen 1 only 3 3 3 Output Screen Select corresponding window split mode and output channels 3 3 4 Tour Click button to enable tour the icon becomes you can see the tour is in process 3 3 5 PTZ Click system goes to the PTZ control interface Please...

Page 39: ...the corresponding channel See Figure 3 12 Figure 3 12 3 3 10 Remote Device Click system goes to the remote device interface Please refer to chapter 3 4 3 3 11 Network Click system goes to the network interface It is to set network IP address default gateway and etc Please refer to chapter 3 11 3 3 12 HDD Manager Click system goes to the HDD manager interface It is to view and manage HDD informatio...

Page 40: ...import export and chapter 3 14 4 upgrade for detailed information Figure 3 13 3 3 14 System Status Click you can go to the following interface See Figure 3 14 Here you can view host information RAID information HDD information HDD usage rate fan speed CPU usage CPU temperature memory usage power informaiton and etc The following interface is based on our single power series product Figure 3 14 ...

Page 41: ... Add button you can add current device to the bottom pane of the interface System supports batch add function Click Manual Add button you can add a device directly Here you can set TCP UPD auto connection mode The default setup is TCP See Figure 3 16 Important Please note the manual add function is for Dahua Panasonic Sony Dynacolor Samsung AXIS Arecont ONVIF and Custom When the type is the custom...

Page 42: ...y go to the Remote Device interface See Figure 3 17 Figure 3 17 3 4 3 Image From main menu Setting Camera Image you can see the image interface is shown as below See Figure 3 18 Channel Select a channel from the dropdown list Config file The options includes day night general switch by period Once the mode is switch by period you can set sunset and sunrise time ...

Page 43: ...bottom limit This function is disabled by default Flip It is to switch video left and right limit This function is disabled by default 3D NR It is to process multiple frame At least two frames System uses the information between these two frames to realize noise reduction function BLC It includes several options BLC WDR HLC OFF BLC There are two modes default customize For the default mode the dev...

Page 44: ...video Sensor It is to set when there is peripheral connected IR light Please note some non IR series product support sensor input function Figure 3 18 3 4 4 Channel Name From main menu Setting Camera Channel name you can see an interface shown as in Figure 3 19 It is to modify channel name It max supports 31 character Please note you can only modify the channel name of the connected network camera...

Page 45: ...rom main menu Setting Camera Remote Upgrade the interface is shown as below See Figure 3 20 Click Browse button and then select the upgrade file Then select a channel or you can select device type filter to select several devices at the same time Click Begin button to upgrade You can see the corresponding dialogue once the upgrade is finish ...

Page 46: ...e Figure 3 21 Please note the displayed window amount may vary The following figure is for reference only Please refer to chapter 1 3 Specifications for the window amount your product supported Figure 3 21 3 5 1 Preview If you want to change system date and time you can refer to general settings Main ...

Page 47: ...this area for more than 6 seconds and has no operation the control bar automatically hides Figure 3 22 1 Realtime playback It is to playback the previous 5 60 minutes record of current channel Please go to the Main menu Setting System General to set real time playback time System may pop up a dialogue box if there is no such record in current channel 2 Digital zoom It is to zoom in specified zone ...

Page 48: ...ck to snapshot 1 5 times The snapshot file is saved on the USB device or HDD You can go to the Search interface chapter 3 8 to view 5 Bidirectional talk If the connected front end device supports bidirectional talk function you can click this button Click button to start bidirectional talk function the icon now is shown as Now the rest bidirectional talk buttons of digital channel becomes null too...

Page 49: ...nterface to search and playback a record file Record control Enable disable record channel Alarm output It is to set alarm output mode Remote Search and add a remote device Alarm output Generate alarm output signal manually Main menu Go to system main menu interface Tips Right click mouse to go back to the previous interface Figure 3 25 3 5 4 Preview Display Effect Setup 3 5 4 1 Display From Main ...

Page 50: ...ng screen from the dropdown list and then set resolution Resolution There are four options 1920 1080 1280 1024 1280 720 1024 768 The VGA default resolution is 1280 1024 HDMI default resolution is 1920 1080 Please note the system needs to reboot to activate current setup Click OK button to save current setup 3 5 4 2 Preview Tour Parameters Set preview display mode channel display sequence and tour ...

Page 51: ...Input proper interval value here The value ranges from 1 120 seconds Window split It is to set window split mode Figure 3 27 Tips On the navigation bar click to enable disable tour Click Save button to save current setup 3 6 PTZ Note Before you control the PTZ please make sure the PTZ decoder and the NVR network connection is OK and the corresponding settings are right 3 6 1 PTZ Settings Cable Con...

Page 52: ...TZ Please select remote mode if you are connecting to the network PTZ camera Protocol Select corresponding PTZ protocol such as PELCOD Address Default address is 1 Baud rate Select corresponding baud rate Default value is 9600 Data bit Select corresponding data bits Default value is 8 Stop bit Select corresponding stop bits Default value is 1 Parity There are three options odd even none Default se...

Page 53: ...wn as in Figure 3 30 Please note you can only go to the PTZ control interface when you are in 1 window display mode Figure 3 30 The PTZ setup is shown as in See Figure 3 31 Please note the commend name is grey once device does not support this function The PTZ operation is only valid in one window mode Here you can control PTZ direction speed zoom focus iris preset tour scan pattern aux function l...

Page 54: ...ddle of the eight direction arrows there is a 3D intelligent positioning key See Figure 3 32 Please make sure your protocol supports this function and you need to use mouse to control Click this key system goes back to the single screen mode Drag the mouse in the screen to adjust section size The dragged zone supports 4X to 16X speeds It can realize PTZ automatically The smaller zone you dragged t...

Page 55: ...he Figure 3 31 Icon Function Icon Function Preset Flip Tour Reset Pattern Aux Scan Aux on off button Rotate Go to menu 3 6 2 1 PTZ Function Setup Click you can go to the following interface to set preset tour pattern and scan See Figure 3 34 Figure 3 34 Preset Setup In Figure 3 34 click preset button and use eight direction arrows to adjust camera to the proper position The interface is shown as i...

Page 56: ...o add more presets to the tour Click Del preset button to remove it from the tour Please note some protocols do not support delete preset function Figure 3 36 Pattern Setup In Figure 3 34 click Pattern button and input pattern number Click Begin button to start direction operation Or you can go back to Figure 3 31 to operate zoom focus iris direction operation In Figure 3 34 click End button ...

Page 57: ... Right button Now the scan setup process is complete Figure 3 38 3 6 2 2 Call PTZ Function Call Preset In Figure 3 33 input preset value and then click to call a preset Click again to stop call Call Pattern In Figure 3 33 input pattern value and then click to call a pattern Click again to stop call Call Tour In Figure 3 33 input tour value and then click to call a tour Click again to stop call ...

Page 58: ...Figure 3 39 Figure 3 39 3 7 Record and Snapshot The record snapshot priority is Alarm Motion detect Schedule 3 7 1 Encode 3 7 1 1 Encode Encode setting is to set IPC encode mode resolution bit stream type and etc From Main menu Setting System Encode you can see the following interface See Figure 3 40 Channel Select the channel you want Type Please select from the dropdown list There are three opti...

Page 59: ...e 3 40 3 7 1 2 Overlay Click overlay button you can see an interface is shown in Figure 3 41 Cover area Here is for you to cover area section You can drag you mouse to set proper section size In one channel video system max supports 4 zones in one channel You can set with Fn button or direction buttons Preview monitor The cover area has two types Preview and Monitor Preview means the privacy mask ...

Page 60: ...con Select icon of several dates all checked items can be edited or together Now the icon is shown as Click it to delete a record type from one period Record Type Please check the box to select corresponding record type There are four types Regular MD motion detect Alarm MD Alarm Week day There are eight options ranges from Saturday to Sunday and all Holiday It is to set holiday setup Please note ...

Page 61: ...are five record types regular motion detection MD Alarm MD alarm and intelligence Please following the steps listed below to draw the period manually a Select a channel you want to set See Figure 3 42 Figure 3 42 b Set record type See Figure 3 43 Figure 3 43 c Please draw manually to set record period There are six periods in one day See Figure 3 44 Figure 3 44 Please check the box to select the c...

Page 62: ...e is grey such as channel 1 Now you can select the channel you wan to paste such as channel 5 6 7 If you wan to save current setup of channel 1 to all channels you can click the first box ALL Click the OK button to save current copy setup Click the OK button in the Encode interface the copy function succeeded Please note if you select ALL in Figure 3 47 the record setup of all channels are the sam...

Page 63: ...lect record item you can see Figure 3 48 Select snapshot channel and enable snapshot function Click Save button Figure 3 48 From Main menu Setting Camera Encode Snapshot you can go to snapshot interface See Figure 3 49 Select the snapshot channel from the dropdown list and then select snapshot mode as Timing Schedule from the dropdown list and then set picture size quality and snapshot frequency ...

Page 64: ...tting Storage Schedule you can go to schedule menu See Figure 3 45 Here you can set snapshot period There are total six periods in one day Please refer to chapter 3 7 2 1 for detailed setup information The setup steps are general the same Figure 3 50 ...

Page 65: ...lect a channel from the dropdown list and then check the enable button to enable motion detect function c Click Region Click select button the interface is shown as in Figure 3 52 Here you can set motion detection zone There are four zones for you to set Please select a zone first and then left drag the mouse to select a zone The corresponding color zone displays different detection zone You can c...

Page 66: ...ick to delete a record type from one period In Figure 3 53 Click button after one date or a holiday you can see an interface shown as in Figure 3 54 There are four record types regular motion detection MD Alarm MD alarm e Set sensitivity Please note the sixth level has the highest sensitivity f Click Save button to complete motion detect setup g From Main menu Setting Storage Schedule See Figure 3...

Page 67: ...elect trigger snapshot from the dropdown list and then set picture size quality and snapshot frequency Click OK button to save current setup c From Main menu Setting Event Detect here you can select motion detect type motion detect channel and then check the enable box Please refer to chapter 3 7 3 1 d Click OK button to complete motion detect setup Figure 3 55 ...

Page 68: ...rk IPC external alarm It is the on off alarm signal from the front end device and can activate the local NVR IPC offline alarm Once you select this item system can generate an alarm when the front end IPC disconnects with the local NVR The alarm can activate record PTZ snapshot and etc The alarm can last until the IPC and the NVR connection resumes Enable Please you need to highlight this button t...

Page 69: ...le snapshot function d Click Save button to save alarm snapshot setup Figure 3 57 3 7 5 Manual Record Snapshot You need to have proper rights to implement the following operations Please make sure the HDD has been properly installed 3 7 5 1 Manual Record a Right click mouse and select manual record or in the main menu from Setting Storage Manual Record Manual record menu is shown as in Figure 3 58...

Page 70: ...ord Snapshot no matter what period applied in the record setup All Check the All box to select all channels c Click OK button to complete manual record setup 3 7 5 2 Manual Snapshot Click button at the preview control bar you can snapshot 1 5 picture s From main menu Setting Camera Encode Snapshot you can set snapshot times You can go to chapter 3 8 to view snapshot picture 3 7 6 Holiday Record Sn...

Page 71: ...ure 3 60 Here you can set holiday date name repeat mode start time end time and etc Figure 3 60 c Click Add button to complete holiday setup Now you can enable holiday setup and then click Apply button d From Main menu setting Storage schedule you can go to schedule interface See Figure ...

Page 72: ... item to set snapshot period Set holiday snapshot type Trigger Regular Please refer to chapter 3 7 2 2 or chapter 3 7 3 2 3 7 7 Other Record Snapshot Motion detect Alarm record or snapshot please refer to chapter 3 7 4 Video loss or tampering record or snapshot function please refer to chapter 3 7 3 3 8 Playback and Search 3 8 1 Real time Playback Please refer to chapter 3 5 2 for real time playba...

Page 73: ...evice Click the Browse button you can select the file you want to play Important Redundancy HDD does not support picture backup function but it supports picture playback function You can select to play from redundancy HDD if there are pictures on the redundancy HDD 3 Calendar The blue highlighted date means there is picture or file Otherwise there is no picture or file In any play mode click the d...

Page 74: ...isplay max 128 files in one time Use the and or the mouse to view the file Select one item and then double click the mouse or click the ENTER button to playback You can input the period in the following interface to begin accurate search File type R regular record A external alarm record M Motion detect record Lock file Click the file you want to lock and click the button to lock The file you lock...

Page 75: ...ding four time bars In other playback mode there is only one time bar Use the mouse to click one point of the color zone in the time bar system begins playback The time bar is beginning with 0 o clock when you are setting the configuration The time bar zooms in the period of the current playback time when you are playing the file The green color stands for the regular record file The red color sta...

Page 76: ...5 Smart search When system is playing you can select a zone in the window to begin smart search Click the motion detect button to begin play Once the motion detect play has begun click button again will terminate current motion detect file play There is no motion detect zone by default If you select to play other file in the file list system switches to motion detect play of other file During the ...

Page 77: ...s includes current time See image on the right side of the Figure 3 63 Double click a file name to playback Note After you searched files system implement accurate playback once you click Play for the first time System does not support accurate playback for picture System supports synchronization playback and non synchronous playback The synchronization playback supports all channels and non synch...

Page 78: ...f you can see the mark playback icon on the Search interface Figure 3 62 When you are playback record you can mark the record when there is important information After playback you can use time or the mark key words to search corresponding record and then play It is very easy for you to get the important video information Add Mark When system is playback click Mark button you can go to the followi...

Page 79: ...nformation item you can see system pops up a dialogue box for you to change mark information You can only change mark name here Delete Here you can check the mark information item you want to delete and then click Delete button you can remove one mark item Note After you go to the mark management interface system needs to pause current playback System resume playback after you exit mark management...

Page 80: ...nnel file start time and end time d Click add button system begins search All matched files are listed below System automatically calculates the capacity needed and remained See Figure 3 68 e System only backup files with a before channel name You can use Fn or cancel button to delete after file serial number f Click backup button you can backup selected files There is a process bar for you refere...

Page 81: ...t only The system will not terminate backup process The file name format usually is Channel number Record type Time In the file name the YDM format is Y M D H M S File extension name is dav 3 9 2 Import Export This function allows you to copy current system configuration to other devices It also supports import create new folder and delete folder and etc function From Main menu Setting System Impo...

Page 82: ... current folder After successfully import system needs to reboot to activate new setup Format Click Format button system pops up a dialogue box for you to confirm current operation System begins format process after you click the OK button Note System can not open config backup interface again if there is backup operation in the process System refreshes device when you go to the config backup ever...

Page 83: ...Start to backup and you can see the corresponding dialogue box after the process is finish 3 9 4 USB Device Auto Pop up After you inserted the USB device system can auto detect it and pop up the following dialogue box It allows you to conveniently backup file log configuration or update system See Figure 3 71 Please refer to chapter 3 9 1 file backup chapter 3 9 3 backup log chapter 3 9 2 import e...

Page 84: ...eem as the alarm signal activation stays such as the buzzer tour PTZ activation snapshot channel record The stay time here does not include the latch time During the alarm process the alarm signal can begin an anti dither time if system detects the local alarm again The screen prompt alarm upload email and etc will not be activated For example if you set the anti dither time as 10 second you can s...

Page 85: ...X Record Delay System can delay the record for specified time after alarm ended The value ranges from 10s to 300s Tour Here you can enable tour function when an alarm occurs System one window tour Snapshot You can enable this function to snapshoot image when a motion detect alarm occurs Buzzer Highlight the icon to enable this function The buzzer beeps when an alarm occurs Please highlight icon to...

Page 86: ...76 Figure 3 73 Figure 3 74 Figure 3 75 ...

Page 87: ...o loss you can see the interface is shown as in Figure 3 77 This function allows you to be informed when video loss phenomenon occurred You can enable alarm output channel and then enable show message function You can refer to chapter 3 10 1 1Motion detect for detailed information Tips You can enable preset tour pattern activation operation when video loss occurs Figure 3 77 3 10 1 3 Tampering ...

Page 88: ... is only valid for the same type which means you can not copy a channel setup in video loss mode to tampering mode About Default function Since detection channel and detection type may not be the same system can only restore default setup of current detect type For example if you click Default button at the tampering interface you can only restore default tampering setup It is null for other detec...

Page 89: ...main menu Setting Event Face detect the interface is shown as in Figure 3 80 Human face ROI Check the box here system can enhance the human face display pane Sensitivity System supports 6 levels The sixth level has the highest sensitivity You can refer to the chapter 3 10 1 1 to set other parameters ...

Page 90: ...x here system can generate an alarm once the audio input is abnormal Intensity change Check the box here system can generate an alarm once the audio volume becomes strong Sensitivity It refers to the audio recognition sensitivity The higher the value is the higher the sensitivity is Threshold It is to set intensity change threshold The smaller the value is the higher the sensitivity is You can ref...

Page 91: ... From Main menu Setting Event Alarm output you can see an interface shown as in Figure 3 82 Here is for you to set proper alarm output Auto manual stop Click OK button of the alarm reset you can clear all alarm output status Figure 3 82 ...

Page 92: ...ace is shown as in Figure 3 88 There are two ways for you to set periods There are max 6 periods in one day There are four record types regular motion detection MD Alarm MD alarm In Figure 3 88 Select icon of several dates all checked items can be edited together Now the icon is shown as Click to delete a record type from one period In Figure 3 88 Click button after one date or a holiday you can s...

Page 93: ...rd mode as Schedule in Record interface Main Menu Advanced Record Please note the manual record has the highest priority System record all the time no matter there is an alarm or not if you select Manual mode Now you can go to the Schedule interface Main Menu Setting Schedule to set the record type corresponding channel number week and date You can select the record type Regular MD Alarm MD Alarm ...

Page 94: ...84 Figure 3 83 Figure 3 84 ...

Page 95: ...85 Figure 3 85 Figure 3 86 ...

Page 96: ...86 Figure 3 87 Figure 3 88 ...

Page 97: ...t Please select alarm activation output port multiple choices Less than System can alarm you when the HDD space is less than the threshold you set here For HDD no space type only Latch Here you can set corresponding delaying time The value ranges from 1s 300s System automatically delays specified seconds in turning off alarm and activated output after external alarm cancelled Show message system c...

Page 98: ...88 Figure 3 90 Figure 3 91 ...

Page 99: ...f the gateway the MTU of the DVR shall be the same as or is lower than the MTU of the gateway In this way you can reduce packets and enhance network transmission efficiency Right now the value here is for read only The following MTU value is for reference only 1500 Ethernet information packet max value and it is also the default value It is the typical setup when there is no PPPoE or VPN It is the...

Page 100: ... are offline Please note these cards shall be in the same LAN IP Version There are two options IPv4 and IPv6 Right now system supports these two IP address format and you can access via them MAC address The host in the LAN can get a unique MAC address It is for you to access in the LAN It is read only IP address Here you can use up down button or input the corresponding number to input IP address ...

Page 101: ...0 means there is no connection limit TCP port Default value is 37777 UDP port Default value is 37778 HTTP port Default value is 80 HTTPS port Default value is 443 RTSP port Default value is 554 Important System needs to reboot after you changed and saved any setup of the above four ports Please make sure the port values here do not conflict ...

Page 102: ... name and PPPoE password you get from your ISP Internet service provider Click save button you need to restart to activate your configuration After rebooting NVR will connect to internet automatically The IP in the PPPoE is the NVR dynamic value You can access this IP to visit the unit ...

Page 103: ...DDNS please select DDNS type and highlight enable item And them please input your PPPoE name you get from you IPS and server IP PC with DDNS Click save button and then reboot system Click save button system prompts for rebooting to get all setup activated After rebooting open IE and input as below http DDNS server IP virtual directory name webtest htm e g http 10 6 2 85 NVR _DDNS webtest htm Now y...

Page 104: ... the domain name and the IP address Right now current DDNS server is for our own devices only You need to refresh the bonding relationship of the domain and the IP regularly There is no user name password or the ID registration on the server At the same time each device has a default domain name Generated by MAC address for your option You can also use customized valid domain name has not register...

Page 105: ...ter IP in the LAN WAN IP It is the router IP in the WAN Port Mapping list The port mapping list here is the one to one relationship with the router s port mapping setting List Service name Defined by user Protocol Protocol type Internal port Port that has been mapped in the router External port Port that has been mapped locally Default UPNP default port setting is the HTTP TCP and UDP of the NVR A...

Page 106: ...system needs to check the validity of all IPv6 addresses and implement optimization After you enabled trusted sites function only the IP listed below can access current NVR If you enable blocked sites function the following listed IP addresses can not access current NVR Enable Highlight the box here you can check the trusted site function and blocked sites function You can not see these two modes ...

Page 107: ...ace if there is any space before or after the newly added IP address e System only checks start address if you add IP address System check start address and end address if you add IP section and the end address shall be larger than the start address f System may check newly added IP address exists or not System does not add if input IP address does not exist Delete Click it to remove specified ite...

Page 108: ...he send interval ranges from 0 to 3600 seconds 0 means there is no interval Health email enable Please check the box here to enable this function This function allows the system to send out the test email to check the connection is OK or not Interval Please check the above box to enable this function and then set the corresponding interval System can send out the email regularly as you set here Cl...

Page 109: ... Serv U FTP Server Serv U Administator Now you can set user password and FTP folder Please note you need to grant write right to FTP upload user See Figure 3 102 Figure 3 102 You can use a PC or FTP login tool to test setup is right or not For example you can login user ZHY to H1 40H1 40H1 40HTUFTP 10 10 7 7UTH and then test it can modify or delete folder or not See Figure 3 103 ...

Page 110: ...nel User name and password is the account information for you to login the FTP File length is upload file length When setup is larger than the actual file length system will upload the whole file When setup here is smaller than the actual file length system only uploads the set length and auto ignore the left section When interval value is 0 system uploads all corresponding files After completed c...

Page 111: ...s listed below to configure In Figure 3 105 check the box to enable the SNMP function Input the IP address of the PC than is running the software in the Trap address You can use default setup for the rest items Compile the above mentioned two MIB file via the software MIB Builder Run MG SOFT MIB Browser to load the file from the previous step to the software Input the device IP you want to manage ...

Page 112: ...0 5 OSPF router 224 0 0 13 PIMv2 router Administrative scoped addressees 239 0 0 0 239 255 255 255 Private address space Like the single broadcast address of RFC1918 Can not be used in Internet transmission Used for multiple cast broadcast in limited space Except the above mentioned addresses of special meaning you can use other addresses For example Multiple cast IP 235 8 8 36 Multiple cast PORT ...

Page 113: ... via the proxy Here the proxy has a switch function In the network service device supports the server address of IPv4 or domain Please follow the steps listed below to use this function Please set proxy server address port and sub device name at the device end Please enable the auto register function the device can auto register to the proxy server 1 The setup interface is shown as in Figure 3 108...

Page 114: ...rt number The device ID here shall be the same with the ID you input in Figure 3 108 Click Add button to complete the setup 4 Now you can boot up the proxy server When you see the network status is Y it means your registration is OK You can view the proxy server when the device is online Important The server IP address can also be domain But you need to register a domain name before you run proxy ...

Page 115: ...column You can use the dropdown list to select peripheral device Click Browse button to select the snap path The steps here are same as preview backup operation You can view all connected network adapter names including Ethernet PPPoE WIFI and 3G you can click the button on the right panel to begin Sniffer Click the grey stop button to stop Please note system can not Sniffer several network adapte...

Page 116: ...ere you can view the follow statistics of the device network adapter Here you can view information of all connected network adapters The connection status is shown as offline if connection is disconnected Click one network adapter you can view the flow statistics such as send rate and receive rate at the top panel ...

Page 117: ...tal capacity record time and etc The operation includes format resume from error change HDD property Read write Read only Here you can also set alarm and HDD storage position 3 12 1 Format a From Maini menu Setting Storage HDD Manager you can go to HDD management interface See Figure 3 112 ...

Page 118: ... see system needs to restart to activate current setup 3 12 2 HDD Information From Main menu Info System HDD here is to list hard disk type total space free space and status See Figure 3 113 means current HDD is normal means there is no HDD If disk is damaged system shows as Please remove the broken hard disk before you add a new one Figure 3 113 ...

Page 119: ...e HDD amount the device connected to means the second HDD is current working HDD Type The corresponding HDD property Total space The HDD total capacity Free space The HDD free capacity Status HDD can work properly or not Bad track Display there is bad track or not Page up Click it to view previous page Page down Click it to view the next page View recording time Click it to view HDD record informa...

Page 120: ...Advanced It is to set HDD group and HDD group setup for main stream sub stream and snapshot operation Click main stream sub stream snapshot button to set corresponding HDD group information See Figure 3 115 through Figure 3 117 Figure 3 115 Figure 3 116 ...

Page 121: ...Raid0 Raid1 Raid5 Raid6 and Raid10 Local hotspare supports Raid1 Raid5 Raid6 and Raid10 3 12 4 1 RAID Config From Main menu Setting Storage RAID RAID Config it is for you to manage RAID HDD It can display RAID name type free space total space status and etc Here you can add delete RAID HDD Click Add button to select RAID type and then select HDDs click OK button to add See Figure 3 118 ...

Page 122: ...gure 3 118 3 12 4 2 RAID Info From Main menu Setting Storage RAID RAID info it is to display RAID name space type member HDD hotspare HDD status and etc Here you can delete RAID See Figure 3 119 Figure 3 119 ...

Page 123: ...nterface See Figure 3 121 Pack duration Here is for you to specify record duration The value ranges from 0 to 120 minutes Default value is 60 minutes Device ID Please input a corresponding device name here Device No When you are using one remote control not included in the accessory bag to control several NVRs you can give a name to each NVR for your management Language System supports various lan...

Page 124: ... here to synchronize the NVR time and IPC time Startup wizard Once you check the box here system will go to the startup wizard directly when the system restarts the next time Otherwise it will go to the login interface Mouse property You can set double click speed via dragging the slide bard You can Click Default button to restore default setup Figure 3 121 3 13 2 Data and Time From Main menu Sett...

Page 125: ...ime modification please stop record operation first After completing all the setups please click save button system goes back to the previous menu Figure 3 122 3 13 3 Holiday From Main menu Setting System General Holiday holiday setup interface is shown as in Figure 3 123 Click Add new holiday button you can input new holiday information See Figure 3 124 Here you can set holiday name repeat mode a...

Page 126: ...tenance and Manager 3 14 1 System Info 3 14 1 1 Version From main menu Info System Version you can go to version interface Here is for you to view some version information See Figure 3 125 Please note the following figure for reference only Channel ...

Page 127: ... in Alarm out System version Build Date Web Serial number Figure 3 125 3 14 1 2 BPS From main menu Info System BPS here is for you to view current video bit rate kb s and resolution See Figure 3 126 Figure 3 126 ...

Page 128: ... to disconnect or block one user if you have proper system right System detects there is any newly added or deleted user in each five seconds and refresh the list automatically Figure 3 127 3 14 1 4 Remote Device Information From main menu Info Event here you can view the channel status of the remote device connection log and etc See Figure 3 128 Figure 3 128 ...

Page 129: ... IPC status Front end does not support Front end supports There is alarm event from current front end Connection status Connection succeeded Connection failed Refresh Click it to get latest front end channel status Figure 3 129 3 14 1 5 2 Firmware From main menu Setting Remote Firmware it is to view channel IP address manufacturer type system version SN video input audio input external alarm and e...

Page 130: ...s in a list System max displays 100 logs in one page It can save 500 000 logs on the HDD and 16384 logs on the system System max supports 500 000 16384 logs if there is a HDD System max supports 16384 logs if there is no HDD Please use page up down button on the interface or the front panel to view more Tips Double click a log item to view its detailed information See Figure 3 132 Click PgUp PgDn ...

Page 131: ...121 Figure 3 131 Figure 3 132 3 14 3 Account From main menu Setting System Account here is for you to implement account management See Figure 3 133 and Figure 3 134 Here you can Add new user Modify user ...

Page 132: ... levels admin and user The user name and group name can consist of eight bytes One name can only be used once There are four default users admin 888888 666666 and hidden user default Except user 6666 other users have administrator right Hidden user default is for system interior use only and can not be deleted When there is no login user hidden user default automatically login You can set some rig...

Page 133: ...emo information if necessary There are many rights such as control panel shut down real time monitor playback record record file backup PTZ user account system information view alarm input output setup system setup log view clear log upgrade system control device and etc The modify group interface is similar to the Figure 3 135 Figure 3 135 3 14 3 2 Add Modify User ...

Page 134: ... management usually we recommend the general user right is lower than the admin account The modify user interface is similar to Figure 3 136 Figure 3 136 3 14 4 Update From Mani menu Setting Info Update you can go to the following interface See Figure 3 137 a Insert USB device that contain the upgrade file b Click Start button and then select the bin file c You can see the corresponding dialogue b...

Page 135: ...See Figure 3 138 Click default icon system pops up a dialogue box You can highlight to restore factory default setup All Camera Network Event Storage System Please highlight icon to select the corresponding function After all the setups please click OK button system goes back to the previous menu Warning After you use default function some your customized setup may lose forever Please think twice ...

Page 136: ...e PC to transfer data directly Protocol COM is for card overlay function Network keyboard is for you to use the special keyboard to control the device PTZ matrix is to connect to the peripheral matrix control Baud rate You can select proper baud rate Data bit You can select proper data bit The value ranges from 5 to 8 Stop bit There are three values 1 1 5 2 Parity there are five choices none odd e...

Page 137: ...n here you can set auto reboot time and auto delete old files setup You can set to delete the files for the specified days See Figure 3 140 You can select proper setup from dropdown list After all the setups please click save button system goes back to the previous menu Figure 3 140 ...

Page 138: ...nd turns off power Logout Log out menu You need to input password when you login the next time Restart Reboot device If you shut down the device there is a process bar for your reference system waits for 3 seconds and then shut down You can not cancel Please note sometimes you need to input the proper password to shut down the device Figure 3 141 ...

Page 139: ...eries product max supports 4 network adapters The default setup is eth1 192 168 1 108 eth2 192 168 1 106 eth3 192 168 1 105 and eth4 192 168 1 104 Use order ping NVR IP address to check connection is OK or not 4 1 2 Log in Open the IE and then input the NVR IP address in the address column For example if your NVR IP address is 192 168 1 108 then please input http 192 168 1 108 in IE address column...

Page 140: ...e interface is shown as below See Figure 4 3 Figure 4 3 Please input your user name and password Default factory name is admin and password is admin Note For security reasons please modify your password after you first login 4 2 LAN Mode ...

Page 141: ... Please refer to Figure 4 5 for main stream and extra stream switch information Figure 4 5 Section 3 Start Talk button You can click this button to enable audio talk Click to select bidirectional talk mode There are four options DEFAULT G711a G711u and PCM See Figure 4 6 After you enable the bidirectional talk the Start talk button becomes End Talk button and it becomes yellow Please note if audio...

Page 142: ...on 7 PTZ operation panel Please refer to chapter 4 4 for detailed information Section 8 Image setup and alarm setup Please refer to chapter 4 5 for detailed information Section 9 From the left to the right you can see video quality fluency full screen 1 window 4 window 6 window 8 window 9 window 13 window 16 window 20 window 25 win dow 36 window You can set video fluency and real time feature prio...

Page 143: ...on please make sure you have properly set PTZ protocol There are eight direction keys In the middle of the eight direction keys there is a 3D intelligent positioning key Click 3D intelligent positioning key system goes back to the single screen mode Drag the mouse in the screen to adjust section size It can realize PTZ automatically Please refer to the following sheet for PTZ setup information Par...

Page 144: ...ct Pattern from the dropdown list You can input pattern value and then click Start button to begin PTZ movement such as zoom focus iris direction and etc Then you can click Add button to set one pattern Aux Please input the corresponding aux value here You can select one option and then click AUX on or AUX off button Light and wiper You can turn on or turn off the light wiper Figure 4 11 4 5 Image...

Page 145: ...aturation Current channel border becomes green Or you can click Reset button to restore system default setup Figure 4 12 4 5 2 Alarm output Here you can enable or disable the alarm signal of the corresponding port See Figure 4 13 Figure 4 13 4 6 Zero channel Encode Select a window and then click zero channel encode button the interface is shown as below See Figure 4 14 Figure 4 14 ...

Page 146: ...utton on the left pane is null 2 You can select different channels and different monitor modes at the bottom of the interface See Figure 4 16 Figure 4 16 Important The window display mode and the channel number are by default For example for the 16 channel the max window split mode is 16 3 Multiple channel monitor system adopts extra stream to monitor by default Double click one channel system swi...

Page 147: ...odify manually All channels are trying to synchronize Please note the synchronization effect still depends on your network environments For bandwidth consideration system can not support monitor and playback at the same time System auto closes monitor or playback interface when you are searching setup in the configuration interface It is to enhance search speed 4 8 Setup 4 8 1 Camera 4 8 1 1 Remot...

Page 148: ... system can connect the device automatically and add it to the Added device list Or you can double click one item in the list to add a device Modify Click or any device in the Added device list you can change the corresponding channel setup Delete Click you can delete the remote connection of the corresponding channel Connection status Connection succeeded Connection failed Delete Select a device ...

Page 149: ... button here system only connect to the corresponding device of current channel 4 8 1 1 2 Upgrade Important This function is for online network camera only From main window Setup Camera Remote device Upgrade you can see an interface is shown as below See Figure 4 19 Check the network camera you want to upgrade and then click Browse button to select upgrade file Click Start upgrade button to begin ...

Page 150: ... the bright section and the dark section of the video will be adjusted accordingly You can use this function when the whole video is too dark or too bright Please note the video may become hazy if the value is too high The value ranges from 0 to 100 The recommended value ranges from 40 to 60 Contrast It is to adjust monitor window contrast The value ranges from 0 to 100 The default value is 50 The...

Page 151: ...d WDR For the WDR scene this function can lower the high bright section and enhance the brightness of the low bright section So that you can view these two sections clearly at the same time The value ranges from 1 to 100 When you switch the camera from no WDR mode to the WDR mode system may lose several seconds record video HLC After you enabled HLC function the device can lower the brightness of ...

Page 152: ...nnel Please select a channel from the dropdown list Video enable Check the box here to enable extra stream video This item is enabled by default Code stream type It includes main stream motion stream and alarm stream You can select different encode frame rates form different recorded events System supports active control frame function ACF It allows you to record in different frame rates For examp...

Page 153: ...is 50 Recommended value is frame rate 2 Watermark enable This function allows you to verify the video is tampered or not Here you can select watermark bit stream watermark mode and watermark character Default character is DigitalCCTV The max length is 85 digit The character can only include number character and underline 4 8 1 3 2Snapshot From main window Setup Camera Encode Snapshot the snapshot ...

Page 154: ... privacy mask zones Time Title You can enable this function so that system overlays time information in video window You can use the mouse to drag the time title position You can view time title on the live video of the WEB or the playback video Channel Title You can enable this function so that system overlays channel information in video window You can use the mouse to drag the channel title pos...

Page 155: ...etup Figure 4 24 4 8 1 4 Camera Name From main window Setup Camera Camera name here you can set channel name See Figure 4 25 Figure 4 25 4 8 2 Network 4 8 2 1 TCP IP From main window Setup Network TCP IP the TCP IP interface is shown as in Figure 4 26 ...

Page 156: ...t tolerance In this mode device uses bond0 to communicate with the external devices You can focus on one host IP address At the same time you need to set one master card Usually there is only one running card master card System can enable alternate card when the master card is malfunction The system is shown as offline once all cards are offline Please note all cards shall be in the same LAN Load ...

Page 157: ...ode to the static mode you need to reset the IP parameters Besides IP submask gateway and DHCP are read only when the PPPoE dial is OK IP Address Please use the keyboard to input the corresponding number to modify the IP address and then set the corresponding subnet mask and the default gateway Preferred DNS DNS IP address Alternate DNS Alternate DNS IP address For the IP address of IPv6 version d...

Page 158: ...e provider and enable PPPoE function Please save current setup and then reboot the device to get the setup activated Device connects to the internet via PPPoE after reboot You can get the IP address in the WAN from the IP address column Please note you need to use previous IP address in the LAN to login the device Please go to the IP address item to via the device current device information You ca...

Page 159: ...tion allows you to access the NVR via the registered domain name Besides the general DDNS the quick DDNS works with the device from the manufacturer so that it can add the extension function 2 Function Introduction The quick DDNS client has the same function as other DDNS client end It realizes the bonding of the domain name and the IP address Right now current DDNS server is for our own devices o...

Page 160: ...ons shall be more than 60 seconds Too many registration requests may result in server attack System may take back the domain name that is idle for one year You can get a notification email before the cancel operation if your email address setup is OK 4 8 2 5 IP filter From main window Setup Network IP filter the IP filter interface is shown as in Figure 4 30 After you enabled trusted sites functio...

Page 161: ...email address Authentication Encryption mode You can select SSL or none Subject Input email subject here Attachment System can send out the email of the snapshot picture once you check the box here Receiver Input receiver email address here Max three addresses It supports SSL TLS email box Interval The send interval ranges from 0 to 3600 seconds 0 means there is no interval Please note system will...

Page 162: ...ormation 4 8 2 7 FTP From main window Setup Network FTP the FTP interface is shown as in Figure 4 32 It is to set FTP IP port and etc for remote storage Figure 4 32 4 8 2 8 UPnP From main window Setup Network UPnP here you can also add modify or remove UPnP item See Figure 4 33 It allows you to establish the mapping relationship between the LAN and the public network In the Windows OS From Start C...

Page 163: ...3 4 8 2 9 SNMP From main window Setup Network SNMP the SNMP interface is shown as in Figure 4 34 The SNMP allows the communication between the network management work station software and the proxy of the managed device It is reserved for the 3rd party to develop Figure 4 34 Please refer to the following sheet for detailed information ...

Page 164: ...fault setup is write Trap address The destination address of the Trap information from the proxy program of the device Trap port The destination port of the Trap information from the proxy program of the device It is for the gateway device and the client end PC in the LAN to exchange the information It is a non protocol connection port It has no effect on the network applications It is a UDP port ...

Page 165: ...s port and sub device name at the device end Please enable the auto register function the device can auto register to the proxy server Figure 4 36 4 8 2 12 Alarm Centre From main window Setup Network Alarm centre the alarm center interface is shown as below See Figure 4 37 This interface is reserved for you to develop System can upload alarm signal to the alarm center when local alarm occurs Befor...

Page 166: ...gain if you have changed device IP You need to download root certificate if it is your first time to use HTTPS on current PC Figure 4 38 4 8 2 13 1 Create Server Certificate If it is your first time to use this function please follow the steps listed below In Figure 4 38 click button input country name state name and etc Click Create button See Figure 4 39 Note Please make sure the IP or domain in...

Page 167: ...igure 4 38 click button system pops up a dialogue box See Figure 4 41 Figure 4 41 Click Open button you can go to the following interface See Figure 4 42 Figure 4 42 Click Install certificate button you can go to certificate wizard See Figure 4 43 ...

Page 168: ...igure 4 43 Click Next button to continue Now you can select a location for the certificate See Figure 4 44 Figure 4 44 Click Next button you can see the certificate import process is complete See Figure 4 45 ...

Page 169: ...4 46 Figure 4 46 Click Yes button system pops up the following dialogue box you can see the certificate download is complete See Figure 4 47 Figure 4 47 4 8 2 13 3 View and set HTTPS port From Setup Network Connection you can see the following interface See Figure 4 48 You can see HTTPS default value is 443 ...

Page 170: ...d port information here You can input https xx xx xx xx to access Now you can see the login interface if your setup is right 4 8 3 Event 4 8 3 1 Video detect 4 8 3 1 1Motion Detect After analysis video system can generate a video loss alarm when the detected moving signal reached the sensitivity you set here From main window Setup Event Video detect Motion detect the motion detect interface is sho...

Page 171: ...161 Figure 4 49 Figure 4 50 ...

Page 172: ...162 Figure 4 51 Figure 4 52 ...

Page 173: ...f you select motion detection type you can click this button to set motion detection zone The interface is shown as in Figure 4 51 Here you can set motion detection zone There are four zones for you to set Please select a zone first and then left drag the mouse to select a zone The corresponding color zone displays different detection zone You can click Fn button to switch between the arm mode and...

Page 174: ...he alarm signal to the centre Including alarm centre Message When 3G network connection is OK system can send out a message when motion detect occurs Send Email If you enabled this function System can send out an email to alert you when an alarm occurs Tour You need to click setup button to select tour channel System begins 1 wiindow or multiple window tour display among the channel s you set to r...

Page 175: ...nterface is shown as in Figure 4 56 After analysis video system can generate a tampering alarm when the detected moving signal reached the sensitivity you set here For detailed setups please refer to chapter 4 8 3 1 1 motion detect for detailed information Figure 4 56 4 8 3 1 4Video diagnosis Important ...

Page 176: ...4 57 Figure 4 57 Click Set button the interface is shown as below See Figure 4 58 System can generate an alarm once there is stripe noise or video is color cast out of focus or over exposure Figure 4 58 For detailed setups please refer to chapter 4 8 3 1 1 motion detect for detailed information 4 8 3 2 Face Detect When camera detects human face system can generate an alarm ...

Page 177: ...t is abnormal or audio volume changes From main menu Setup Event Audio detect you can see an interface shown as in Figure 4 60 Input abnormal Check the box here system can generate an alarm once the audio input is abnormal Intensity change Check the box here system can generate an alarm once the audio volume becomes strong Sensitivity It refers to the audio recognition sensitivity The higher the v...

Page 178: ...cted alarm devices such as buzzer The input mode includes local alarm network alarm and IPC external alarm and IPC offline alarm 4 8 3 4 1Local Alarm From main menu Setup Event Alarm Local alarm the local alarm interface is shown as in Figure 4 61 It refers to alarm from the local device ...

Page 179: ...169 Figure 4 61 Figure 4 62 ...

Page 180: ...f you do not select current setup applies to today only You can select all week column to apply to the whole week Click OK button system goes back to local alarm interface please click save button to exit Anti dither System only memorizes one event during the anti dither period The value ranges from 5s to 600s Sensor type There are two options NO NC Record channel System auto activates motion dete...

Page 181: ...tem can upload the alarm signal to the centre Including alarm centre Send Email If you enabled this function System can send out an email to alert you when an alarm occurs Tour You need to click setup button to select tour channel System begins 1 wiindow or multiple window tour display among the channel s you set to record when an alarm occurs See Figure 4 53 PTZ Activation Here you can set PTZ mo...

Page 182: ...s shown as in Figure 4 65 Network alarm refers to the alarm signal from the network System does not support anti dither and sensor type setup For setup information please refer to chapter 4 8 3 4 1 Figure 4 65 4 8 3 4 4IPC Offline Alarm From main menu Setup Event Alarm IPC offline alarm the IPC offline alarm interface is shown as ...

Page 183: ...is offline For setup information please refer to chapter 4 8 3 4 1 Figure 4 66 4 8 3 5 Abnormality From main menu Setup Event Abnormality you can go to the abnormality interface It includes three types HDD Network Power fault See Figure 4 67 through Figure 4 69 Figure 4 67 ...

Page 184: ...ice can alarm when capacity is not sufficient You need to draw a circle to enable this function Network event type includes Disconnect IP conflict MAC conflict See Figure 4 68 Power fault The interface is shown as in Figure 4 69 This function is for power redundancy series product When this function is on you can remove one power sourcing from the system it does not affect the normal operation of ...

Page 185: ...this function The buzzer beeps when an alarm occurs 4 8 3 6 Alarm Output From main menu Setup Event Alarm output it is to set alarm output mode See Figure 4 70 Figure 4 70 4 8 4 Storage 4 8 4 1 Schedule From main menu Setup Storage Schedule you can go to the schedule interface In this interfaces you can add or remove the schedule record setup See Figure 4 71 There are five record modes Regular mot...

Page 186: ...176 Figure 4 71 Figure 4 72 ...

Page 187: ...ce current setup is for today only Please click Save button and then exit Copy Copy function allows you to copy one channel setup to another After setting in channel click Copy button you can go to interface Figure 4 73 You can see current channel name is grey such as channel 1 Now you can select the channel you wan to paste such as channel 5 6 7 If you wan to save current setup of channel 1 to al...

Page 188: ...ion Channel Here you can view channel number The number displayed here is the max channel amount of your device Status There are three statuses schedule manual and stop Schedule System enables auto record function as you set in record schedule setup general motion detect and alarm Manual It has the highest priority Enable corresponding channel to record no matter what period applied in the record ...

Page 189: ...HDD interface is shown as below See Figure 4 76 Here you can set HDD group Figure 4 76 4 8 4 4 2Main Stream From main menu Setup Storage Advanced Main stream the main stream interface is shown as in Figure 4 77 Here you can set corresponding HDD group to save main stream Figure 4 77 4 8 4 4 3Sub Stream From main menu Setup Storage Advanced Sub stream the sub stream interface is shown as in Figure ...

Page 190: ...ure your purchased product support the RAID function otherwise you can not see the following interface 4 8 4 5 1RAID Config From main menu Setup Storage RAID RAID config you can go to the following interface See Figure 4 80 It is for you to manage RAID HDD It can display RAID name type free space total space status and etc Here you can add delete RAID HDD Click Add button to select RAID type and t...

Page 191: ...ks From main menu Setup Storage RAID Hotspare you can see an interface shown as in Figure 4 82 The type includes two options Global It is global hotspare disk When any RAID becomes degrading it can replace and build the RAID Local It is local hotspare disk When the specified RAID becomes degrading it can replace and build the RAID Select a hot spare device and then click Delete button Click Apply ...

Page 192: ...igure 4 83 Check the box to enable iSCSI function and then input iSCSI server IP address and port The default port number is 3260 Click Set path button system pops up the path setup dialogue box Please select the connected path and then click OK button See Figure 4 84 Each path here stands for an iSCSI share disk The path is already generated when it was created on the server ...

Page 193: ...s button or input customized user name Click add button now you have added an iSCSI server Click OK button the setup is finish The interface is shown as in Figure 4 85 Note If you have not input a user name password or check the anonymous button system pops up a dialogue box to prompt you that system is going to add anonymously In this situation once the iSCSI path has the access setup you may not...

Page 194: ... the modification activated Video Standard This is to display video standard such as PAL HDD full Here is for you to select working mode when hard disk is full There are two options stop recording or rewrite If current working HDD is overwritten or the current HDD is full while the next HDD is no empty then system stops recording If the current HDD is full and then next HDD is not empty then syste...

Page 195: ...our PC current time DST Here you can set day night save time begin time and end time You can set according to the date format or according to the week format NTP You can check the box to enable NTP function NTP server You can set the time server address Port It is to set the time server port Interval It is to set the sync periods between the device and the time server 4 8 5 1 3Holiday Setup From m...

Page 196: ...for detailed information Parameter Function Resolution There are four options 1920 1080 1280 1024 default 1280 720 1024 768 Please note the system needs to reboot to activate current setup Transparency Here is for you to adjust transparency The value ranges from 128 to 255 Time title channel title Check the box here you can view system time and channel number on the monitor video Image Check the b...

Page 197: ...e tour Check the box here to enable tour function Interval Here is for you to adjust transparency The value ranges from 5 to 120s The default setup is 5s Split Here you can set window mode and channel group System can support 1 4 8 9 16 25 36 window according to device channel amount Motion tour Alarm tour Here you can set motion detect tour alarm tour window mode System supports 1 8 window now 4 ...

Page 198: ...e two options 1 2 Default setup is 1 Parity There are five options none odd even space mark Default setup is none 4 8 5 4 PTZ The PTZ interface is shown as in Figure 4 92 local type and Figure 4 93 remote type Before setup please check the following connections are right PTZ and decoder connection is right Decoder address setup is right Decoder A B line connects with DVR A B line Click Save button...

Page 199: ...me dial switch setup Parity Default setup is none Please set according to the speed dome dial switch setup 4 8 5 5 Account Note For the character in the following user name or the user group name system max supports 6 digits The space in the front or at the end of the string is null The valid string includes character number and underline The user amount default setup is 64 and the group amount de...

Page 200: ...system interior use only and can not be deleted When there is no login user hidden user default automatically login You can set some rights such as monitor for this user so that you can view some channel view without login Here you can input the user name and password and then select one group for current user Please note the user rights shall not exceed the group right setup For convenient setup ...

Page 201: ...assword twice to confirm the new setup Please click the OK button to save Please note the password ranges from 1 digit to 6 digit It shall include the number only For the user of the account rights he can modify the password of other users Figure 4 96 4 8 5 5 2Group The group management interface can add remove group modify group password and etc The interface is shown as in Figure 4 97 Figure 4 9...

Page 202: ...he box to select the corresponding rights It includes shutdown reboot device live view record control PTZ control and etc Figure 4 98 Modify group Click the modify group button you can see an interface is shown as in Figure 4 99 Here you can modify group information such as remarks and rights Figure 4 99 4 8 5 6 Auto maintain ...

Page 203: ...4 100 4 8 5 7 Import Export From main menu Setup System Import export the interface is shown as in Figure 4 101 Figure 4 101 Please refer to the following sheet for detailed information Parameter Function Import It is to import the local setup files to the system Export It is to export the corresponding WEB setup to your local PC 4 8 5 8 Default From main menu Setup System Default the default setu...

Page 204: ...erated under the supervision of the professional engineer Figure 4 103 4 8 6 Cluster Service The Cluster service is a system component used to control activities on a single node When one or several device s are malfunction it can switch to the slave device to replace the work accordingly There are two standards when the master device is malfunction 1 Device is offline 2 Device storage is damaged ...

Page 205: ...tion you can view device IP work status Click operation button you can view the connection log of the main device See Figure 4 104 Figure 4 104 Click Manual add the interface is shown as below See Figure 4 105 Figure 4 105 Click to view event occurrence time name operation and reason See Figure 4 106 ...

Page 206: ...on Otherwise cluster function is null Please refer to chapter 4 8 6 4 4 8 6 3 Record Transfer From main menu Setup Cluster service Record transfer you can go to the record transfer interface When the master device is malfunction and can not record system can use slave device to record instead You can use this function to forward the record files on the slave device to the main device After the mas...

Page 207: ... on the slave device to the master device 4 8 6 4 Cluster control From main menu Setup Cluster service Cluster control you can go to the cluster control interface It is to enable disable cluster See Figure 4 109 Figure 4 109 You can see the corresponding prompt if you successfully enabled cluster service 4 8 6 5 DCS Log From main menu Setup Cluster service DCS log you can go to the DCS log interfa...

Page 208: ...Info Version the version interface is shown as in Figure 4 111 Here you can view record channel alarm input output information software version release date and etc Please note the following information for reference only Figure 4 111 4 9 2 Log From main menu Info Log here you can view system log See Figure 4 112 ...

Page 209: ...own list and then click search button to view the list You can click the stop button to terminate current search operation Detailed information You can select one item to view the detailed information Clear You can click this button to delete all displayed log files Please note system does not support clear by type Backup You can click this button to backup log files to current PC 4 9 3 Online Use...

Page 210: ...ure 4 114 4 10 Playback Click Playback button you can see an interface is shown as in Figure 4 115 Please set record type record date window display mode and channel name You can click the date on the right pane to select the date The green highlighted date is system current date and the blue highlighted date means it has record files ...

Page 211: ...a file you want to play and then click Play button system can begin playback You can select to playback in full screen Please note for one channel system can not playback and download at the same time You can use the playback control bar to implement various operations such as play pause stop slow play fast play and etc See Figure 4 117 ...

Page 212: ... download and then click download button you can see an interface shown as in Figure 4 118 The Download button becomes Stop button and there is a process bar for your reference Please go to you default file saved path to view the files Figure 4 118 ...

Page 213: ... record type and record time to download There are two download types The download by file interface is shown as in Figure 4 119 and the download by time interface is shown as in Figure 4 120 Figure 4 119 Figure 4 120 Watermark Watermark interface is shown as in Figure 4 121 Please select a file and then click Verify button to see the file has been tampered with or not ...

Page 214: ...m events Figure 4 122 Please refer to the following sheet for detailed information Type Parameter Function Alarm Type Video loss System alarms when video loss occurs Motion detection System alarms when motion detection alarm occurs Tampering System alarms when camera is viciously masking Disk full System alarms when disk is full Disk error System alarms when disk error occurs External alarm Alarm ...

Page 215: ... interface when there is an alarm Alarm Sound Play alarm sound System sends out alarm sound when an alarm occurs You can specify as you wish Sound path Here you can specify alarm sound file 4 12 Log out Click log out button system goes back to log in interface See Figure 4 123 You need to input user name and password to login again Figure 4 123 4 13 Un install Web Control You can use web un instal...

Page 216: ...capacity i m which is storage of each channel needed unit Mbyte i m i q i h i D 2 In the formula i h means the recording time for each day hour i D means number of days for which the video shall be kept Step 3 According to Formula 3 to calculate total capacity accumulation T q that is needed for all channels in the device during scheduled video recording c i i T m q 1 3 In the formula c means tota...

Page 217: ...riod the toxic or hazardous substance or elements contained in products will not leak or mutate so that the use of these substances or elements will not result in any severe environmental pollution any bodily injury or damage to any assets The consumer is not authorized to process such kind of substances or elements please return to the corresponding local authorities to process according to your ...

Reviews: