background image

Quick Start Guide 

1.2 Connecting Alarm Input/Output 

The camera can connect to external alarm input/output devices through digital input/output. 


Alarm input/output is available on select models. 
Step 1 

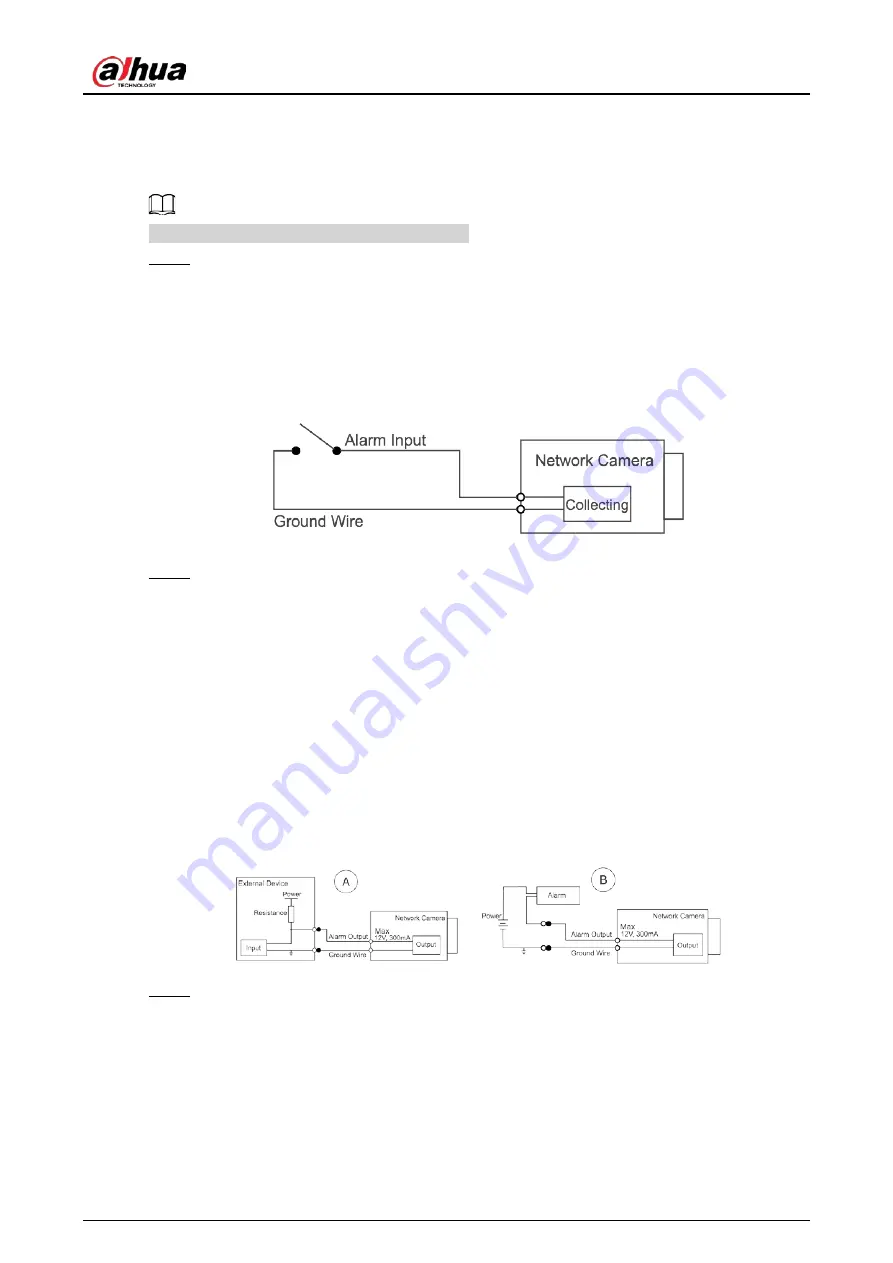
Connect the alarm input device to the alarm input end of the I/O port. 
Device collects different states of alarm input port when the input signal is idling and 
being grounded. 

  Device collects logic "1" when input signal is connected to +3 V to +5 V or idling. 

  Device collects logic "0" when input signal is grounded. 

Figure 1-2 Alarm input 


Step 2 

Connect alarm output device to the alarm output end of the I/O port. The alarm output is 
open-drain output, which works in the following modes. 

  Mode A: Level application. Alarm outputs high and low level, and the alarm outlet is 

OD, which requires external pull-up resistance (10 K Ohm typical) to work. The 
maximum external pull-up level is 12 V, maximum port current is 300 mA and the 
default output signal is high-level (external pull-up voltage). The default output signal 
switches to low- level when there is alarm output (As long as the operating current is 
below 300 mA, the output low-level voltage is lower than 0.8 V). 

  Mode B: Switch application. Alarm output is used to drive external circuit, the 

maximum voltage is 12 V and the maximum current is 300 mA. If the voltage is higher 
than 12 V, please use an additional electric relay. 

Figure 1-3 Alarm output 


Step 3 

Log in to web page, and then configure alarm input and alarm output in alarm settings. 

  The alarm input on the web page is corresponding to the alarm input end of the I/O 

port. There will be high level and low level alarm signal generated by the alarm input 
device when alarm occurs. Set the input mode to "NO" (default) if the alarm input signal 
is logic "0" and to "NC" if the alarm input signal is logic "1". 

  The alarm output on the web page is corresponding to the alarm output end of the 

device, which is also the alarm output end of the I/O port. 

Summary of Contents for IPC-HFW2831T-ZS-S2

Page 1: ...Bullet Network Camera Quick Start Guide ZHEJIANG DAHUA VISION TECHNOLOGY CO LTD V1 0 3...

Page 2: ...ler you might collect the personal data of others such as their face fingerprints and license plate number You need to be in compliance with your local privacy protection laws and regulations to prote...

Page 3: ...nt If there is any doubt or dispute we reserve the right of final explanation Upgrade the reader software or try other mainstream reader software if the manual in PDF format cannot be opened All trade...

Page 4: ...safety code and standards and check whether the power supply is correct before operating the device Please follow the electrical requirements to power the device When selecting the power adapter the p...

Page 5: ...oint where they exit from the device Do not directly touch the photosensitive CMOS Use an air blower to clean the dust or dirt on the lens The dome cover is an optical component Do not directly touch...

Page 6: ...t use volatile solvents such as ethyl alcohol benzene diluent or abrasive detergents on the device to avoid damaging the coating and degrading the performance of the device The dome cover is an optica...

Page 7: ...ork Configuration 3 2 1 Initializing the Camera 3 2 2 Changing the Device IP Address 4 2 3 Logging in to Web Page 4 3 Installation 5 3 1 Packing List 5 3 2 Dimensions 5 3 3 Installing the Camera 6 3 3...

Page 8: ...des power to the camera with PoE PoE is available on select models 3 Audio input Connects to sound pick up device to receive audio signal 4 Audio output Connects to speakers to output audio signal 5 A...

Page 9: ...evel is 12 V maximum port current is 300 mA and the default output signal is high level external pull up voltage The default output signal switches to low level when there is alarm output As long as t...

Page 10: ...gment properly for the device The following figures are for reference only 2 1 Initializing the Camera Step 1 Search for the device that needs to be initialized through ConfigTool 1 Double click Confi...

Page 11: ...evices whose IP addresses need to be changed and then click Modify IP Step 3 Configure IP address Static mode When you select Static you need to enter Start IP Subnet Mask and Gateway The IP addresses...

Page 12: ...he installation such as electric drill is not provided in the package The operation manual and related tool information are contained in the disk or the QR code Figure 3 1 Packing list 3 2 Dimensions...

Page 13: ...alling SD Card SD card slot is available on select models Disconnect the power before installing or removing the SD card Press the reset button for 10 seconds to reset the device Figure 3 6 Install SD...

Page 14: ...Quick Start Guide 7 Figure 3 7 Cable going through the side cable tray Figure 3 8 Cable going through the mounting surface...

Page 15: ...Installing Waterproof Connector This part is needed only when a waterproof connector comes with the camera and the camera is used outdoors Figure 3 9 Install waterproof connector 3 3 5 Adjusting Lens...

Page 16: ...Quick Start Guide...

Reviews: