background image


Web  Configuration    51 


Parameter 

Description 

C Area 

A region drawn to detect the vehicle speed. 

C Check 

A line drawn to check whether the speed detected matches the actual 

speed of the vehicle. 

The following functions are only available in E-Police mode. 

Stop Line 

The stop line on a physical lane. 

Front Line 

Front line is recommended to be drawn at one-vehicle-position away from 

the stop line at the bottom. 

Middle Line 

The middle line is recommended to be drawn below the stop line to ensure 

that when the vehicle crosses the middle line, the vehicle front wheel has 

crossed the stop line. 

Rear Line 

The rear line is recommended to be drawn above the area. If there is no 

waiting area, draw it near the top 1/3 of screen. 

  Lane  information  will  be  displayed  after  lane  lines  are  drawn.  You  can  edit  or  delete 

Step 5

lane lines. 


Click 

  to delete the current lane line. 


Click 

  to configure the corresponding lane. See Figure 6-50 and Figure 6-51. 

Click

 Yes

 to save the configuration. 

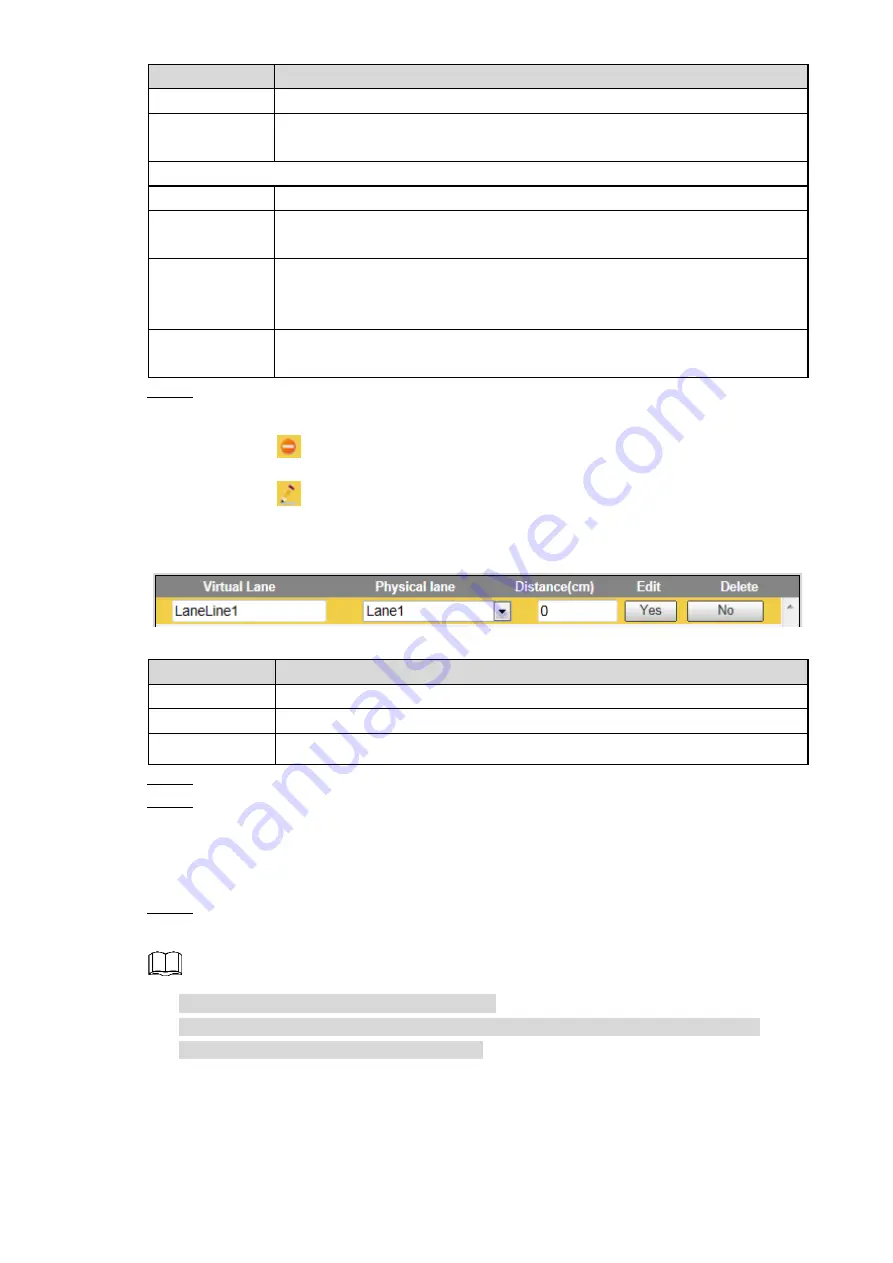
 Editing lane line 

Figure 6-50


 Lane line parameters 

Figure 6-51

Parameter 

Description 

Virtual Lane 

Enter the name of virtual lane you have drawn. 

Physical Lane 

Select the lane according to the actual road conditions. 

Distance 

The distance from the lower edge of video image to the stop line. 

  Click 

Yes

 to save the configuration. 

Step 6

  Click 

OK

 to save the configuration. Click 

Refresh

 to refersh the interface. 

Step 7

6.5.1.4.5 Video Analyse

–Speed Measuring 

You can configure the installation parameters of the camera to realize speed measuring. 

  Select 

Setting > ITC > Intelligent > Video Analyse > Speed Measuring

Step 1

The 

Speed Measuring

 interface is displayed. See Figure 6-52. 


This function is only available in ANPR mode. 


The value configured must be the same as the actual installation, otherwise, it may 

influence the precision of speed measuring. 

Summary of Contents for DHI-ITC952-RF2D

Page 1: ...Dahua HD Intelligent Traffic Camera User s Manual V1 0 1 ZHEJIANG DAHUA VISION TECHNOLOGY CO LTD...

Page 2: ...its are designed to provide reasonable protection against harmful interference in a commercial environment Operation of this equipment in a residential area is likely to cause harmful interference in...

Page 3: ...appear in the Manual Signal Words Meaning Indicates a high potential hazard which if not avoided will result in death or serious injury Indicates a medium or low potential hazard which if not avoided...

Page 4: ...hods to help you solve a problem or save you time NOTE Provides additional information as the emphasis and supplement to the text Revision History No Version Revision Content Release Time 1 V1 0 1 Upd...

Page 5: ...eplacing battery make sure the same model is used Use the recommended power cables in the region and conform to the rated power specification Use the power adapter provided with the Camera otherwise i...

Page 6: ...alling TF Card 8 3 2 2 Removing TF Card 9 I O Interface 9 3 3 3 3 1 Installing the Cable 10 3 3 2 Removing the Cable 10 Corrugated Pipe 10 3 4 4 System Network 11 5 ConfigTool 12 Modifying IP Address...

Page 7: ...cord Query 40 Setting 41 6 5 6 5 1 ITC Intelligent Traffic Camera 41 6 5 2 Camera 71 6 5 3 Network 79 6 5 4 Remote Device 81 6 5 5 Event 82 6 5 6 Storage 86 6 5 7 System 89 6 5 8 Information 108 Alarm...

Page 8: ...for your reference The functions may vary according to the model and the actual functions of the model shall prevail Picture Composition Composites several pictures of violations into one picture and...

Page 9: ...ugh network single channel record data compressed by the Camera is transmitted to the network terminal for decompression and reconstruction 400ms delay at most if bandwidth allows Max supports 10 conn...

Page 10: ...rately reflecting the color balance when the illumination source changes Partial white balance Adjusting the color balance according to the surrounding environment Automatic Exposure Automatically det...

Page 11: ...V AC 24V RESET Reset button Restore to factory default settings When system runs normally the power indicator light is blue press and hold the RESET button for at least 5 seconds and the system restor...

Page 12: ...ly as alarm output port and wiper output port R1 T1 G R2 T2 G R3 T3 G 3 channel radar port Simultaneous connection of 3 radars R RS 232 ports RS232_RX RS232 port receiving terminal T RS232_TX RS232 po...

Page 13: ...Structure 6 Side Panel 2 2 Side panel dimensions mm Figure 2 2 Front Panel 2 3 Front panel dimensions mm Figure 2 3...

Page 14: ...Varifocal Lens 3 1 This section takes some models as the example and the actual model shall prevail 3 1 1 Installing the Lens Remove the protective covers of sensor and lens Insert the spacer in betw...

Page 15: ...lens Figure 3 3 Unplug the cable from the lens mount Step 1 Turn the lens to counter clockwise until the lens is removed See Figure 3 3 Step 2 Install the protective covers of sensor and lens to preve...

Page 16: ...ion 9 Installing TF card Figure 3 4 3 2 2 Removing TF Card Remove the TF card according to the direction shown by the arrow See Figure 3 5 Removing TF card Figure 3 5 I O Interface 3 3 I Ointerface Fi...

Page 17: ...Insert the screwdriver into the square slot corresponding to the connecting cable Press Step 1 the screwdriver vertically to loosen and expose the metal sheet of the circular slot Pull the cable out o...

Page 18: ...ideos of different surveillance scenes and transmit video data to controller central server or back end storage device through network See Figure 4 1 System network Figure 4 1 Video detector Radar Fla...

Page 19: ...ol shall prevail Open ConfigTool and on the Devices found page you can see the device information such as status type model IP MAC and version See Figure 5 1 Main interface Figure 5 1 Modifying IP Add...

Page 20: ...s as the same IP Batch modify Figure 5 2 Click OK Step 5 Upgrading the Camera 5 2 Supports upgrading one device or batch upgrade Open ConfigTool Step 1 Click and the Upgrade interface is displayed See...

Page 21: ...5 4 Upgrade the device Step 5 Upgrade one device Click Upgrade and the system starts upgrading You can see the upgrade progress Batch upgrade Click OK and the system starts upgrading If the device is...

Page 22: ...rch 5 4 Click to search device The Setting interface is displayed See Figure 5 6 Setting Figure 5 6 Current segment search Search devices in the same network segment with the PC Other segment search S...

Page 23: ...network segment The network segment can be set as 192 168 1 X but cannot be the same with the factory default IP of the Camera 192 168 1 108 3 Execute ping device IP command on PC to check network con...

Page 24: ...ter the user name and password Step 5 The Config Guide interface is displayed See Figure 6 3 Config guide 1 Figure 6 3 Click Next Step 6 The interface for configuring IP address subnet mask and defaul...

Page 25: ...on the same network segment with the IP address of the Camera If routing device is used then enter the corresponding gateway and subnet mask Live interface Figure 6 5 Before installing the plug in ma...

Page 26: ...n to the web by following the steps below For first time login see 6 1 1 First time Login Enter the IP address of the Camera in the browser address bar and press Enter Step 1 Enter user name and passw...

Page 27: ...ace Setting You can configure settings such as basic properties business type internet protocol alarm time and storage You can also check information of the Camera Alarm You can configure alarm settin...

Page 28: ...selecting the business type click OK The system prompts Save succeeded See Figure 6 9 Work mode Figure 6 9 If you change the business type a box which prompts you to reboot pops up See Figure 6 10 Cli...

Page 29: ...Web Configuration 22 Manual reboot Figure 6 10 Rebooting Figure 6 11...

Page 30: ...different modes day night The following steps provide guides in resepct of zoom in out and focus as well as configuring preset points Click Next after configuring the work mode or click PTZ Step 1 The...

Page 31: ...he work mode of corresponding preset point You Step 5 can select Daytime Night Dawn Dusk and Other Click Add and the preset point will be added You can check the preset point Step 6 information in Pre...

Page 32: ...Click this icon to add a preset point Click this icon to delete a preset point Preset Config You can view and change the settings in PTZ setup See Figure 6 14 Go to Click Go to and it will go to the...

Page 33: ...o the green line area click Snapshot and Step 2 the icon changes into Resume See Figure 6 16 The green line area is defined by the system Snapshot Figure 6 16 Click Zoom and draw a box around the plat...

Page 34: ...pixel to 220 pixel You need to zoom in and focus the lens through PTZ setup If the actual plate width pixel is bigger than the reference pixel then zoom out and focus the lens See 6 2 2 PTZ Draw plat...

Page 35: ...usiness Type see 6 2 1 Work Mode Click Next after setting Plate pixel check or click Trigger Mode Step 1 The Config Guide interface is displayed See Figure 6 19 Trigger mode config mode Figure 6 19 Do...

Page 36: ...Enable Radar is selected see Figure 6 21 To configure the parameters see 6 5 1 4 1 Radar ANPR RS485 is applicable to multi lane capture If Enable RS485 is selected see Figure 6 22 To configure the pa...

Page 37: ...r detection See Figure 6 23 Step 4 To configure the parameters see 6 5 1 4 4 Video Analyse Scene Setup Click OK to save the configuration Click Refresh to refresh the interface Draw line Figure 6 23 C...

Page 38: ...ick Trigger Mode Step 1 The Config Guide is displayed See Figure 6 24 Trigger mode config mode Figure 6 24 Double click the mode you want to select Step 2 The RS485 interface is displayed See Figure 6...

Page 39: ...n See Figure 6 26 Step 3 To configure the parameters see 6 5 1 4 4 Video Analyse Scene Setup Click OK to save the configuration Click Refresh to refresh the interface Draw line Figure 6 26 Click Next...

Page 40: ...ully connected Step 3 After clicking Test check whether the light is successfully connected in the video image at the right side Click OK to save the configuration Click Refresh to refresh the interfa...

Page 41: ...e 6 5 1 2 Lane Property Step 2 Click OK to save the configuration Click Refresh to refresh the interface Step 3 Click Next to Complete Step 4 Click Back and you can return to configure the Lamp config...

Page 42: ...30 Click Finish to complete guide setting Step 2 Click Back and you can return to configure the Lane Property Live 6 3 The Live interface is displayed after successfully log in to web See Figure 6 31...

Page 43: ...ar and video detect Information such as event type capture time lane plate vehicle color speed vehicle sign and vehicle type are displayed Click on the button to snapshot Snapshots are saved based on...

Page 44: ...d Manual Snap Unfasten Seat Belt Calling While Driving and No Helmet Vehicle Sign Search pictures by the selected vehicle sign You can select All Unknown or a specific vehicle sign Lane Select the sna...

Page 45: ...ription Download Time Create Time When downloading pictures to PC use the time on the PC Snap Time When downloading pictures to PC use the snapshot time Download Mode Selected File Download selected p...

Page 46: ...click a picture to check the picture Step 3 6 4 2 Flow Query You can check the traffic flow of selected time The function is available on select models and the actual product shall prevail Flow Query...

Page 47: ...e 6 6 Record Figure 6 36 Table 6 6 Play parameters Parameter Description Click it and then you can select Original or Adpative playback Click to enter full screen Double click the video image or press...

Page 48: ...he Watermark interface is displayed See Figure 6 37 Watermark Figure 6 37 Click Open Record to select the record Step 2 Click Water Verify The system will display the verify progress and normal waterm...

Page 49: ...ights When changing the business type the system prompts The config is amend are you sure to reboot Click Yes and the ITC reboots In this way the work mode will be successfully changed Snap Match Mode...

Page 50: ...ty SnapEnable Select the lane s to enable snapshot The lane No corresponds to lanes on roads Illegal Type Config Video Analyse Select according to actual needs The Camera analyzes violations according...

Page 51: ...Figure 6 42 Step 3 Different event types correspond to different advance configuration items The following description takes Overspeed as the example For other events refer to this example Advance con...

Page 52: ...the start time and end time 3 Click Yes to save the configuration Click OK to save the configuration Click Refresh to refresh the interface Step 5 6 5 1 3 Snapshot You can configure the max speed work...

Page 53: ...ion Click Refresh to refresh the interface Step 3 6 5 1 4 Intelligent Different models with different work modes may support different intelligent functions and the actual product shall prevail In ANP...

Page 54: ...ITARD 024 SA I Work Mode The way of sending information captured by Radar You can select Single Continuous or Manual Currently the Camera supports only Single Special program is required if you want t...

Page 55: ...ulti lane capture Select Setting ITC Intelligent Radar The Radar interface is displayed See Step 1 Figure 6 46 RS485 ANPR Figure 6 46 Configure the parameters see Table 6 12 Step 2 Table 6 12 RS485 AN...

Page 56: ...Three protocols are available SigDetect RedLightSigDetect and RedLightSigDetect 2 0 Data Bits The value is 8 by default Stop Bits The value is 1 by default Baud Rate The value is 9600 by default Pari...

Page 57: ...selected downwards arrow will be displayed when drawing the lane line If Vehicle Rear is selected upwards arrow will be displayed when drawing the lane line Region The region to be detected A green bo...

Page 58: ...tep 5 lane lines Click to delete the current lane line Click to configure the corresponding lane See Figure 6 50 and Figure 6 51 Click Yes to save the configuration Editing lane line Figure 6 50 Lane...

Page 59: ...f snapshot range to the pole Distance camera scene middle L2 The distance from the middle bottom of snapshot range to the pole Click OK to save the configuration Click Refresh to refersh the interface...

Page 60: ...ng a red light within the defined time after the light turns red Cast Light Change the traffic light of corresponding lane into red Click to configure the coordinates of light group See Figure 6 54 an...

Page 61: ...c light Swing Detect When the position of traffic light changes slightly the video detection area will be enlarged Light Group Number You can configure the number according to the actual condition of...

Page 62: ...Web Configuration 55 Recognition ANPR Figure 6 56 Recognition E Police Figure 6 57 Configure the parameters See Figure 6 58 Step 2...

Page 63: ...d drive This is applicable to countries and regions with right hand drive system Analyse Mode The mode of detecting number plate Four modes are available Head Mode Tail Mode Head Prior Mode and Tail P...

Page 64: ...meters Parameter Description DaytimeOn Halo control works at daytime NightOn Halo control works at night Global When configuring multiple areas each area shares the same level of halo control Level Th...

Page 65: ...custom functions Click OK to save the configuration Click Refresh to refersh the interface Step 3 6 5 1 5 OSD Config 6 5 1 5 1 Video OSD It is to configure OSD information of video channel including...

Page 66: ...flow information Configure queue information Step 6 Click Queue Info check Turn on and then click OK A white line will be displayed at the back of the last vehicle in the queen This function is only...

Page 67: ...and font color of OSD information Step 4 You can configure the font color at the bottom right side Click More and the box of configuring new line and separater is displayed See Figure Step 5 6 63 1 Y...

Page 68: ...l change to Click to delete the corresponding OSD option Remove All Delete all the OSD information New Line Select one OSD information and then click New Line The option next to the selected OSD infor...

Page 69: ...Configure the parameters See Table 6 21 Step 4 Table 6 21 Snap mosaic parameters Parameter Description All Type Snap Includes ANPR Overspeed Underspeed Calling While Driving No Helmet and Unfasten Sea...

Page 70: ...s of Plate Driver Face and Passenger Face Cutouts will be saved in the storage path See Setting Storage Destination Path Click OK to save the configuration Click Refresh to refersh the interface Click...

Page 71: ...isplayed See Figure 6 68 Face overlap Figure 6 68 Check Driver Face Overlap Enable Step 2 You can enable face overlap of driver and assistant driver Step 3 Configure the overlap position and size of d...

Page 72: ...connected If a port is set as flash lamp port make sure a flash lamp is connected otherwise it may cause lamp damage Lamp config Figure 6 70 Select the lamp type of each port For parameter setting se...

Page 73: ...pulse width of the light The higher the value the brighter the light Freq Configure the flash frequency of the light The higher the value the more frequent the light flashes Prevalue Prevalue of brigh...

Page 74: ...1 9 Black White List 6 5 1 9 1 White List Search You can search whether a plate number is included in the white list or you can import or export plate number in the white list Select Setting ITC BW L...

Page 75: ...ple Figure 6 74 For plate color plate type vehicle color and vehicle type the number depends on the sequence of them in the corresponding drop down list Import one by one 1 Click Add and the Add box i...

Page 76: ...cle in the Black List is detected Select Setting ITC BW List Black List Search The Black List Search interface is displayed See Figure 6 77 Check Enable to enable black list function Black list search...

Page 77: ...ect Setting ITC Traffic Flow Flow Data to check the flow data of each lane within the period The flow data will automatically update when a period ends It supports a maximum of 1 000 data Flow data Fi...

Page 78: ...titude Figure 6 80 6 5 1 12 Intelligence Default Select Setting ITC Intelligence Default The Intelligence Default interface is displayed See Figure 6 81 Click Default and then a prompt box pops up Cli...

Page 79: ...value gets bigger The recommended range is 40 60 and the available range is 0 100 The value is 50 by default The larger the value the brighter the image Contrast You can adjust the contrast when the...

Page 80: ...scenarios with low brightness Sync Signal Includes Inner Sync and Outside Sync Current Signal shows the actual sync signal When selecting Outside Sync you can drag the slider to configure the Day Phas...

Page 81: ...TC Work Mode Snap Tridim Denoise When it is On 3D digital noise reduction DNR is enabled to reduce noise of snapshots Video Tridim Denoise When it is On 3D DNR is enabled to reduce noise of video Scen...

Page 82: ...de Select Setting Camera Attributes Iris Step 1 The Iris interface is displayed See Figure 6 84 Iris Figure 6 84 Configure the parameters See Table 6 25 Step 2 Table 6 25 Iris parameters Parameter Des...

Page 83: ...ust the overall brightness If the measured zone is bright then the overall image will be darkened and vice versa When Partial Measure is selected you can draw metering zone s in the video image Click...

Page 84: ...higher the value the better the quality Max Bit Rate It is the upper limit of stream in VBR In CBR the value is fixed I Frame Interval The number of P frame between two I frames The number varies acc...

Page 85: ...bit rate Click OK to save the configuration Click Refresh to refresh the interface Click Default Step 3 and then OK to restore to default settings 6 5 2 2 2 Snapshot It is to configure the snapshot s...

Page 86: ...Delete Click to delete the most recently configured interest area You can click several times to delete more than one area You can also right click on the video image to delete interest area Click OK...

Page 87: ...Both IP versions can be accessed IP Address IP address of the camera Subnet Mask The subnet mask that masks the IP address of camera Default Gateway The default gateway corresponding to IP address of...

Page 88: ...rameters Parameter Description Enable Check to enable auto register Server IP The IP address of server that needs to be registered Port The port for auto register Sub Device ID ID designated by the se...

Page 89: ...et by default 6 5 5 Event It is to configure alarm and abnormality 6 5 5 1 Alarm 6 5 5 1 1 Relay Activation You can connect the alarm output device to corresponding I O port Select Setting Event Alarm...

Page 90: ...Normally open NO and normally closed NC are available Relay out Select the alarm output port Alarm Delay The delay time of alarm after it is triggered Period setting Figure 6 94 Click OK to save the c...

Page 91: ...red when the camera has abnormality Select Setting Event Abnormality Step 1 The No Storage interface is displayed See Figure 6 96 You can view other abnormality events see Figure 6 97 Figure 6 98 Figu...

Page 92: ...eded Step 2 Configure the parameters See Table 6 33 Step 3 Table 6 33 Parameters of abnormality events Parameter Description Enable Check to enable corresponding abnormality event Relay out Check to e...

Page 93: ...cceleration Threshold Configure the threshold of acceleration Click OK to save the configuration Click Refresh to refresh the interface Click Default Step 4 and then OK to restore to default settings...

Page 94: ...Parameter Description Offline Transfer When the network disconnects or fails snapshots will be stored in TF card After the network is restored the snapshots will be uploaded from the TF card to FTP or...

Page 95: ...ing Storage Destination Client The Client interface is displayed See Figure 6 106 Offline Transfer When the network disconnects or fails snapshots will be stored in TF card After the network is restor...

Page 96: ...ou want to save the picture Record Path Click Browse and select the path you want to save the record Click OK to save the configuration Click Refresh to refresh the interface Click Default Step 3 and...

Page 97: ...and NTSC are available PAL Much more common around the world and can be found in most of Western Europe Australia China and elsewhere NTSC Mostly limited to North America parts of South America Japan...

Page 98: ...ess of time setting server Port The port number of time setting server Time Zone The time zone where the Camera locates Interval The synchronization interval of the Camera and the time setting server...

Page 99: ...authority It is recommended to give fewer authorities to normal users than premium users User Management You can view user information add or delete user s and modify user password Select Setting Sys...

Page 100: ...ation such as username password group name memo and authority Click OK to save the configuration Modify user information Click corresponding to the user The Modify User box pops up See Figure 6 111 Yo...

Page 101: ...ding single quotation marks double quotation marks semicolon colon and Password strength prompts will be made according to the points obtained from password length letters numbers characters and combi...

Page 102: ...rength 70 points Strong 50 points Middle 0 points Weak User Group Management You can view user group information add or delete user group s and modify user group password Select Setting System Account...

Page 103: ...You can modify the memo and authority of the group Click OK to save the configuration Modify group Figure 6 114 The admin and user groups can not be deleted A group can not be deleted if the group ha...

Page 104: ...You can view Onvif user information add or delete user s and modify user password Select Setting System Account Onvif User The Onvif User interface is displayed See Figure 6 115 Onvif user Figure 6 11...

Page 105: ...rs upper case letters lower case letters and special characters but not including single quotation marks double quotation marks semicolon colon and For password strength evaluation see Table 6 39 Modi...

Page 106: ...s IP segment MAC address or IPv6 and then click Yes Step 4 The newly added address is displayed See Figure 6 121 Trusted list Figure 6 121 Click OK and the system prompts Save succeeded Step 5 On the...

Page 107: ...rs group members This allows a single message to be sent to the group Broadcast allows all devices on the same network segment will see the same message Password Reset Enable it so you can reset the p...

Page 108: ...The system prompts Operation succeeded when it is done successfully The IP or Domain name must be the same as the IP or domain name of the Camera Click Install to install the certificate Step 4 The sy...

Page 109: ...Import the certificate to the browser Step 7 The following steps take Internet Explorer as the example Different browsers support different ways of importing the certificate and the actual browser sha...

Page 110: ...ick Install Certificate and then the Certificate Import Wizard interface is displayed See Figure 6 127 Certificate import wizard Figure 6 127 3 Click Next and then the Certificate Store interface is d...

Page 111: ...and then the Select Certificate Store interface is displayed See Figure 6 128 Select certificate store Figure 6 129 5 Select Trusted Root Certification Authorities and then click OK The Completing the...

Page 112: ...was successful See Figure 6 131 Certificate import finished Figure 6 131 7 Click OK to finish certificate import Select the Enable HTTPs check box and then click OK Step 8 The Reboot interface is dis...

Page 113: ...e private key file of Step 4 certificate Install the root certificate For details see Step 7 from Create Certificate Step 5 Select the Enable HTTPs check box and then click OK Step 6 The Reboot interf...

Page 114: ...36 Click Import or Export Step 2 Import Import the configuration files from local backup Export Export the configuration on web to local PC The imported and exported files should be in the format of b...

Page 115: ...y reboot the Camera Click OK to save the configuration Click Refresh to refresh the interface Step 3 6 5 7 7 Upgrade Import the update file in the format of bin to the system and then update the syste...

Page 116: ...5 8 2 1 Log You can search and check log by the time and type and backup the log The log type includes All System Setting Data Event Record Account and Safety Select Setting Information Log Log Step...

Page 117: ...te Log Step 2 Configure the IP address port and device number Step 3 Click OK to save the configuration Click Refresh to refresh the interface Click Default Step 4 and then OK to restore to default se...

Page 118: ...tion and tone of alarm Select Alarm on the web interface and the Alarm interface is displayed See Figure 6 144 Figure 6 145 and Table 6 42 Alarm ANPR Figure 6 144 Alarm E Police Figure 6 145 Table 6 4...

Page 119: ...he black list is detected Gyro Abnormal Attitude Alarm when unusual attitude of device is detected such as tilt Illegal Access Alarm when illegal access is detected Operation Listen Alarm When there i...

Page 120: ...s helps ensure data integrity and avoid losing all the data of the card TF card read write limit Do not set the TF card as the storage media of pre set recording It may damage the TF card duration TF...

Page 121: ...to enable the auto check for updates function to obtain timely information of firmware updates released by the manufacturer We suggest that you download and use the latest version of client software...

Page 122: ...llowing services SNMP Choose SNMP v3 and set up strong encryption passwords and authentication passwords SMTP Choose TLS to access mailbox server FTP Choose SFTP and set up strong passwords AP hotspot...

Page 123: ...s If there are no communication requirements between two sub networks it is suggested to use VLAN network GAP and other technologies to partition the network so as to achieve the network isolation eff...

Page 124: ...AHUA VISION TECHNOLOGY CO LTD Address No 1199 Bin an Road Binjiang District Hangzhou P R China Postcode 310053 Tel 86 571 87688883 Fax 86 571 87688815 Email overseas dahuatech com Website www dahuasec...

Reviews: