background image

User’s Manual 

60 


Storage 

4.4

This chapter introduces configurations of schedules for records, snapshots, and holiday, storage 
methods, and record control. 

4.4.1


Schedule 

You can configure schedules of records, snapshots, and holidays. 


Before configuring schedule, set 

Record Mode 

as 

Auto

 in

 Setting > Storage > Record Control

. If 

you select 

Off

, the system will not record video or take snapshot as scheduled. 

4.4.1.1


Record Schedule 

The system starts or stops video recording as scheduled. 


Select 

Setting > Storage > Schedule > Record

Step 1

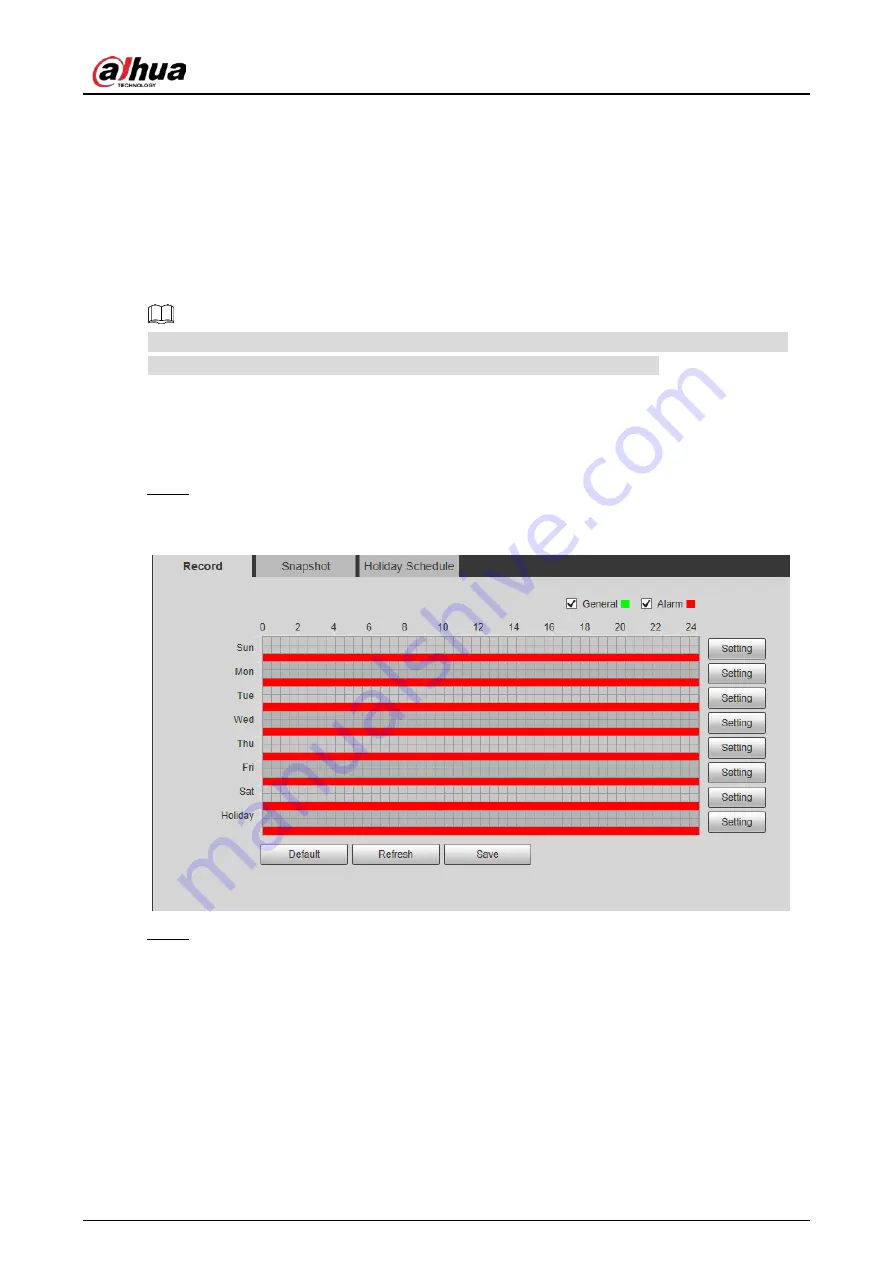
The record schedule interface is displayed. See Figure 4-44. 


Record schedule 

Figure 4-44


Set a record plan. 

Step 2


Method one: Select a record type, such as 

Alarm

, and then  press and drag the left mouse 

button to draw the time period for alarm record on the timeline. 


Method two: Enter an actual time period. 


Click 

Setting

 of the day you want to set. 

1)

The 

Setting

 interface is displayed. See Figure 4-45. 

Summary of Contents for DH-PFR4K-B240

Page 1: ...User s Manual Security Radar User s Manual V1 0 2 ZHEJIANG DAHUA VISION TECHNOLOGY CO LTD...

Page 2: ...ch if not avoided could result in property damage data loss lower performance or unpredictable result TIPS Provides methods to help you solve a problem or save you time NOTE Provides additional inform...

Page 3: ...and supplementary documentation There still might be deviation in technical data functions and operations description or errors in print If there is any doubt or dispute please refer to our final exp...

Page 4: ...ilated place and do not block the ventilation of the device Operate the radar within the rated range of power input and output Do not disassemble the radar Transport use and store the radar under the...

Page 5: ...11 2 5 Device List 12 2 6 PTZ Control 12 2 7 3 Playback 14 Video Playback 14 3 1 3 1 1 Playing Video 15 3 1 2 Record Types 16 3 1 3 Auxiliary Functions 16 3 1 4 Record Files 16 3 1 5 Clipping Records...

Page 6: ...4 4 4 1 Schedule 60 4 4 2 Destination 63 4 4 3 Record Control 66 System 67 4 5 4 5 1 General 68 4 5 2 Date Time 68 4 5 3 Account 70 4 5 4 Onvif User 74 4 5 5 Safety 75 4 5 6 Firewall 82 4 5 7 Default...

Page 7: ...is 192 168 1 108 by default You need to use IP segment reasonably according to actual network environment so that the radar can connect to network Logging in to Web Client 1 2 1 2 1 Device Initializa...

Page 8: ...r and special characters excluding Make sure that the password and the confirmed password are the same Follow the password strength prompt to set a password with high security Set admin password Figur...

Page 9: ...ck box and then click Next Step 5 P2P Figure 1 5 Read on screen notifications select P2P check box as needed and then click Next Step 6 Online upgrade Figure 1 6 Read on screen notifications select Au...

Page 10: ...s needed and then click Save Step 8 The login interface is displayed See Figure 1 8 Login Figure 1 8 1 2 2 First time Login You need to download and install the plug in for the first time login Enter...

Page 11: ...You can set the allowed wrong password times in Setting Event Abnormality Illegal Access For details see 4 3 2 3 Illegal Access Download and install the plug in according to the on screen instructions...

Page 12: ...enter the IP address of the radar in the address bar and then press Enter Step 1 The login interface is displayed See Figure 1 11 Login Figure 1 11 Click Forgot password Step 2 The Prompt interface is...

Page 13: ...urs after you get the security code otherwise it will be invalid If the security code is not used twice continuously for the third time the system will prompt that you fail to acquire the security cod...

Page 14: ...n blank characters and contain at least two types of characters among upper case lower case number and special characters excluding Follow the password strength prompt to set a password with high secu...

Page 15: ...tion No Name 1 Set encoding mode 2 Video tool 3 Adjust video window 4 Function tabs 5 Function options 6 Device list Encoding Configuration 2 1 You can select stream media protocol from TCP UDP and RT...

Page 16: ...y the storage path in Setting Radar Settings Video Path For details see 4 1 1 4 Storage Path 5 Record Click the icon to take record of the live video 6 Audio Click the icon to mute or unmute the video...

Page 17: ...Options 2 5 Click each icon to use different functions such as manual positioning and taking snapshots and records For details see Figure 2 6 and Table 2 4 Function options Figure 2 6 Table 2 4 Funct...

Page 18: ...tocol use main stream to monitor and store video Main stream is applied in live view and record storage by default Click the icon again to close live video 2 Sub Stream 1 Under the selected stream med...

Page 19: ...directions Up down left right upper left upper right lower left and lower right 2 Quick position Click the icon draw a box on radar s live interface and then the PTZ camera will rotate focus and quick...

Page 20: ...efore playback you need to configure parameters such as record and snapshot schedule storage method and record mode For details see 4 4 Storage Click Playback tab The Playback interface is displayed S...

Page 21: ...ds 7 Time format of the time bar For details see 3 1 6 Time Format of the Time Bar 3 1 1 Playing Video You can do video playback operations such as playing and pausing stopping fast and slow playing a...

Page 22: ...zoom in or zoom out the image and take a snapshot For details see Figure 3 5 and Table 3 3 Auxiliary functions Figure 3 5 Table 3 3 Auxiliary function icon descriptions No Name Description 1 Digital Z...

Page 23: ...elected record as needed The function column is displayed as Figure 3 7 Clip record Figure 3 7 Select start time of clipping on time bar which should be within time range of the record Step 1 Move you...

Page 24: ...ions Icon Description Click the icon to display the time bar in 24 hour mode Click the icon to display the time bar in 2 hour mode Click the icon to display the time bar in 1 hour mode Click the icon...

Page 25: ...date and then you can play back snapshots On the calendar the date with blue background means the current date has snapshots See Figure 3 11 For parameter descriptions see Table 3 7 Select snapshots...

Page 26: ...ons Icon Description Click the icon to search all snapshot files within the start time and end time of selected date Click icon to download snapshot file to local storage Click icon to return to calen...

Page 27: ...VS 4 1 1 Video You can set video stream snapshots overlay and storage path 4 1 1 1 Video Stream You can set the main stream and sub stream of live videos Select Setting Radar Settings Video Video Step...

Page 28: ...ference Bit Rate The most suitable bit rate range recommended to users according to the set resolution and frame rate Bit Rate The value is the upper limit of the stream in VBR mode In CBR mode it is...

Page 29: ...olution of snapshot under main stream by default Quality Set the image quality There are six levels from 1 to 6 6 is the best The higher the level is the larger the picture will be Interval Set snapsh...

Page 30: ...User s Manual 24 Channel title Figure 4 3 Time title Figure 4 4...

Page 31: ...User s Manual 25 OSD information Figure 4 5 Font Figure 4 6...

Page 32: ...e Channel Title box to adjust the display position Time Title Enable or disable Time Title to be overlaid on the video image By selecting Week Display check box the day will be displayed Drag the Time...

Page 33: ...overlaid on the video image Click Save Step 3 4 1 1 4 Storage Path You can set storage paths of snapshots and records taken from live view and snapshots downloads and video clips from playback Select...

Page 34: ...is set to 80 by default Keep the port consistent with the PTZ camera Click Save Step 4 Switch to to enable alarm track linkage between the radar and the selected camera 4 1 3 Linkage You can import a...

Page 35: ...gure 4 13 Crop the map according to the detection range of the radar Drag the box to select the Step 3 range and then click Cut Map Click Confirm Screen to get the map with the range you need Step 4 C...

Page 36: ...tomatically get the map width and height Click Next 5 Radar Positioning Drag the end points of the yellow sector on the map to adjust the radar orientation Step 1 When the dotted line points to the ri...

Page 37: ...height of the camera Step 2 Enter the height of the lens otherwise the camera radar linkage effect will be reduced Select Close to turn off Alarm Track otherwise you cannot calibrate the camera Step...

Page 38: ...en click Save 6 4 1 4 Region Management You can add different types of regions draw alarm pre warning or shield areas set arming periods filter objects in regions and more Select Setting Radar Setting...

Page 39: ...nfigure arming periods Step 6 Set arming periods Figure 4 18 Set arming periods and the alarm can only be triggered when it occurs during the 1 defined period The time period in green on the timeline...

Page 40: ...will not trigger alarms For 50 m and 120 m radars the speed range must be within 1 to 40 km h for 240 m radar the range must be within 1 to 72 km h for 300 m and 450 m radars the range must be within...

Page 41: ...arm rule descriptions Region Description Alarm area Secondary priority The target will be tracked when it enters the alarm area When targets appear both in the alarm area and pre warning area only the...

Page 42: ...User s Manual 36 50 m 120 m protection zone management Figure 4 19 240 m protection zone management Figure 4 20...

Page 43: ...cause the radar to give cluttering trajectory and misinformation more frequently Detection Region Select the detection region according to actual application For 240 m radar 100 240 m available 240 m...

Page 44: ...Apply to detection regions with trees shrubs and other swaying objects that might cause misinformation Capacious Apply to detection regions without trees shrubs or large barriers 240 m 300 m 450 m rad...

Page 45: ...Enter host name 15 characters at most Ethernet Card Select the Ethernet card that needs to be configured The default one is Wire You can change the default Ethernet card if there is more than one car...

Page 46: ...t During restarting you will have no more than 2 minutes to configure the device IP address by a ping packet with defined length the server will be turned off in 2 minutes or it will be turned off imm...

Page 47: ...i show in netsh c i i add neighbors 12 192 168 0 125 11 40 8c 18 10 11 ping l 480 t 192 168 0 125 Power off and restart radar or restart the device by network Step 4 Check the PC command line If infor...

Page 48: ...the value is 554 by default If you play live view with QuickTime VLC or Blackberry smart phone the following URL format is available When the URL format requiring RTSP you need to specify channel num...

Page 49: ...25 PPPoE Figure 4 25 Select Enable and then enter username and password Step 2 Click Save Step 3 4 2 4 DDNS Properly configure DDNS and then the domain name on the DNS server matches your IP address...

Page 50: ...the DDNS service provide You need to register an account with username and password on the DDNS service provider s website Password Interval The update cycle of the connection between the radar and t...

Page 51: ...sword and the sender information Sender Sender s email address Authentication Select Authentication from None SSL and TLS TLS is set by default For the detailed configuration see Table 4 13 Title Ente...

Page 52: ...le SMTP service in your mailbox Click Save Step 3 4 2 6 UPnP Universal Plug and Play a protocol that establishes mapping relation between intranet and Internet This function enables you to access intr...

Page 53: ...automatically You cannot modify mapping relation Select Start Device Discover as needed Step 3 Click Save to make the configurations valid Step 4 4 2 7 SNMP Simple Network Management Protocol which ca...

Page 54: ...ess information of V1 version Select V2 and the system can only process information of V2 version Select V3 and then V1 and V2 become unavailable You can configure username password and authentication...

Page 55: ...ress of the device you need to manage in the MG SOFT MIB Browser 4 and then select version to search Unfold all the tree lists displayed in the MG SOFT MIB Browser and then you can view 5 the configur...

Page 56: ...blem can be solved by setting a multicast IP for the radar and adopting the multicast protocol Select Setting Network Multicast Step 1 The RTP interface is displayed See Figure 4 32 RTP Figure 4 32 Se...

Page 57: ...ameter Description Authentication PEAP protected EAP protocol Username The username that was authenticated on the server Password Corresponding password Click Save Step 4 4 2 11 QoS You can solve prob...

Page 58: ...traversal technology which enables user to manage devices easily without requiring DDNS port mapping or transit server Scan the QR code with your smartphone and then you can add and manage devices on...

Page 59: ...d other recording devices from different manufacturers to mutually communicate with each other ONVIF is on by default Select Setting Network Access Platform ONVIF Step 1 The ONVIF interface is display...

Page 60: ...54 Alarm linkage Figure 4 37 Select Enable check box to enable the alarm linkage and configure parameters as Step 2 needed Configure arming period Click Setting 1 The Period interface is displayed Se...

Page 61: ...that time period Select All or the check box of any other day and the set time period will apply to the selected days You can set 6 time periods per day Click Save to return to the Alarm interface 3 S...

Page 62: ...300 s after the alarm is ended Send Email By selecting Send Email the system automatically sends email to the specified mailbox when the alarm is triggered You can configure the mailbox in Setting Net...

Page 63: ...space percentage and if the free space in the SD card is lower than the defined percentage the alarm is triggered Click Save Step 3 4 3 2 2 Network When any abnormality happens to the network the ala...

Page 64: ...4 18 Table 4 21 Illegal access parameter descriptions Parameter Description Enable Select Enable check box to enable to network card abnormality detection Login Error The number of times that the log...

Page 65: ...al detection range of the radar is covered for more than 50 The radar is rotated for more than 30 But in open areas 30 rotation of the radar might not trigger the alarm Select Setting Event Abnormalit...

Page 66: ...video or take snapshot as scheduled 4 4 1 1 Record Schedule The system starts or stops video recording as scheduled Select Setting Storage Schedule Record Step 1 The record schedule interface is disp...

Page 67: ...ck Save to return to the Record interface 3 Each color matches with a different record schedule Green General video record The system records continuously within the set period Red Alarm video record...

Page 68: ...p 2 Click Save Step 3 4 4 1 3 Holiday Schedule Set certain days as holiday and when the Record or Snapshot is selected in the holiday schedule the system takes snapshot or records as holiday schedule...

Page 69: ...4 detection type and detection period For details see 4 4 1 1 Record Schedule Click Save Record and snapshot will be taken according to the set holiday schedule for Step 5 the selected days 4 4 2 Dest...

Page 70: ...al SD card FTP Save in the FTP server NAS Save in the NAS network Attached Storage Click Save Step 3 4 4 2 2 Local Display the internal SD card information You can set it as read only or read write yo...

Page 71: ...Table 4 23 Step 3 Table 4 23 FTP parameter descriptions Parameter Description Server Address The IP address of the FTP server Port The port number of the FTP server Username The username to log in to...

Page 72: ...ers in the same network share files through TCP IP SMB Server Message Block Provide shared access for clients and the server Server Address The IP address of the NAS server Remote Directory The destin...

Page 73: ...duration set in Pre event Record of the video which starts before enabling recording into the whole record Disk Full Set the record method when the disk is full You can select from Stop The system st...

Page 74: ...e 4 26 General parameter descriptions Parameter Description Name The name of the radar Each device has a different name Language Select system language Video Standard Select video standard from PAL an...

Page 75: ...the radar is at Current Time Configure system time Click Sync PC and the system time will sync to the time on PC DST Enable DST as needed Select the check box and then configure start time and end ti...

Page 76: ...the same You can have 18 users and 8 groups at most according to factory settings You can manage users in two methods Single user or group Duplicate usernames or group names are not allowed A user ca...

Page 77: ...gure 4 56 Add user Figure 4 56 Enter username and password and then select group and operation permission Step 2 A user can be in only one group at a time and the group users can own authorities withi...

Page 78: ...User s Manual 72 Restricted login Figure 4 57 Click Save Step 4 Modifying a User Click of the selected user Step 1 The Modify User interface is displayed See Figure 4 58...

Page 79: ...sword check box Step 2 Enter the old password new password and then confirm the password Step 3 Click Save Step 4 Deleting a User Click to delete the added user 4 5 3 2 Group You have two groups named...

Page 80: ...4 5 3 1 User Deleting a Group For details see 4 5 3 1 User 4 5 4 Onvif User You can add delete and modify Onvif users Select Setting System Account Onvif User Step 1 The Onvif User interface is displ...

Page 81: ...ming Protocol RTSP ensures the safety of the streaming media during transmission Select Setting System Safety RTSP Authentication Step 1 The RTSP Authentication interface is displayed See Figure 4 62...

Page 82: ...by default You can enable SSH authentication to perform safety management Multicast Broadcast Search Enabled by default When multiple users watch the live video simultaneously through network they ca...

Page 83: ...e and then you can connect through HTTPS with your PC The HTTPS can ensure safety of data communication user information and radar with reliable technology Create a certificate or upload the authentic...

Page 84: ...wnload to download root certificate 5 The Save As dialog box is displayed See Figure 4 66 Download certificate Figure 4 66 Select storage path and then click Save 6 Double click the RootCert cer icon...

Page 85: ...User s Manual 79 Certificate Figure 4 67 Click Install Certificate 8 The Certificate Import Wizard interface is displayed See Figure 4 68...

Page 86: ...User s Manual 80 Certificate import wizard Figure 4 68 Click Next Select Trusted Root Certification Authorities See Figure 4 69 9 Store certificate Figure 4 69 Click Next 10...

Page 87: ...ting the Certificate Import Wizard interface is displayed See Figure 4 70 Complete certificate import wizard Figure 4 70 Click Finish 11 The Security Warning dialog box is displayed See Figure 4 71 Se...

Page 88: ...igure 4 73 If HTTPS is enabled you cannot access the radar through HTTP It will switch to HTTPS automatically 4 5 6 Firewall You can configure network access refuse PING request and prevent Semijoin t...

Page 89: ...as an example Step 1 Select Setting System Safety Firewall The Firewall interface is displayed See Figure 4 74 Firewall Figure 4 74 Step 2 Select Network Access from Rule Type list and then select En...

Page 90: ...v6 Enter IP address in IPv6 format such as aa aa aa aa aa aa aa aa Device All Ports Set access ports You can select all ports or the ports in defined range Device All Ports Set all IP port in trust li...

Page 91: ...you imported in linkage configuration cannot be imported or exported Select Setting System Import Export The Import Export interface is displayed See Figure 4 77 Import Export Figure 4 77 Click Export...

Page 92: ...pgrade You can upgrade the system to the latest version to improve radar function and stability If wrong upgrade file has been used please restart the radar otherwise some functions might not work pro...

Page 93: ...Check and you can check for upgrade manually Information 4 6 You can view version log working time upgrade times of the system and more 4 6 1 Version You can view hardware information system version...

Page 94: ...s Data Include configuring disk type erasing data hot swap FTP status and record mode Event Record events such as video detection smart plan alarm and abnormality Include event start and event end Rec...

Page 95: ...Select Enable check box to enable the remote log function Step 2 Set the IP address port and device number as needed Step 3 Click Save Step 4 You can click Default to restore the settings 4 6 4 Online...

Page 96: ...to record the alarm when disk malfunctions External Alarm Select to record the alarm when radar receives external alarm Illegal Access Select to record the alarm when unauthorized access occurs Securi...

Page 97: ...l 91 Parameter Name Description Alarm Tone Play Alarm Tone Select the function and choose audio file When alarm occurs system automatically generates alarm audio Tone Path Select Browse to choose alar...

Page 98: ...User s Manual 92 6 Logging out Click Logout tab and then the system goes back to login interface See Figure 6 1 Login Figure 6 1...

Page 99: ...for updates function to obtain timely information of firmware updates released by the manufacturer We suggest that you download and use the latest version of client software Nice to have recommendatio...

Page 100: ...our audio and video data contents are very important or sensitive we recommend that you use encrypted transmission function to reduce the risk of audio and video data being stolen during transmission...

Page 101: ...95 Establish the 802 1x access authentication system to reduce the risk of unauthorized access to private networks Enable IP MAC address filtering function to limit the range of hosts allowed to acce...

Page 102: ...User s Manual 96...

Reviews: