Daewoo SH-7500D Instruction Manual Download Page 17

VCR

Operation

30

31

Timer Recording

For timer recordings, clock, date, and stations must be set correctly. 

Load a cassette with its safety tab in place and with sufficient free space for the recording.

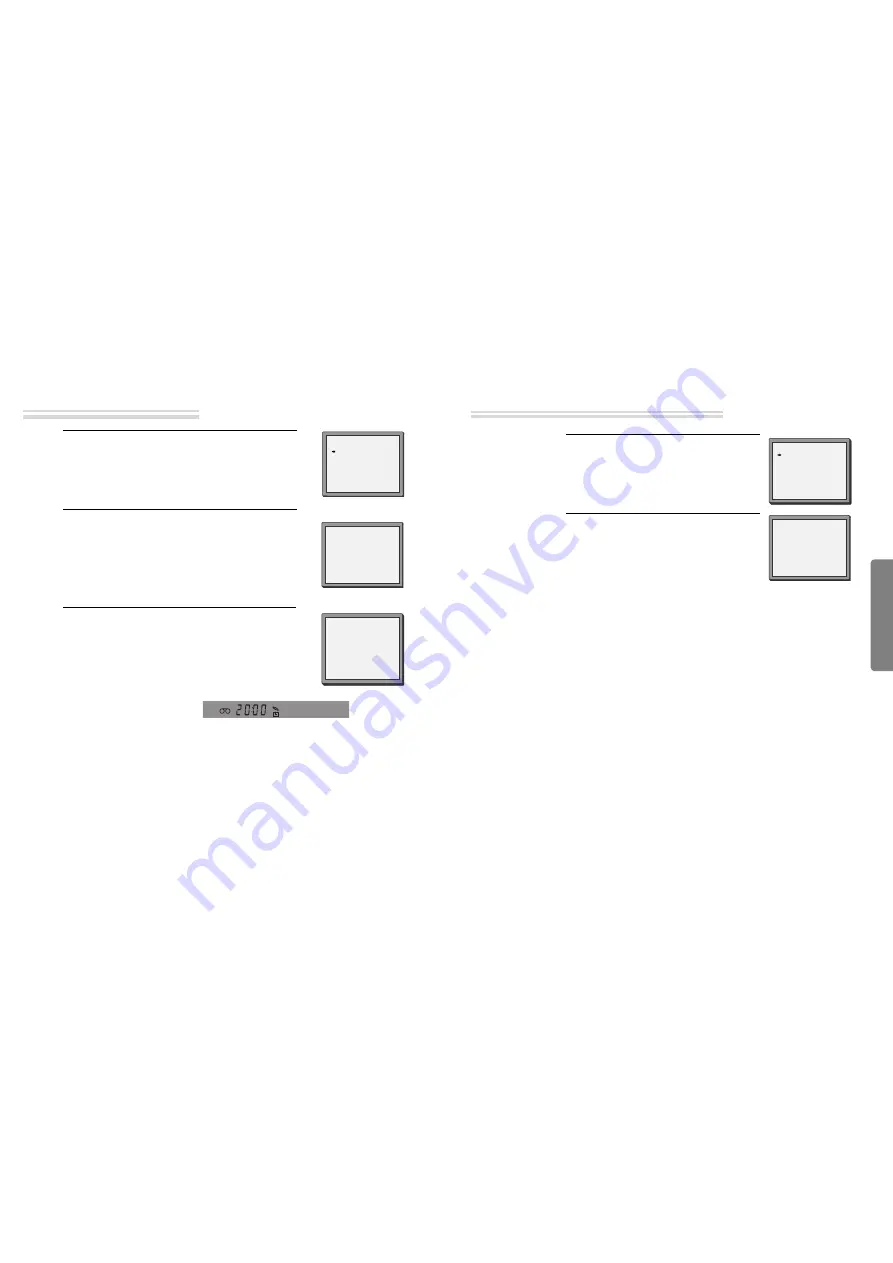
Press  "SETUP", choose "TIMER PROGRAM". Press OK.
Choose a free programme location. Press OK.
You will be asked if you want to record  "ONCE", "WEEKLY"
or  "DAILY". 

Please decide and confirm with OK.

1

Type in one after the other: 

•  The programme location number;
•  the time the broadcast starts,
•  the time the broadcast ends, 
•  the day of the broadcast, if it is not today. 
•  Select LP if you wish to make a very long recording .

2

If you wish to make changes:
Move to the position you want to change using the  [

œ

œ

/

]

buttons. Change the setting using the [PR+/- ] or [number]
buttons.
If all setting are ok, press  [

œ

œ

or 

], till you see “OK :

CONFIRM” in the bottom line.
Confirm.

3

Switch your player off.

• Wait a few seconds after typing a one-digit-number.

• If you have made a mistake, move to the position you want to change using the [

œ

œ

/

] buttons

and change the setting.

• If programme timings overlap, the machine will give a warning message. If you don’t adjust

the times, the machine will record the first programme completely then continue with the
second one.

• If there is no sufficient free space for the recording on the cassette the video switches

automatically to “LP” for double recording capacity. 

• The recorder will eject cassettes which have the safety tab removed.
• The player will be powered on and record the program at the set time.
• In case the player is powered on  after setting of timer recording, the player cannot record in

VCR mode but can record in DVD mode.  

PR+/-:SELECT(AV)

0-9  :SETUP(PR)

/

:CORRECT   SETUP:END

PR

--

START TIME

--:--

END TIME

--:--

START DATE

--/--

TAPE SPEED

SP

TIMER  PROGRAM (ONCE)

PR

01

START TIME

18:10

END TIME

20:30

START DATE

22/08(FRI)

TAPE SPEED

LP

PR+/-:SELECT(AV)

0-9 : SETUP (PR)

/

:CORRECT

OK:CONFIRM           SETUP:END

TIMER  PROGRAM  (ONCE)

HOW OFTEN DO YOU WANT

TO RECORD THIS PROGRAM?

PR+/-:SELECT
OK:CONFIRM       SETUP:END

ONCE

WEEKLY(ONCE A WEEK)

DAILY(MON-FRI)
DAILY(MON-SAT)
DAILY(MON-SUN)

Normal timer recording

Timer Recording

Call the player’s "SETUP", 
choose "TIMER PROGRAM".

1

Select the programming to change or erase, press
OK. 
If you want to erase this programming press
button  [0].

If you wish to make changes, move to the position
you want to change using the [

œ

œ  

or 

] buttons.

Change the settings using the [PR +/–] buttons.

If all settings are correct, press OK to confirm the
changes. Exit the menu with SETUP.

2

TIMER  PROGRAM

PR

START END

DATE

03  

21:20   22:20  16/08

01    18:10   20:30  22/08
--   

-- : --  

-- : --  -- / --   

--   

-- : --  

-- : --  -- / --

--   

-- : --  

-- : --  -- / --   

--   

-- : --  

-- : --  -- / --

--   

-- : --  

-- : --  -- / --

--   

-- : --  

-- : --  -- / --

PR+/-:SELECT
OK:CONFIRM         SETUP:END

TIMER  PROGRAM (ONCE)

PR

03

START TIME

21:20

END TIME

22:20

START DATE

16/08(SAT)

TAPE SPEED

SP

0 :ERASE

/

:CORRECT   SETUP:END

Timer Review – changing and erasing

All manuals and user guides at all-guides.com

Summary of Contents for SH-7500D

Page 1: ...SE FF OPEN CLOSE AV INPUT Please read this manual carefully before connecting your DVD VCR and operating it for the first time Keep the manual in a safe place for future reference SH 7500D INSTRUCTION...

Page 2: ...DVD Playback 22 VCR Playback 23 Recording 24 VCR Operation Tuning in New Stations 27 Timer Recording 30 More Functions 32 Connections and Copying 35 DVD Operation Playing a desired scene 37 Confirmin...

Page 3: ...he safety and operating instructions should be read before the unit is operated 2 RETAIN INSTRUCTIONS The safety and operating instructions should be retained for future reference 3 HEED WARNINGS All...

Page 4: ...turer 24 HEAT The product should be situated away from heat sources such as radiators heat registers stoves or other products including amplifiers that produce heat 25 To prevent battery electrolyte l...

Page 5: ...service center about checking and replacement In recording important screen Be sure to record the screen and check whether recording is performed properly We beg you to understand compensation of reco...

Page 6: ...el in home connect this jack with amp or unit embedded with digital audio decoder A V OUTPUT Jack A V INPUT Jack Connection to ANTENNA Cable Connection to TV Main body Rear Panel Timer Recording Stand...

Page 7: ...IOUS button move into a previous chapter or track 3 VCR Record SPEED button 4 VCR Record button 5 VCR TV VCR button 6 DVD 3D button 7 VCR CM SKIP 8 VCR Replay button 9 POWER button 0 DVD SELECT button...

Page 8: ...e surplus cable plugged in ANT IN jack in rear panel of TV Connect the cable to ANT jack in rear panel of DVD Video Connect TV to DVD Video Connect TV jack in DVD Video with ANT IN jack in TV with RF...

Page 9: ...r playback video with DVD Video insert recording tape attached recording tab in DVD Video Turn on DVD Video Press INPUT button of remote control and adjust DVD Video to display AV or AV F in TV screen...

Page 10: ...eo unit Select External Input connected with DVD Video Playback DVD disc or Hi Fi videotape you can hear sound in speaker of stereo unit Use in COMPONENT In jack attached in TV or amp supporting Dolby...

Page 11: ...Press the OK button to confirm the recommended RF channel Should you wish the stations to have the same numbers as those used on the TV follow the instructions in Sorting programme locations on page...

Page 12: ...played in the normal picture 3 This player is set to OSD On Screen Display ON mode before shipping and you can change it to OFF mode VCR SETUP CLOCK SET LANGUAGE SET RF OUTPUT SET OSD ON OFF PR SELECT...

Page 13: ...If you press this button once more it starts playback again 4 Press EJECT button in the front part or OPEN CLOSE button on remote control to remove the tape 5 If the product which has a auto detector...

Page 14: ...PAUSE button if the pause status continues for five minutes the recording is released automatically 6 To exit recording press STOP button 7 Recording To Record With VCR To Enjoy a TV Channel or DVD du...

Page 15: ...s simplest to use the same location number on both the TV and video and confirm 3 Set the station you want the programme location number the proper broadcast system for your location BG DK the broadc...

Page 16: ...NAME O___ If the location numbers used for programmes stored in your TV and player are different you can change them on the player To do this move the stations to the right numbers until they are arr...

Page 17: ...tte the video switches automatically to LP for double recording capacity The recorder will eject cassettes which have the safety tab removed The player will be powered on and record the program at the...

Page 18: ...ng time and cassette length Searching for a recorded program via index Reset the counter COUNTER RESET 0 00 00 If you press the PLAY button for 5secs during stop or still mode it goes Auto repeat mode...

Page 19: ...Connections and Copying If you are using a RCA cable select the AV input on the TV to see the picture from the player If you are not using a RCA cable select the button number on the TV reserved for...

Page 20: ...scene of current chapter or track Press the TITLE PBC or MENU button A list of the titles on the disc is displayed For the case of VCD disc menu screen will appear only when the disc has PBC function...

Page 21: ...T E R T I T L E O F F VCD T R A C K A L L O F F CD MP3 Repeat one Repeat all R a n d o m O F F Each time you press REPEAT button in playback mode repeat playback starts as below A A B O F F Playing de...

Page 22: ...d press ENTER at the starting point to be viewed listened to again 1 Recalling Clearing a marker Press MARK during playback Press to select the marker to be recalled cleared Press PLAY to recall a mar...

Page 23: ...JPG MPG disc mode MUSIC file select JPG file select MPG file select current cursor file name For more information refer to 45 48p Selecting an AUDIO language SUBTITLE language and 3D AUDIO The user ma...

Page 24: ...he DVD open OPEN CLOSE button the disc tray opens Put a MP3 or CDDA disc on the disc tray with the label side up Press the DVD open OPEN CLOSE button the disc tray closes The unit will take a short wh...

Page 25: ...18 0 00 34 0 03 59 Repeat one max 6 01 musicfamily i am Smooth PROGRAM LIST _ _ 1 01 musicfamily i 2 02 musicfamily i 3 03 musicfamily i 4 04 musicfamily i 5 05 musicfamily i 6 06 musicfamily i 7 07 m...

Page 26: ...s movie or file press To view fast forward playback press To view fast reverse playback press If you press DISPLAY button it shows the current disc mode If a disc includes menus the user may use them...

Page 27: ...Language Setup OSD AUDIO SUBTITLE DISC MENU SPANISH GERMAN ITALIAN DUTCH RUSSIAN CZECH HUNGARIAN AUTO OSD AUDIO SUBTITLE DISC MENU GERMAN ITALIAN DUTCH RUSSIAN CZECH HUNGARIAN AUTO OTHERS Enter the a...

Page 28: ...he DVD VCR to the INTERLACED input on your TV If SCAN MODE is set to PROGRESSIVE connect Y Pb Pr on the DVD VCR to the PROGRESSIVE SCAN input on your TV TV ASPECT SCAN MODE INTERLACED PROGRESSIVE Audi...

Page 29: ...ess SETUP button 1 OSD SCREEN SAVER DEFAULTS PARENTAL PASSWORD ON ON RESET 8 ADULT OSD SCREEN SAVER DEFAULTS PARENTAL PASSWORD ON OFF OSD SCREEN SAVER DEFAULTS PARENTAL PASSWORD ON OFF OSD SCREEN SAVE...

Page 30: ...nitor by looking at the menu shown on the TV monitor It stands for PlayBack Control CHAPTER It means the information recorded in a DVD A title in a DVD is divided into many tracks of which a track is...

Page 31: ...en does not appear Noise screen noise appears on screen Noise appears on screen after recording While in playing noise appears Sound and screen are irregular Sound comes out but screen does not appear...

Page 32: ...with the recorder You may start recording it in REC PAUSE Please start recording it from stop condition Please select CABLE not NETWORK from the CHANNEL SETTING Trouble Shooting DVD The recorder does...

Page 33: ...A JACK VIDEO output common use of DVD and VCR VIDEO output terminal 1 0 Vp p unbalanced RCA JACK VIDEO output DVD only Component output 75 In load Y 1 0Vp p Pb 0 7Vp p Pr 0 7Vp p AUDIO output common u...

Reviews: