background image

16

MICROWAVE UTENSILS

Glass, Ceramic and China

Ovenproof glass or ceramic baking dishes are the most used microwave utensils.
Many of these items are readily available in most homes : glass measure, custard cups, mixing bowls,
covered casseroles, pie plates and round or square cake dishes. Ovenproof dinner ware is usually safe to
use in the microwave.

Do not heat or cook in glass jars or bottles.

Do not use dishes with silver, gold, platinum or other metal trim. Arcing may occur and /or the dish may
break.

Do not use delicate or stemmed glassware. Although the glass may be transparent to microwave energy,
heat from the food may cause the glassware to crack.

Plastics

Plastic dishes, cups, mugs and bowls may be used in the oven for short periods of time. None of these
should be used in the oven for prolonged periods because distortion and melting may occur.
Check manufacturer’s recommendations concerning microwave safety.

Plastic wrap can be used to cover dishes in most recipes if the dish is deep enough to avoid plastic wrap
touching the food. Always vent the wrap by folding back one corner to allow excess steam to escape.

Plastic cooking bags should be slit before cooking so excess steam can escape.
Do not use wire twist ties to close the bag. Wire twist ties can cause arcing which can damage the oven.

Paper

Paper cups, wax paper, napkins, paper towels, and plates may be used for short cooking. Prolonged time
in the oven can cause paper to burn. Do not use recycled paper products, such as brown paper bags.
They contain impurities which may cause arcing and damage the oven.

Metal 

Metal utensils should not be used in the oven. Metal reflects microwave energy so foods will not cook so
foods will not cook evenly.
Metal can cause arcing and damage the oven.

UTENSIL TEST

Dishes that do not absorb microwave energy are best for microwave
cooking. Lock on the label to verify that particular cups, glasses, plates
are indeed suitable, especially paper goods. If you are not sure, try this
utensil test to check.
¥ Put the empty utensil in the microwave oven.
¥ Put one cup of water in a glass measure next to the empty utensil.
¥ Heat on HI for 1 minute.
¥ After 1 minute the water should be warm but the utensil should not.

If the utensil is warm, it is not suitable for microwave cooking.

Summary of Contents for KOR-164H

Page 1: ...ERATING INSTRUCTIONS MICROWA VE OVEN KOR 164H 1 2 3 4 5 6 7 8 9 0 KICHEN TIMER CLOCK POWER STOP CLEAR START SPEEDY COOK MEAT MORE M W DEF Ons Touch Easy Cook TIMER LOCK Ib BEVERAGE POPCORN FRESH VEGETABLE FROZEN VEGETABLE FROZEN PIZZA DINNER PLATE LESS POULTRY FISH DEFROST ...

Page 2: ......

Page 3: ...for example near a kitchen sink in a wet basement or near a swimming pool and the like 12 Do not immerse cord or plug in water 13 Keep cord away from heated surfaces 14 Do not let cord hang over edge of table or counter 15 Either a When cleaning surfaces of door and oven that comes together on closing the door use only mild non abrasive soaps or detergents applied with a sponge or soft cloth or b ...

Page 4: ...S COMMISSION RADIO FREQUENCY INTERFERENCE STATEMENT U S A ONLY WARNING This equipment generates and uses ISM frequency energy and if not installed and used properly that is in strict accordance with the manufacturer s instructions may cause interference to radio and television reception It has been type tested and found to comply with limits for an ISM equipment pursuant to part 18 of FCC rules wh...

Page 5: ...ly This microwave oven requires a power supply of approximately 15 Amperes 120 Volts 60 Hz and a grounded outlet A short power cord is provided to reduce the risk of the user becoming entangled in or tripping over a longer cord Longer cord sets or extension cords are available and may be used if care is exercised If an extension cord is used the marked electrical rating of the cord should be at le...

Page 6: ...X 486 mm 23 2X13 3X19 1 in CAVITY DIMENSIONS W X H X D 399 X 263 X 426 mm 15 7X10 4X16 8 in NET WEIGHT APPROX 18 5KG 40 8 lbs TIMER 99 min 99 sec POWER LEVELS 10 LEVELS SPECIFICATIONS 589 486 339 1 2 3 4 5 6 7 8 9 0 KICHEN TIMER CLOCK POWER STOP CLEAR START SPEEDY COOK MEAT MORE M W DEF Ons Touch Easy Cook TIMER LOCK Ib BEVERAGE POPCORN FRESH VEGETABLE FROZEN VEGETABLE FROZEN PIZZA DINNER PLATE LE...

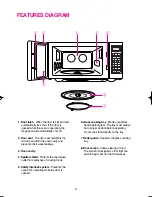
Page 7: ... from operating while the door is opened 6 Glass cooking tray Made of specical heat resistant glass The tray must always be in proper position before operating Do not cook food directly on the tray 7 Roller guide Supports the glass cooking tray 8 Door screen Allows viewing of food The screen is designed so that light can pass through but not the microwaves FEATURES DIAGRAM 1 2 3 4 5 6 7 8 9 0 KICH...

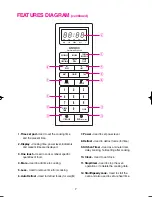
Page 8: ...re displayed 3 One touch Used to cook or reheat specific quantities of food 4 More Used to add time to cooking 5 Less Used to remove time from cooking 6 Auto Defrost Used to defrost foods for weight 7 Power Used to set power level 8 Defrost Used to defrost foods for time 9 Kitchen Timer Used as a minute timer delay cooking hold setting after cooking 10 Clock Used to set clock 11 Stop Clear Used to...

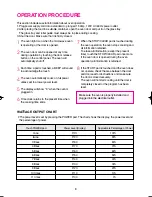
Page 9: ...between the door and door seal for obstructions and make sure the door is closed securely The oven will not start cooking until the door is completely closed or the program has been reset OPERATION PROCEDURE This section includes useful information about oven operation 1 Plug power supply cord into a standard 3 pronged 15 Amp 120V AC 60Hz power outlet 2 After placing the food in a suitable contain...

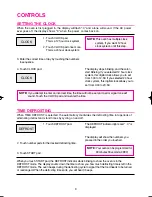
Page 10: ...llows you to set from 0 00 to 23 59 TIME DEFROSTING When TIME DEFROST is selected the automatic cycle divides the defrosting time into periods of alternating defrost and stand times by cycling on and off When you touch START pad the DEFROST indicator starts blinking to show the oven is in the DEFROST mode The display counts down the time to show you how much defrosting time is left in the DEFROST ...

Page 11: ...unts down in the display window The oven beeps during the defrosting cycle to signal that the food needs to be turned or rearranged When the defrosting time ends you will hear 3 beeps MEAT 1 Touch POULTRY pad 2 Select desired defrosting weight 3 Touch START pad The g indicator light and 800 is displayed The display will show what you touched POULTRY DEFROSTING begins POULTRY 1 Touch FISH pad 2 Sel...

Page 12: ...ts and 0 is displayed The display will show the numbers you pressed in the order you touched The M W indicator lights and P HI is The display will show what you touched This example shows power level 5 The display will show the number you COOKING IN ONE STAGE When you touch START pad the M W indicator starts blinking to show the oven is cooking The display counts down the time to show how much coo...

Page 13: ...lay cooking and used as a hold setting after cooking However delay cooking can not be programmed for defrost Timer operates without microwave energy 1 Touch KITCHEN TIMER pad 2 Press the amount of time you want to count down 3 Touch START pad The KITCHEN TIMER indicator lights and 0 is displayed The display will show the numbers you pressed in the order you touched The display counts down the time...

Page 14: ...ged room temperature microwave popcorn 2 Place bag in oven according to manufacturer s directions 3 Pop only one bag at a time 4 After popping open bag carefully popcorn and steam are extremely hot 5 Do not reheat unpopped kernels or reuse bag 6 Do not leave oven unattended while popping popcorn CAUTION If prepackaged popcorn is of a different weight than the recommended weight do not use the popc...

Page 15: ... Touch BEVERAGE three times within 1 5 seconds DINNER PLATE 350g Touch DINNER PLATE once 450g Touch DINNER PLATE twice within 1 5 seconds FRESH VEGETABLE 200g Touch FRESH VEGETABLE once 400g Touch FRESH VEGETABLE twice within 1 5 seconds 1 Touch FROZEN VEGETABLE pad once for 200g of frozen vegetable or twice for 400g of frozen vegetable FROZEN VEGETABLE When you touch FROZEN VEGETABLE pad once 200...

Page 16: ... can be increased to a maximum of 99 minutes CHILD SAFETY LOCK The safety lock prevents unwanted oven operation such as by small children To set press and hold STOP CLEAR for 3 seconds LOCK indicator lights To cancel press and hold STOP CLEAR for 3 seconds LOCK indicator goes off TO STOP THE OVEN WHILE THE OVEN IS OPERATING 1 Press STOP CLEAR pad You can restart the oven by touching START pad Touc...

Page 17: ...the food Always vent the wrap by folding back one corner to allow excess steam to escape Plastic cooking bags should be slit before cooking so excess steam can escape Do not use wire twist ties to close the bag Wire twist ties can cause arcing which can damage the oven Paper Paper cups wax paper napkins paper towels and plates may be used for short cooking Prolonged time in the oven can cause pape...

Page 18: ... occur when the microwave oven is operated under high humidity conditions and in no way indicates malfunction of the unit It is occasionally necessary to remove the glass tray for cleaning Wash the tray in warm sudsy water or in a dishwasher 1 2 3 4 5 6 7 The roller guide and oven cavity floor should be cleaned regularly to avoid excessive noise Simply wipe the bottom surface of the oven with mild...

Page 19: ...or a short time will not damage the oven However it is not recommended Q Can the oven be used with the glass tray or roller guide removed A No Both the glass tray and roller guide must always be used in the oven before cooking Q Can I open the door when the oven is operating A The door can be opened anytime during the cooking operation Then microwave energy will be instantly switched off and the t...

Reviews: