Daewoo KOC-621Q Owner'S Manual Download Page 16

15

KEEP THE OVEN CLEAN

INSIDE THE OVEN

The interior three side walls and floor are stainless steel.
For easy cleaning, wipe spills and spatters as they occur with
a damp cloth or sponge with water and a mild detergent.
Rinse the cavity of any cleaning residue with a clean damp or
sponge after cleaning. Dry with a soft cloth.

These areas can also cleaned by using plastic or nylon
scouring pads recommended for use of Teflon and
Silverstone*.

For hard to remove soil, use a mild non-abrasive cleaner.
Use on the stainless steel areas, turntable and rotating base
only.

FLOOR
A grill element is installed under the floor, and there are holes
on the floor over the grill. Therefore, you must be very careful
not to drop any waterdrops or spills over the holes. Do not
wipe the holed-surface with a damp cloth or detergent Only
use soft, clean and dry cloth.

When you clean the groove or floor with a damp cloth, you
need to be careful not to touch the holed-surface.

TOP SURFACE
Two quartz grill elements are installed on the top surface. As
they are fragile, be careful not to press or grip them hard. Do
not remove the grill elements to clean the surface.

Warning
Just as your traditional oven becomes hot also this oven will
become hot during use of the grill functions or in combination
with microwaves. children should be supervised at all times
when using the oven.

TURNTABLE AND ROTATING BASE
These two parts are easily removable for cleaning. The
turntable should be cleaned frequently and is dishwasher proof.
If food spills are accumulated under the rotating base, the
oven will not operate efficiently. Be sure to wipe up any spills
as they occur in this area.

Clean these parts as described in by the same method of
cleaning inside the oven. Be sure to properly reinstall these
parts into the cavity affer cleaning.

DOOR
While the oven door is still warm, any spatters or food soils
should be wiped off with a damp sudsy cloth or sponge.
Rinse with water and wipe dry with a cloth.

If steam or condensation appears around this area, wipe with
a cloth. This may occur when the oven is operating under
high humidity and with foods containing lots of moisture. This
is a normal part of microwave cooking.

EXTERIOR

CONTROL PANEL
Excercise care when cleaning this area. To clean, wipe the
panel with a slightly dampened cloth, using only water.
Wipe dry. Do not scrub this area or use any sort of chemical
cleaner. Avoid use of excess water.

OUTSIDE SURFACE
The outside surfaces should be cleaned with soap and water,
rinsed and dried with a soft cloth. Do not use any type of
household or abrasive cleanser.
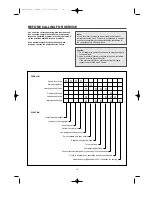
M/W

1. Roast Beef
3. Roast Chicken
5. Vegetable

Auto Cook

M/W

Def.

Grill

Temp

g

2. Roast Pork
4. Fish Fillets

Grill

Combi

Temp

Clock

Combi

KOC-621Q

Stop/
Clear

Defrost

1000g

100g

10m.

1m.

10s.

Auto Cook

Start/

Speedy cook

Note:
Do not use any other Turntable in the oven. Do not
operate the oven without the Turntable and Rotating
Base Properly in place.

Note:
• DO NOT USE ANY TYPE OF OVEN CLEANER ON

ANY PART OF THE OVEN. It will damage some of the
interior and exterior surfaces of the oven.

• In order to keep the good condition of your oven, clean

the inside after each cooking.

Note:
• Although your oven is provided with safety features, it is

important to observe the following:

1. It is important not to defeat or tamper with safety

interlocks.

2. Do not place any object between the oven front face

and the door or allow residue to accumulate on sealing
surfaces. Wipe the sealing area frequently with a mild
detergent, rinse and dry. Never use abrasive powers
or pads.

3. When opend, the door must not be subjected to strain,

for example, a child hanging on an opend door or any
load could cause the oven to fall forward to cause injury
and also damage to the door. Do not operate the oven
if it is damaged, until it has been repaired by a service
technician. It is particulary important that the oven
closes propery and that there is no damage to the:

1) Door(bent)
2) Hinge and Hookes(broken or loosened)
3) Door seals and sealing surface.

4. The oven should not be adjusted or repaired by

anyone except a properly trained service technician.


KOC-621Q0S(¿ )-Desuk˙  


01.11.24 

11:58 

AM 


˘

`

15

Summary of Contents for KOC-621Q

Page 1: ...Roast Chicken 5 Vegetable Auto Cook M W Def Grill Temp g 2 Roast Pork 4 Fish Fillets Grill Combi Temp Clock Combi KOC 621Q Stop Clear Defrost 1000g 100g 10m 1m 10s Auto Cook Start Speedy cook MICROWA...

Page 2: ...rowave energy It is important not to defeat or tamper with the safety interlocks b Do not place any object between the oven front face and the door or allow soil or cleaner residue to accumulate on se...

Page 3: ...itted with 13 AMP fuse marked with the number BS 1362 We recommend the use of good quality plugs and wall sockets that can be switched off when the machine is not in use IMPORTANT The wires in the mai...

Page 4: ...turned edges act like antennas Metal such as twist ties poultry pins or gold rimmed dishes in the microwave Recycled paper towels containing small metal pieces being used in the microwave General Use...

Page 5: ...iercing Always pierce food which has a skin or membrane for example potatoes tomatoes apples sausages etc If you don t pierce them steam will build up inside and they may explode 3 Lids Always remove...

Page 6: ...2 2 Defrost Press to select weight time defrost mode 3 3 Grill Press to select grill 4 4 Combi Press to select combi cooking mode 5 5 Temp Press to select temperature 6 67 78 8 Use to set time and we...

Page 7: ...ven for all cooking It rotates clockwise or counterclockwise during cooking It is easily removable for cooking and cleaning needs Metal rack This metal rack is used with the turntable tray HOW TO USE...

Page 8: ...hild lock 1 Touch stop clear pad 0 or clock appears in the display 2 Press and hold stop clear pad for 3 seconds The oven will beep and 0 shows in display previously Now the oven cannot be operated To...

Page 9: ...ow Low Defrost Warm percentage 50 P 50 40 P 40 30 P 30 20 P 20 10 P 10 Output 390W 300W 220W 140W 90W Note The oven will automatically work on 100 microwave power if a cooking time is entered without...

Page 10: ...erior of the oven when taking food in and out Use thick oven gloves while handling food or accessories The oven mode enables you to cook food in the same way as in a traditional oven Microwaves are no...

Page 11: ...Touch start speedy cook pad The temp indicator starts blinking The oven will now preheat When oven is preheated the oven will beep and the oven temperature starts blinking Then open the door and plac...

Page 12: ...0s pad to set the defrosting time For a cooking time of 11 minutes touch 10m 1m pad once up to 60 minutes 11 00 shows in display 3 Touch start speedy cook pad The Def indicator start blinking The oven...

Page 13: ...1000g pad once up to 2000 grams 1000 shows in display Refer to the auto cook menu chart below for further details 4 Touch start speedy cook button m w and grill indicator start blinking The oven ligh...

Page 14: ...can restart the oven by closing the door and touching start speedy cook button 2 Press the stop clear button Oven stops operating If you wish to cancel the cooking settings press the stop clear butto...

Page 15: ...king at the outer edges of the food Covering food helps To reduce spattering To shorten cooking times To retain food moisture All covering which will allow microwaves to pass through are suitable See...

Page 16: ...loth If steam or condensation appears around this area wipe with a cloth This may occur when the oven is operating under high humidity and with foods containing lots of moisture This is a normal part...

Page 17: ...uite normal for steam to be emitted around the door during the cooking cycle The door is not intended to seal the oven cavity completely but its special design contributes to the complete safety of th...

Page 18: ...levels The oven light dims and clicking noises can be heard when the oven cycles Q When is the oven light on and off A The oven light is on during the cooking time and when the door is opened Q Why do...

Page 19: ...repair or replacement of parts due to normal wear and tear 2 Home service transport cost and other costs and risks of transport relating directly or indirectly to the guarantee of the product 3 Damag...

Reviews: