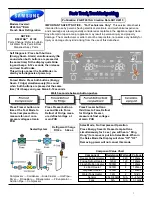
background image

CONTENTS

1. SPECIFICATION

1

2. NAME OF PARTS

2

3. REFRIGERANT CYCLE DIAGRAM

3

4. WRING DIAGRAM

4

5. MACHINE ROOM VIEW AND PART LIST

5

6. METHODS OF EXCHANGING MAIN PARTS

6

7. EXPLODE VIEW AND PARTS LIST

10

8. PARTS LIST    

11

Summary of Contents for FR-330

Page 1: ...LTD S M No FR33000012 Caution In this Manual some parts can be changed for improving their performance without notice in the parts list So if you need the latest parts information please refer to PPL Parts Price List in Service Information Center http svc dwe co kr ...

Page 2: ...TS 1 SPECIFICATION 1 2 NAME OF PARTS 2 3 REFRIGERANT CYCLE DIAGRAM 3 4 WRING DIAGRAM 4 5 MACHINE ROOM VIEW AND PART LIST 5 6 METHODS OF EXCHANGING MAIN PARTS 6 7 EXPLODE VIEW AND PARTS LIST 10 8 PARTS LIST 11 ...

Page 3: ...ystem Defrost Operation Cold Control Freezer Refrigerator Total Height Width Depth Net Weight 1 207L 268L 115g Fan Cooling Convection Type Air Forced Convection Forced Fin Evaporator Type 57Kg External Dimension 1636mm 600mm 687mm Automatic Start Stop Adjustable Dial Capacity 61L ...

Page 4: ...2 NAME OF PARTS 2 ...

Page 5: ...3 REFRIGERANT CYCLE DIAGRAM 3 ...

Page 6: ...4 WRING DIAGRAM 4 ...

Page 7: ...E HOT 13 BASE COMP AS 2 COMPRESSOR 8 DRYER AS 14 BRACKET EARTH 3 P RELAY AS 9 PIPE SUC AS 15 POWER CORD AS 4 PIPE VAPORI AS 10 PIPE SUC CONN 16 ABSORBER PIPE A 5 ABSORBER PIPE B 11 BOX POWER AS 6 PIPE S PLT 12 HARNESS EARTH 5 MACHINE ROOM VIEW AND PART LIST 5 ...

Page 8: ...screwdriver into the hole of F louver 2 Assemble it by pressing triangle shape by hand 2 R control box 1 After pressing both bottom surfaces of shade and pull forward 2 To exchange the interior lamp unscrew the lamp counterclockwise 3 Remove two screws 6 METHODS OF EXCHANGING MAIN PARTS 6 ...

Page 9: ...of exchanging main parts 4 Pull slightly forward with instant force 5 Remove the housing 6 After romoving the control switch knob and two screws for fixing control switch change the control switch to new one 7 ...

Page 10: ...lass tube heater 1 Remove 2 screws that fasten the evaporator 2 Slightly pull the evaporator to the arrow s direction 3 Move the entire eveporator upward the pipe center to the arrow s direction Do not crumble the part A of the accumulator during the process 8 Evaporator fastening screw BIMETAL ...

Page 11: ...n the heater supporter 6 Install the heater covers upper and lower on a new glass tube heater Make the cover with holes the lower one 7 Place the glass tube heater lead wire shown as below and fasten the shaded area with type 8 Fin insert the lead wire connection terminals Same colored lead wires 9 Set the evaporator on normal position and secure the fastening screws 9 Raise d Heater Cover Glass t...

Page 12: ...7 EXPLODE VIEW AND PARTS LIST 1 Expoloded views JORDAN MIDDLE DAEWOO FR 330 10 ...

Page 13: ...2PIN 1 23 3012906300 HINGE M AS 1 24 3016004000 SPECIAL BOLT M6XL10 SWCH22A 2 25 3011161200 CASE VAPORI PP 1 26 401VA42021 FAN MOTOR ASS 3210DWNFF 2 240 50 1 27 3010530401 ASSY R CONTL BOX 220 240V 50HZ 1 28 3013600020 LAMP AS 240V 15W 1 29 3010008502 DUCT M F AS 1 30 4017Z87570 SHADE R HC 2 1 31 4010C75252 LABEL DUCT PC 1 32 3018913600 LOUVER F AS 1 33 3012914500 HINGE T AS 1 34 3014558300 COVER ...

Page 14: ...0 POCKET F U GPPS 1 50 ASSY R DOOR URT HCFC 141B 1 51 3012310010 GASKET R DR AS PVC S 1 52 3019016200 POCKET SM GPPS 1 53 7002501611 SCREW MACHINE TRS 5X16 MFZN 4 54 3011165700 CASE EGG GPPS 2 55 3019015900 POCKET EGG GPPS 1 56 3019016000 POCKET MULT GPPS 2 57 3019016100 POCKET BOTL GPPS 1 58 3012624200 HANDLE R A ABS 1 A TYPE 59 3011611110 DECO F HNDL AS 1 A TYPE 12 ...

Reviews: