background image

8

Chapter 1 : Overview of Your Equipment

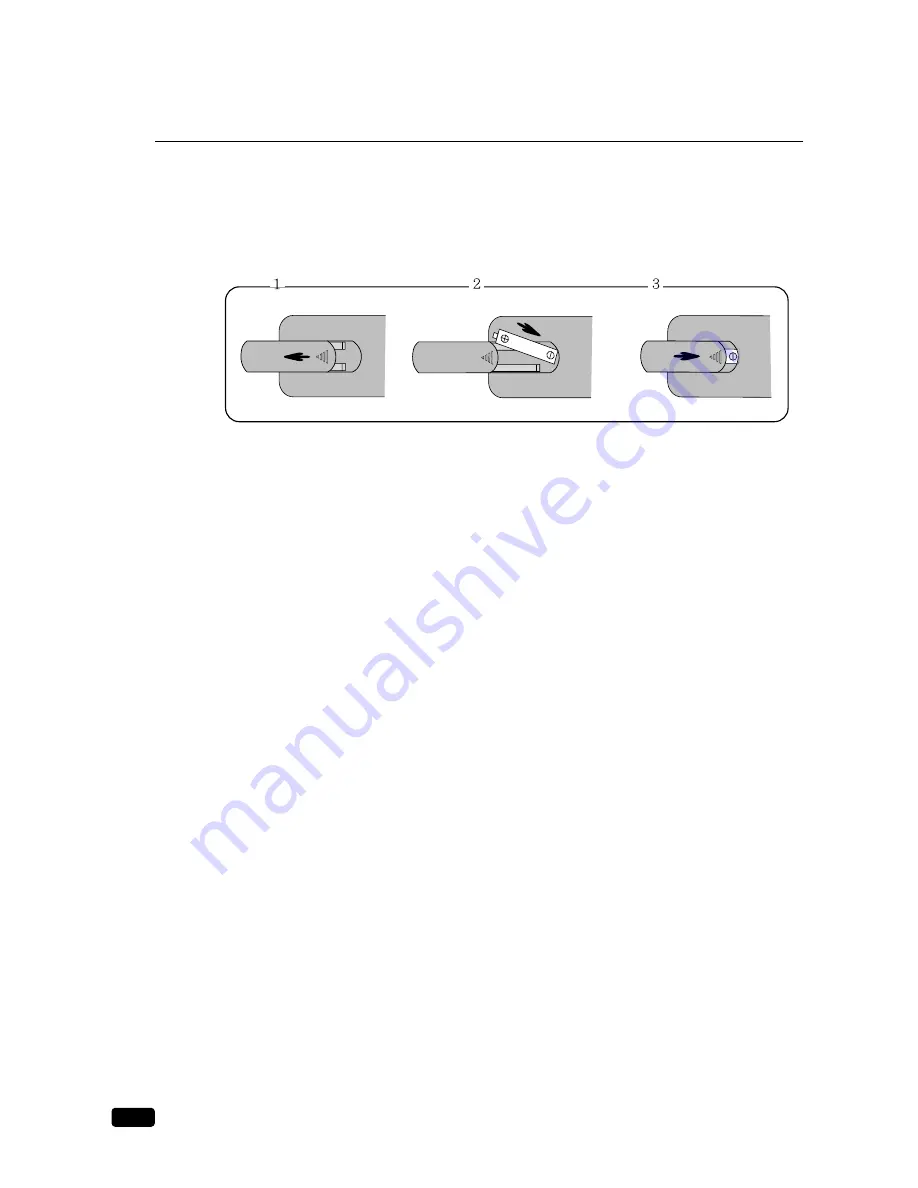
Installing Your Remote Control Batteries

1.

Open the battery compartment on the back of the remote control.

2.

Install two AAA-size batteries (not included) as shown. Make sure the “+” and “-” terminals
are oriented correctly.

3.

Replace the cover.

Notes

Do not mix different types of batteries, or mix an old and a new battery.

Remove and replace weak batteries. Weak batteries can leak and damage your controller.
Dispose of batteries properly; never throw them into a fire.

Point your remote at the receiver on the center of the front of the TV/VCR. Make sure the
receiver is not blocked.

The remote control can operate up to 30 feet away from the TV/VCR, if you are directly fac-
ing the front of the TV/VCR. Operating distance diminishes as you move to the sides of the
TV/VCR.

Summary of Contents for DVQ 14H1FC

Page 1: ...DVQ 14H1FC DVQ 20H1FC INSTRUCTION MANUAL TV VCR COMBINATION DVQ 14H2FC DVQ 20H2FC ...

Page 2: ...CATV SYSTEM INSTALLER THIS REMINDER IS PROVIDED TO CALL THE CATV SYSTEM INSTALLER S ATTENTION TO ARTICLE 820 40 OF THE NEC THAT PROVIDES GUIDELINES FOR PROPER GROUND ING AND IN PARTICULAR SPECIFIES THAT THE CABLE GROUND SHALL BE CONNECT ED TO THE GROUNDING SYSTEM OF THE BUILDING AS CLOSE TO THE POINT OF CABLE ENTRY AS PRACTICAL CAUTION The AC power cord provided with this product is polarized one ...

Page 3: ...e center for servicing Do not put your fingers or objects into the TV VCR cassette holder Do not place anything directly on top of the unit WARNING Mosture condensation may occur inside the unit when it is moved from a cold place to a warm place after heating in a cold room or under conditions of high humidity if a tape is played in a TV VCR that has moisture it may damage the tape and TV VCR when...

Page 4: ...ble operation of the televi sion equipment and to protect it from over heating these opening must not be blocked or covered The opening should never be blocked by placing the television equipment on a bed sofa rug or other similar surface This equipment should never be placed near or over a radiator or heat register This tele vision equipment should not be placed in a built in installation such as...

Page 5: ...rmallybyfollowingtheoperatinginstruc tions Adjustonlythosecontrolsthatarecov eredbytheoperatinginstructionsasan improperadjustmentofothercontrolsmay resultindamageandwilloftenrequireexten siveworkbyaqualifiedtechniciantorestore theTVreceivertoitsnormaloperation e Ifthetelevisionequipmenthasbeendroppedor thecabinethasbeendamaged f When the television equipment exhibits a distinct change in performa...

Page 6: ...e 19 Basic Recording 20 One Touch Recording OTR 21 Displaying the TV VCR s Status during VCR Operation 22 Using the Counter Zero Stop 23 Chapter 5 Using Timer Functions 24 Setting the Clock Automatically 24 Setting the Clock Manually 25 Setting the On Time 26 Setting the Off Time 26 Canceling the On Time or Off Time 27 Setting the Sleep Timer 28 Chapter 6 Additional TV Features 29 Changing the Lan...

Page 7: ...signal from local PBS sta tions Infrared Remote Control The remote control included with your TV VCR allows you to complete almost all opera tions from the comfort of your easy chair 181 Channel Capability Your TV VCR has a advanced tuner that can receive up to 181 channels Closed Caption Decoder Your TV VCR can decode the hidden text and captions that are broadcast with many shows and are include...

Page 8: ...h in advance Daily Weekly Recording You can easily set your VCR to record every day at the same time or to record every week at the same time Sleep Timer You can set your TV VCR to turn off after a certain amount of time passes from 15 min utes to 120 minutes On Timer You can set your TV VCR to turn on at a certain time Parental Control Parental control is on the 31 page Unpacking Your TV VCR The ...

Page 9: ...other A V component 3 EAR PHONE jack Use this jack to the earphone not supplied The sound from the speaker is turned off 4 Remote control receiver This receiver receives a signal from your remote control Do not block it 5 STAND BY red indicator This indicator light up when the power is off 6 REC red green indicator This indicator light up red when recording and light up green when timer program op...

Page 10: ... B buttons volume Press these buttons to change your TV VCR s volume 13 y yCHx x buttons channel Press these buttons to change channels on your TV VCR You will also use these buttons to adjust the tracking 14 POWER button Press this button to turn your TV VCR on or off Your TV VCR s Back Panel 1 Antenna terminal Use this terminal to attach an antenna or cable system to your TV VCR 1 ...

Page 11: ...rn to the previous channel you were watching 5 CANCEL Press this button to erase timer program recording settings 6 C RESET Press this button to reset the counter to 0 00 00 7 MUTE Press to turn the TV VCR s sound on and off 8 y yCHx x TRK Press these buttons to change channels on your TV VCR or select items in the menu system or to adjust the tracking of a video tape during play back 9 C CVOLB B ...

Page 12: ...this button to rewind the tape 17 FF button Fast Forward Press this button to fast forward the tape 18 PAUSE STILL Press to temporarily stop the tape during recording or playback 19 REC OTR Press this button to begin recording Press repeatedly to set a recording time using One Touch Recording OTR 20 STOP EJECT Press this button when the tape is moving to stop the tape Press this button when the ta...

Page 13: ...nt types of batteries or mix an old and a new battery Remove and replace weak batteries Weak batteries can leak and damage your controller Dispose of batteries properly never throw them into a fire Point your remote at the receiver on the center of the front of the TV VCR Make sure the receiver is not blocked The remote control can operate up to 30 feet away from the TV VCR if you are directly fac...

Page 14: ...our TV VCR The antenna terminal is a silver metal post partially surrounded by two plastic tabs For help in locating the antenna terminal see Your TV VCR s Back Panel on page 5 There is no antenna provided with your TV VCR Connecting an Antenna If your antenna ends in a single coaxial lead simply press or screw the cable onto the antenna terminal on the back of your TV VCR If your antenna ends in ...

Page 15: ...store Press or screw the coaxial lead onto the com biner place the twin leads underneath the screws on the combiner and tighten the screws Press the cable from combiner onto the antenna terminal on the back of the TV VCR If your antenna system has two sets of twin 300 ohm leads you must obtain a combiner available at your local electronics store Place one set of twin leads underneath the screws on...

Page 16: ...cable box simply press or screw the incoming cable onto the antenna terminal on the back your TV If your cable system requires you to use a converter box for all channels connect the incoming cable to the IN terminal on the converter box Connect another cable between the OUT terminal on the converter box and the antenna terminal on the TV You will need to keep your TV tuned to channel 3 or 4 and c...

Page 17: ...hannels on the TV VCR when the A B switch is in the B position you need to change channels on the converter box and your TV should be tuned to channel 3 or 4 Connecting Other Pieces of Equipment You may want to connect a VCR laser disc player satellite receiver or another type of equip ment to your TV VCR We recommend that you follow the instructions included with the piece of equipment you wish t...

Page 18: ...tons If a channel is not in memory you can tune to it with the number buttons but not with the x xCHy y buttons Follow these steps to program your TV VCR s memory 1 With the TV on press the MENU button until Set Up menu will be displayed 2 Use the x xCHy y buttons to select Reception then use the VOLB B button to select Air or Cable If you connected an antenna to your TV VCR select Air If you conn...

Page 19: ...e 2 The number buttons 0 9 will take you to any channel even if it has not been memorized To change to a channel enter its num ber the TV VCR will tune to the new channel when you enter the second digit of the channel 3 The FAVORITE CH button will take you instantly to the last channel you were watching Changing the Volume 1 To change the volume of the TV VCR set use the C CVOLB B but tons on the ...

Page 20: ...mory 1 Use the number buttons to tune to the channel 2 Press the MENU button until Set Up menu will be displayed 3 Use the x xCHy y buttons to select Add Delete Channels then use the VOLB B button to enter the Add Delete Channels process 4 If the channel is not in memory then use the C CVOLB B buttons to add the channel from memory 5 If the channel is in memory then use the C CVOLB B buttons to de...

Page 21: ...the MENU button then Video menu will appear 2 The Settings item will be selected Use the CVOLB buttons to turn Settings to Preset or Custom 3 Use the buttons to select the video setting you wish to adjust Descriptions of the video settings are on the next page 4 Use the CVOLB buttons to adjust the video setting to the level you prefer 5 When you are finished press the MENU button until menu OSD wi...

Page 22: ...button if the picture is gray and lacks contrast press the VOLB button The brightness setting controls the overall amount of light in the picture If the picture is too bright press the CVOL button if the picture is too dark press the VOLB button The sharpness controls how the TV displays edges of objects on screen If the TV shows mul tiple vertical lines at the edges of an object press the CVOL bu...

Page 23: ...ith its tab removed simply place a piece of tape over the space left by the removed tab Inserting a Tape To insert a tape into your TV VCR hold it so that the win dows on the tape face up and the label of the tape faces away from the TV VCR Gently place the tape in the cas sette compartment and push it in slowly Once it is in the compartment part way the TV VCR will pull the tape the rest of the w...

Page 24: ...e control Searching for a scene If you are looking for a particular scene you can use the FF and REW buttons to find the scene faster 1 Press the FF button dur ing playback to search quickly in the forward direction Press the FF button a second time to search at 7X normal in SP speed or 11X nor mal in EP 2 Press the REW button during playback to search quickly in the reverse direction Press the RE...

Page 25: ...the track ing using these buttons until the picture is no longer distorted Basic Recording Your TV VCR makes it easy to record a program you are watching To do this 1 Place the tape on which you want to record in the cassette compartment Fast forward or rewind to the point where you want to begin recording 2 Tune to the channel you want to record 3 Press the SPEED button repeatedly to select the t...

Page 26: ...p to 4 hours 3 When you have reached the length of time that you want the TV to record stop pressing the OTR button The TV VCR will count down the time you set When the timer reaches 00 00 recording will stop 4 You can stop recording at any time by pressing STOP button If you press the POWER button during OTR the picture will turn off but the tape will still record for the remainder of the OTR tim...

Page 27: ...button The current time the current channel the tape statue STOP PLAY REC etc the tape speed and the tape counter will be displayed 2 Press the button a second time to see the current time the current channel the tape status the tape speed and the tape remain will be displayed If the tape is playing the current channel will not be displayed 3 Press the button a third time to return to normal viewi...

Page 28: ...er 2 To reset the counter press the C RESET button on the remote control 0 00 00 The counter is also reset when you put a new cassette in your TV VCR 3 Press the MENU button until Tape menu will be displayed 4 After play the tape use the xCHy buttons to select the Zero stop If the press the VOLB button you can quickly return to the 0 00 00 5 The TV VCR will rewind until it reaches the 0 00 00 mark...

Page 29: ...e the xCHy buttons to set the PBS channel If you don t know the channel of the local PBS station to set Automatic 5 Use the VOLB button to select Time Zone 6 Press the xCHy buttons to select that corresponds to the time zone where you live If you don t know the time zone where you live to set Automatic Press the xCHy buttons to change the Time Zone Automatic Atlantic Eastern Central Mountain Pacif...

Page 30: ... 2 The Set Clock item will be selected Press the VOLB button once then Manual will be displayed in RED 3 Press the xCHy buttons to display the Current Time Set mode 4 Use the xCHy buttons to set the month 5 Press the VOLB button to select the day year and time use the xCHy buttons to set ting If you hold down either xCH or CHy button the corresponding numbers will change more quickly 6 When the cl...

Page 31: ... xCHy buttons to time setting If you hold down either xCH or CHy button the corresponding numbers will change more quickly 5 When the clock is set correctly press the CVOLB buttons to select On Time and use the xCHy buttons to select another Time function or press the L MENU button to exit Setting the Off Time If you enter a time in the Off Time setting your TV VCR will automatically turn off at t...

Page 32: ... change more quickly 5 When the clock is set correctly press the CVOLB buttons to select Off Time and use the xCHy buttons to select another Time function or press the L MENU button to exit Canceling the On Time or Off Time If you would like to cancel the On Time or Off Time press the CANCEL button on the remote control The On Time or Off time will not function correctly unless the clock has been ...

Page 33: ...e menu will be displayed 2 Use the xCHy buttons to select Sleep Timer item 3 Press the CVOLB buttons to set the sleep time Each time you press the CVOLB buttons you step between the available sleep times 15min 30min 45min 60min 90min or 120min 4 When the clock is set correctly press the xCHy buttons to select another Time function or press the L MENU button to exit To cancel the Sleep Timer turn t...

Page 34: ...t can be dis played on your TV VCR screen There are two types of these words captions usually fol low the action on screen providing a written version of the dialogue narration and sound effects text is not usually related to the action on screen often providing information such as news or weather A TV program might be providing more than one set of captions or one set of text To set your TV VCR t...

Page 35: ...select CC1 or CC2 Power Restore User can select the On Off status when the power cord is put into the wall outlet If user has a cable box with AC outlet then user can connect the TV VCR power cord to the AC outlet and control the TV VCR without TV VCR remote control This function is rarely used for home use so special care is needed while using 1 With the TV VCR turned on press the MENU button unt...

Page 36: ...yed 2 Use the xCHy buttons to select Parental Control item 3 Use the VOLB button to enter into Parental Control settings Set a 4 number password using the number keypad 4 Use the xCHy buttons to select Parental Control settings you wish to adjust Descriptions of the Parental Control settings are on the next page 5 Use the CVOLB buttons to adjust the Parental Control settings 6 Use the MENU button ...

Page 37: ...The No Ratings item toggles between Unblock and Block This item determines whether to block or not the programs which are not rated by Movie Ratings and TV Guidelines 4 The Ext Source item toggles between Unblock and Block 5 The Play Source item toggles between Unblock and Block 6 The Change Password item let you set or change the password for entering Parental Control item Use the VOLB buttons to...

Page 38: ...PARENTAL GUIDELINE RATING SYSTEM TV MA TV PG TV 14 TV Y7 TV G Mature Audience Only Parental Guidance Suggested Parents Strongly Cautioned Children 7 and over General Audience Adults only may contain Strong Dialog Bad Language Sex and Violence Scenes Unsuitable for younger childern may contain Suggestive Dialog Bad Language Sex and Violence Scenes Unsuitable for childern under 14 may contain Strong...

Page 39: ...p to a month from now Getting ready Before programming to record keep the following things in mind There must be a tape in the cassette compartment with its erasure prevention tab intact The tape should be rewound or fast forwared to the point where you want to begin recording The clock must be set correctly You should plan your programming sessions If you program sessions that overlap at least on...

Page 40: ...MON Every SAT MON FRI SUN SAT 5 today 4 Press the VOLB button then set the hour of the recording Start time to 8 with the xCHy buttons 5 Press the VOLB button then set the minute of the recording Start time to 00 with the xCHy buttons 6 Press the VOLB button then set the hour of the recording Stop time to 9 with the xCHy buttons 7 Press the VOLB button then set the minute of the recording Stop tim...

Page 41: ...or B to next line then repeat step 2 through 10 12 Press MENU to Exit the Program menu 13 Press POWER to turn off the TV VCR The REC lamp on the front of the TV VCR lights up to Green and the TV VCR enters recording stand by mode The TV VCR turn on automatically and start recording at the preset start time and the REC lamp on the front of the TV VCR changed from Green to Red ...

Page 42: ...ecord Settings 1 With the TV VCR turn on press the MENU button until Program menu will be dis played 2 Using the xCHy buttons select the Program setting which you want to stop recording and press the CANCEL button 3 Press the MENU button to exit the Program menu ...

Page 43: ... the time counter and the remaining tape time counter appears alternately When you use a tape shorter than 120 minutes set Tape Remain to T120 When you use a tape longer than 120 minutes set Tape Remain to Others 1 Press the MENU button until Tape menu will be displayed 2 The Tape Remain item will be selected Press the VOLB button to select T120 or Others 3 Press the MENU button until menu OSD wil...

Page 44: ...tton until Tape menu will be displayed 2 Use the xCHy buttons to select Repeat Play item 3 Press the VOLB button to select On 4 Press the MENU button until menu OSD will be disappeared Rental Play Your TV VCR has a special video setting that improves the quality of worn video tapes espe cially rental tapes To use feature 1 Press the MENU button until Tape menu will be displayed 2 Use the xCHy butt...

Page 45: ...e a tape with index marks in your TV VCR 2 If the index mark is ahead on the tape press the VISS button if the index mark is behind on the tape press VISS button The tape will fast forward or rewind without picture until it finds the index mark Then it will begin playing 3 You can search further than the next index mark For example if you know that the show you want is three index marks behind you...

Page 46: ...DEO jack on the front of your TV VCR 3 Press TV LINE button on the remote control to set the TV VCR to LINE 4 Insert the tape on which you want to record in the TV VCR and set it to the point at which you want to begin recording 5 Insert the tape from which you want to record in the VCR and set it to the point at which you want to begin recording 6 Press the REC OTR button on the TV VCR 7 Press th...

Page 47: ...y be a station problem Check that the antenna is connected and is in good working order has no broken wires and is adjusted correctly The picture is OK but the sound is poor Try another station If the other stations are OK it may be a station problem Check that the antenna is connected is in good working order has no broken wires and adjusted correctly There is poor reception on some channels Try ...

Page 48: ... your video heads cleaned contact an authorized Daewoo repair center Specifications Power Supply AC 120V 60Hz Power Consumption 14H1FC 14H2FC 60W 20H1FC 20H2FC 70W Dimensions WxHxD 14H1FC 14H2FC 382 x 404 x 365mm 20H1FC 20H2FC 498 x 498 x 469mm Weight 14H1FC 14H2FC 14Kg 20H1FC 20H2FC 23Kg Channel Coverage VHF 2 13 CATV 1 14 125 UHF 14 69 Video Signal System NTSC Color Picture Tube 13 or 19 diagona...

Page 49: ...ffects the reliability or detracts from its per formance How to Obtain Warranty Service Warranty service can only be provided by an authorized DECI Service center For the closest authorized Service center to you please contact your Dealer In order to receive warranty service you must provide the authorized Service center with a copy of proof of purchase signifying the date of purchase and the name...

Page 50: ...writer s Laboratories Inc It is designed and manufactured to meet rigid U L safety standards against X radiation fire casualty and electrical hazards Daewoo Electronics Canada Inc 170 Alden Road Markham Ontario L3R 4C1 Tel 905 415 7290 ...

Reviews: