background image

Overview of the equipment,

continued

7

6

Daewoo Video Cassette Recorder User’s Guide

Daewoo Video Cassette Recorder User’s Guide

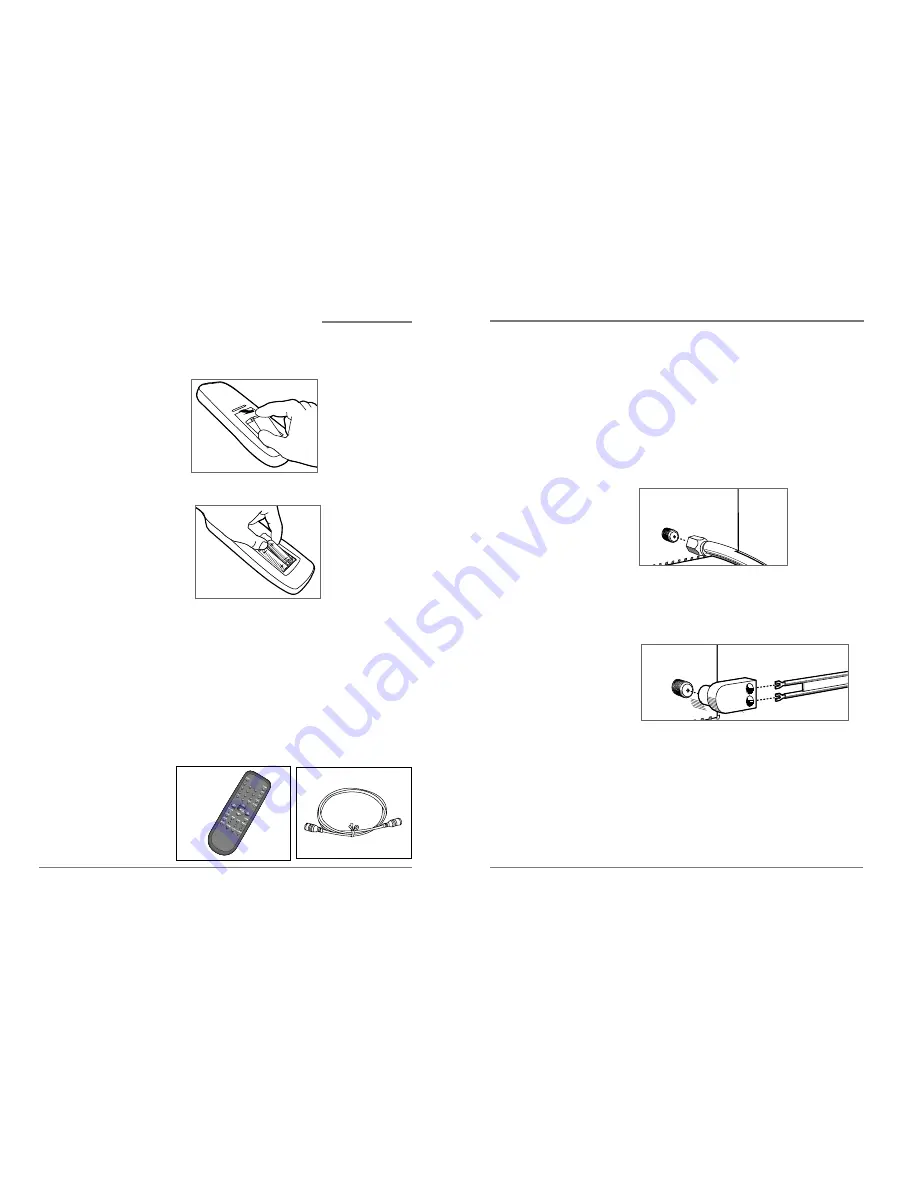
Connecting your VCR

You must connect your VCR to an external antenna or
cable system. Next you will connect the VCR to the
television. Follow the directions below to make these
connections. You will normally only make one of the
connections shown below, not all of them.

Connecting an antenna to the VCR

If your antenna ends in a single coaxial lead,

press or screw the cable onto the ANT. IN terminal
on the back of your VCR.

If your antenna ends in a pair of 300 ohm twin
leads,

use a 300-ohm/75-ohm adapter

(Not Supplied). Place the leads underneath the
screws on the adapter, tighten the screws, then press
the adapter onto the VCR  ANT. IN  terminal.

Antennas with two sets of leads

You may have two sets of leads from your antenna system. 

If your antenna system has both a coaxial lead
and twin 300-ohm leads,

purchase a combiner

(available at electronics stores). Press or screw the
coaxial lead onto the combiner; place the twin leads
underneath the screws on the combiner and tighten
the screws. Press the cable from the combiner onto
the ANT. IN terminal on the back of your VCR.

VCR

ANT.IN

VCR

ANT.IN

Installing the remote control batteries

1

Open the battery compartment on the back of the
remote control.

2

Install AAA size batteries as shown. Make sure the
“+” and “–” terminals are oriented correctly.

3

Replace the cover.

Using the remote control

Hold the remote control within an angle range of about
30° from either side of the remote sensor. The remote
control range is about 23 feet (7m) from the VCR.

Point the front of the remote control directly at the front
of the VCR.

Accessories

Carefully remove the VCR from the carton. Check that the
VCR has not been damaged. The following accessories
are included. 

• Do not mix different types

of batteries, or mix an old
and a new battery.

• Remove and replace

weak batteries. Weak
batteries can leak and
damage your controller.
Dispose of batteries
properly; never throw
them into a fire.

1

2

3

4

5

6

7

8

9

0

Summary of Contents for DV-T858N

Page 1: ...Video Cassette Recorder User s Guide DV T858N As an ENERGYSTAR Partner DAEWOO has determined that this product meets the ENERGYSTAR guidelines for energy efficiency...

Page 2: ...s polarized plug with an extension cord receptacle or other outlet unless the blades can be fully inserted without blade exposure If you need an extension cord use a polarized cord 5 Power Sources Thi...

Page 3: ...er Cord Protection Power supply cords should be routed so that they are not likely to be walked on or pinched by items placed upon or against them paying particular attention to cords at plugs conveni...

Page 4: ...asure 18 Inserting Removing video cassettes 18 Controlling a TV CABLE BOX 19 Program the remote for a TV 19 Program the remote for a CABLE BOX 20 Operate the TV CABLE BOX Component Buttons 21 TV funct...

Page 5: ...ording R0 30 R1 00 OTR One Touch Recording When the lighted indicator is blinking on the display panel the VCR is in the child lock mode Overview of the equipment continued 3 2 Daewoo Video Cassette R...

Page 6: ...Press to turn your VCR on or off Overview of the equipment continued Objects between the remote control and VCR will block the path of the remote control beam Dark walls direct sunshine or very brigh...

Page 7: ...s purchase a combiner available at electronics stores Press or screw the coaxial lead onto the combiner place the twin leads underneath the screws on the combiner and tighten the screws Press the cabl...

Page 8: ...inued ANT IN VCR ANT IN VCR TV 9 8 Daewoo Video Cassette Recorder User s Guide Daewoo Video Cassette Recorder User s Guide If you have a coaxial terminal for VHF signals and twin lead terminals for UH...

Page 9: ...cable between the OUT terminal on the converter box and the ANT IN terminal on the VCR Keep your VCR tuned to channel 3 or 4 and change channels using the converter box If your cable system only requi...

Page 10: ...viewing LANGUAGE SELECT Select a language 1 English 2 Espa ol 3 Fran ais MENU Continue MENU 1 TIMER RECORDINGS 2 CLOCK SET 3 CHANNEL SET 4 FUNCTIONS 5 LANGUAGE SELECT 6 AUDIO SELECT MENU Exit 13 12 D...

Page 11: ...setting between CABLE and ANTENNA When the desired viewing mode is displayed press MENU twice to exit Programming the channel memory The VCR s channel memory determines the channels that are visible...

Page 12: ...der User s Guide 4 Press 2 to select Add Remove Channels 5 Press DISPLAY to add the channel 6 Press MENU three times to exit from the menus Setting the Cable Box Cable Box Setup 1 Press MENU to displa...

Page 13: ...Do not attempt to pull out the video cassette once the VCR begins to load the video cassette Do not insert fingers or any foreign object beyond the door flaps of the cassette compartment this could l...

Page 14: ...VOICE 62 83 9 COMBANO 76 77 10 COMTRONICS 19 30 11 DIAMOND 23 12 EAGLE 20 30 39 13 EAGLE COMTRONICS 93 14 EASTERN 56 59 63 88 15 ELECTRICORD 32 16 EVERAUEST 91 17 FUNAI 95 18 GARRARD 95 19 GE 69 20 G...

Page 15: ...apidly Press PLAY to return to normal play Pausing a video cassette during playback To temporarily stop playback press P S The picture will freeze and the sound will stop Press PLAY to return to norma...

Page 16: ...e control to select the television channel you want to watch The VCR will continue to record the program See Selecting cable or antenna viewing p 14 for information on setting the viewing mode Press P...

Page 17: ...ng program press POWER on the remote control or POWER on the VCR The timer recording indicator will light To stop a timer recording program in process press and hold STOP for about five seconds When t...

Page 18: ...he recording in progress press and hold STOP approximately 5 seconds PROGRAM1 ONE TIME Channel 06 Cable Start Time 04 30AM End Time 05 30AM Start Date 07 10 00 Mon Tape Speed EP CLEAR Cancel MENU For...

Page 19: ...rams are broadcast in mono or stereo audio or with a SAP To record in stereo or a SAP 1 Turn on the TV and VCR 2 Set the TV to channel 3 or 4 or to the video input 3 Set the VCR to VCR mode by pressin...

Page 20: ...you record a programs the VCR places an index mark at the start of the recording To search for an index mark 1 Press MENU to display the menu 2 Press 4 to choose Functions 3 Press 3 to choose Index Se...

Page 21: ...n on this feature SPRING Forward Fall Backward In the Spring daylight saving time begins on the first Sunday in April Because the clock automatically changes from 2 00 AM to 3 00 AM forward one hour r...

Page 22: ...nts accidental erasure of a recording SP Standard play the recording speed to use when the best picture quality is of prime importance and when total recording time is not 36 Daewoo Video Cassette Rec...

Page 23: ...winding near the end of the tape and then slowly finishes rewinding Do not prematurely eject the tape Troubleshooting continued Troubleshooting Your Daewoo VCR is designed to give you trouble free per...

Page 24: ...ted by such laws they are deemed nul and void but the remainder of the warranty shall remain in effect If you require further assistance you may contact us directly at Daewoo Electronics Canada Inc 17...

Reviews: