background image

NEW STATIONS

16

REW 

FF

STANDBY

STOP/     EJECT

CHANNEL

REC/OTR

R

AP

ID

RE

W

IN

D

SY

STE

M

P L A Y

QUICK

STA

RT

ME

CH

AN

IS

M

VIDEO IN L  -  AUDIO IN  -  R

Tuning

T u n i n g   i n

The TV and video recorder are switched on.

To see the picture from your video, press the station button on the TV reserved for
video input or the AV (Audio / Video) button.

"AV" should not be selected with the AV button on the VIDEO.

REMOTE CONTROLLER

INDEX

/

/

00:00

     G-CODE  

1

2

3

4

5

6

7

0

8

9

PAL/SEC

T.R

AV

SP/LP

A.SEL

EJECT

TV/VCR

PR

MENU

OK

PR

G


  -

   CODE

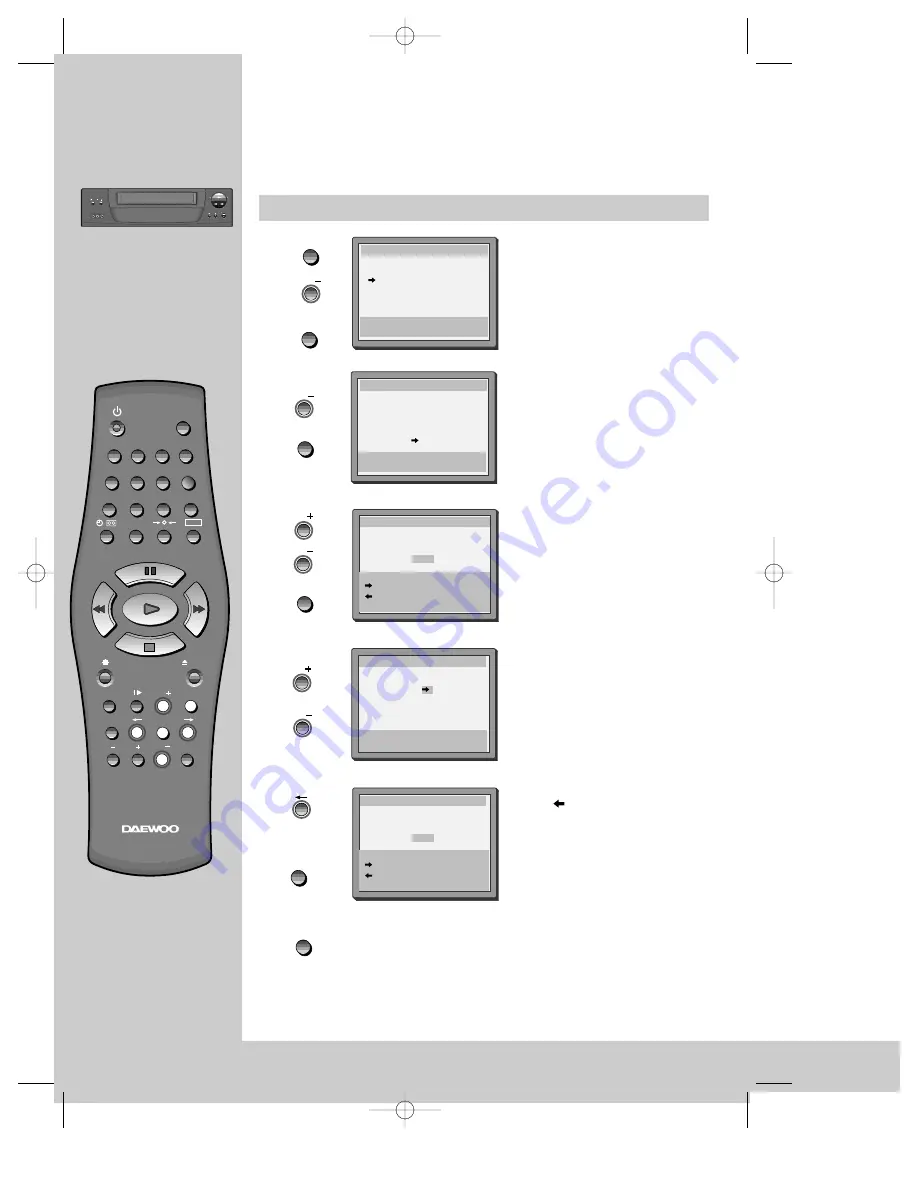
Call the video’s "MAIN MENU", 
choose "VCR Setup", 
then "PR Preset".

Select "Manual Set".

Choose any unused location
number "----" or "P-xx" ...

It's simplest to use the same location
number on both the TV and video.

... and confirm.

Tune in the station you want.

Press 

button to see the

picture.

If it isn’t the station you want, or the
picture is disturbed, carry on tuning.

Once you see the station you
want, store it.

See facing page for station names.

Tune in further stations (from
step 3 onwards) or exit tuning
mode.

MENU

PR PRESET

Auto Search

Manual Set

PR Erase
PR Align

PR+/-:select
OK:confirm          MENU:end

MANUAL SET

PR01 P-01

PR06 P-06

PR02 P-02

PR07 P-07

PR03 P-03

PR08 P-08

PR04 P-04

PR09 P-09

PR05 P-05 

PR10  ----

PR+/-:select
OK:confirm          MENU:end

MANUAL SET

PR+/-:search up/down
MENU :end

PR10

V-L - - - - - - -

- - - - - - - 

68%

MANUAL SET

PR+/-:search up/down

:station correct
:PR view

OK:confirm          MENU:end

PR10

Station Name

P-10

MANUAL SET

PR+/-:search up/down

:station correct
:PR view

OK:confirm          MENU:end

PR10

Station Name

----

2x

PR

OK

PR

OK

PR

PR

OK

PR

PR

OK

MENU

DV-K824DY-HG/H_(¨£` )-‡»¿º   01.3.5 4:2 PM  ˘

`

16

Summary of Contents for DV-K824DY

Page 1: ...DBY STOP EJECT CHANNEL REC OTR R A P I D R E W I ND SYSTEM P LAY QUICK START M E C H A N I S M VIDEOIN L AUDIOIN R Instruction manual Hi Fi Video recorder DV K824DY GB English DV K824DY HG H _GB 01 3...

Page 2: ...od ventilation all around you clean the recorder only with a soft lint free cloth do not use aggressive or alcohol based cleaning agents you disconnect the power supply if the recorder appears to be w...

Page 3: ...6 Still Variable picture search Variable slow motion Accessing new recordings index scan 7 Recording cassettes Simple recording One touch recording OTR 8 Timer recording using G CODE 9 More functions...

Page 4: ...rd or OTR button One Touch Recording means each time you press the button recording is extended by 30 minutes pause record still playback playback start playback stop rewinding fast forwarding a casse...

Page 5: ...VIDEOIN L AUDIOIN R STANDBY STOP EJECT CHANNEL REC OTR REW FF MAIN MENU Timer Program Timer Review VCR Setup PR select OK confirm MENU end VCR SETUP PR Preset Clock Set Language Set RF Output Set PR...

Page 6: ...provide best picture and sound quality Ask your dealer for an appropriate cable if you do not have one Without a RCA cable you need to follow the steps described under If you are not using a RCA cabl...

Page 7: ...nstallation function and enjoy your video recorder If you don t see this picture because you don t use RCA cable search this picture now CH 36 with the station tuning functions of your TV set see its...

Page 8: ...s jittering you can steady it by using the PR buttons You can reduce horizontal interference stripes resulting from inaccurate tracking when playing tapes of poor quality or recorded on other machines...

Page 9: ...ps 1 15 1 10 1 5 1 30 1 25 1 20 1 15 Press repeatedly PLAY switches back to normal playback Select INDEX or INDEX to search forwards or backwards The video will now wind to the beginning of the first...

Page 10: ...iefly then continue Stop your recording Choose the station whose programme you want to record If the programme you wish to record is very long double the possible recording time with LP Long Play Up t...

Page 11: ...seconds G CODE is a trademark applied for by Gemstar Development Corp The G CODE system is manufactured under license from Gemstar Development Corporation Call the G CODE menu From your TV magazine ty...

Page 12: ...it number If you have made a mistake move to the position you want to change using the buttons and change the setting If programme timings overlap the machine will give an warning message If you don t...

Page 13: ...5 22 09 03 21 20 22 2018 09 PR select OK confirm MENU end TIMER REVIEW PR START END DATE 01 12 30 15 15 22 09 03 21 20 22 2018 09 PR select OK confirm MENU end TIMER PROGRAM One Time PR 03 Start Time...

Page 14: ...00 03 07 0 00 24 1x Time and date Shortly 2x Counter Shortly 3x The counter stays 4x The counter disappears Counter display is only possible when a cassette is loaded Reset the counter The video will...

Page 15: ...cassette in its cover You can protect your precious recordings from being wiped by breaking out the safety tab on the side of the cassette some cassettes have a slide Should you wish to re use the ta...

Page 16: ...ms of full length concerts in high quality stereo films with impressive Surround Sound using additional Surround equipment films with two dialogue modes dual bilingual usually the original sound track...

Page 17: ...tereo left audio channel only right channel only the normal mono sound track of a Hi Fi cassette During broadcasting a bilingual performance Main language original sound track sub language dubbed both...

Page 18: ...ation number on both the TV and video and confirm Tune in the station you want Press button to see the picture If it isn t the station you want or the picture is disturbed carry on tuning Once you see...

Page 19: ...s menu just see the left page if it isn t displayed PR Select station correct Either select the name from the stored list MANUAL SET PR station change station correct OK confirm MENU end PR10 Station...

Page 20: ...ed the way you want MENU OK OK OK PR PR PR PR PR ERASE PR select PR view OK erase MENU end Call the video s MAIN MENU choose VCR Setup then PR Preset then PR Align Call the video s MAIN MENU choose VC...

Page 21: ...s to call the video s test picture Tune the TV to the test picture using the channel pre set functions of your TV as described in its manual When you have found the test picture store it under the but...

Page 22: ...om another video machine connect the two machines with a cable between their RCA sockets and select as programme AV using the AV button Set the other video machine to playback and your machine to reco...

Page 23: ...ssemble your own film from camcorder footage for example use the assembly technique for smooth edit points Move the tape to the position at which the new scene is to be added using the play functions...

Page 24: ...down is the distance between remote control and video more than 7 meters is there an object blocking the direct line between remote control and video is there a cassette already loaded If so the video...

Page 25: ...eed in 2 steps either forwards or backwards Press repeatedly PLAY switches back to normal playback Starting from playback you can control slow motion speed in 6 steps 1 15 1 10 1 5 1 30 1 25 1 20 1 15...

Page 26: ...r Weekly and confirm Type in one after the other The programme location number the time the broadcast starts the time the broadcast ends the day of the broadcast if it is not today select LP if you wi...

Page 27: ...cture 19 Tracking 8 Dimensions W x H x D 360 x 90 x 288 mm Weight 4 1 kg Power supply Voltage AC 240V 50Hz Power consumption 18 Watt System Video PAL B H channel range VHF 2 12 UHF 21 69 CATV S1 S41 X...

Page 28: ...DV K824DY HG H _GB 01 3 5 4 0 PM 2...

Reviews: