background image

16

BASIC OPERATIONS

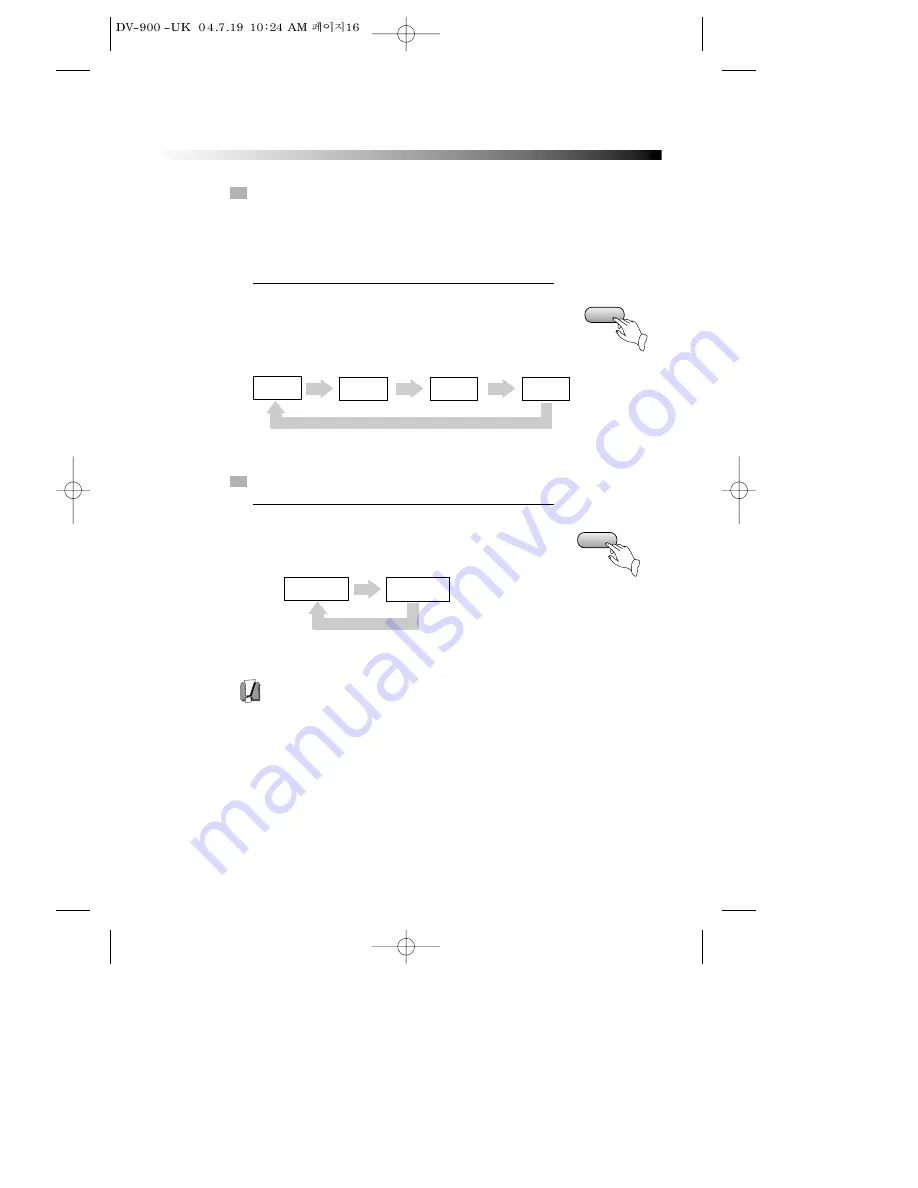
SYSTEM  SETTING

V-MODE

(WHEN SELECTING RGB OR S-VIDEO.)

• When you press the [SYSTEM] button, the TV screen shows

the information as : “If you want to change, push
[SYSTEM] again.” Press the [SYSTEM] button again, the
video out system changes as follows.

According to the system of the TV to be connected, set the system of the unit to
make it match the TV.
In STOP mode, push SYSTEM button on the remote control, then choose TV TYPE.

SYSTEM

V-MODE

•  In case of connecting the SCART, press the [V-MODE] on

the remote control in STOP mode to select RGB or S-VIDEO. 

When you connect the SCART, picture color is strange,
press the V-MODE on the remote control to select RGB
or S-VIDEO.

NTSC

PAL EU

PAL

AUTO

RGB

S-VIDEO

Summary of Contents for DV-900

Page 1: ...INSTRUCTION MANUAL DV 900 DVD PLAYER HELPLINE NUMBER 0870 100 2525 ...

Page 2: ...A DESIRED SCENE 20 To skip scenes in a disc 20 Directly moving to a desired title DVD 20 Playing a disc containing MP3 files 21 Repeat Play 21 Repeating a defined period from A to B DVD 22 Select a Subtitle Language 22 GoTo a Desired section 23 PLAY DISCS IN VARIOUS WAYS 24 Select Angle 24 Zoom Play 24 Book Mark 24 Program Play some disc 25 Program Play CD 25 Program Play MP3 26 Digest Play some d...

Page 3: ...service location see service procedure Use of control adjustments or the performance of procedures other than those specified may result in hazardous radiation exposure To prevent direct exposure to the laser beam do not try to open the enclosure Visible laser radiation when open and interlocks defeated DO NOT STARE INTO THE BEAM DANGER Visible laser radiation when open and interlock failed or def...

Page 4: ...y are not likely to be walked on or pinched by items placed upon or against them paying particular attention to cords at plugs convenience receptacles and the point where they exit from the video product 7 Ventilation Slots and openings in the case are provided for ventilation overheating These openings must not the blocked or covered The openings should never be blocked by placing the video produ...

Page 5: ...ersonnel 17 Conditions Requiring Service Unplug this video product from the wall outlet and refer servicing to qualified service personnel under the following conditions A When the power supply cord or plug is damaged B If liquid has been spilled or objects have fallen into the video product C If the video product has been exposed to rain or water D If the video does not operate normally by follow...

Page 6: ... 9 are available COMPATIBILITY The unit can play DVD video discs and is compatible with CD CD G CD R CD RW PIC CD MP3 discs also can do DVD R DVD RW DVD RW of video format ZOOM It can enlarge pictures MULTI FUNCTIONS Fast forward fast reverse forward and reverse slow frame play repeat play and program play TIME SEARCH It can search a specific part on a disc especially good for watching fiction mov...

Page 7: ...sible CD MP3 DVD R Possible DVD video DVD RAM impossible DVD RW Possible DVD video DVD RW Possible DVD video JPEG Possible Total disc capacity over 4M Each file under 1M CD MP3 Possible Windows format only TITLE The images or music of a DVD are divided into some units among which title is the biggest one When playing a DVD the movie is the title When playing a CD the combined tracks make up the ti...

Page 8: ... If the region number described on the DVD discs does not correspond to the Region number of this player the player will not play this disc This player will play DVD discs made for ALL regions Therefore this player will play DVD discs marked with labels containing the region number 2 or ALL Region 2 Region ALL 2 SCENE The menu pictures motion and motionless pictures of a CD can be divided into som...

Page 9: ... pickup use a cleaning disc to clean it Paying particular attention to the operating instructions of the cleaning disc CONDENSATION Moisture will appear on the pickup lens in the following cases The unit is suddenly moved from a cold place to a warm place The unit is put in a room with a heater or in cold air from an air conditioner Using the unit in a humid place In these cases the unit can not w...

Page 10: ...batteries to the marks in the battery compartment 3 Close the battery compartment 4 Point the remote control at the remote sensor 1 Batteries can last for about 6 months generally Change the batteries of that does not work 2 If the remote control is not used for a long time remove the batteries to prevent battery leakage U M 4 N Note Remote control AAA batteries Video Audio cord Instruction manual...

Page 11: ...sc Press this button to go to the preferred item when the menu is displayed on the TV screen PREV button To skip back from the current chapter or track NEXT button To skip forward to the next chapter or track If playing a Video CD with PBC this button works as the NEXT button to move to the next play list STOP REMOTE SENSOR Receives a light signal from the remote controller DISPLAY Displays operat...

Page 12: ...SOCKET WIRE Creates POWER between wall outlet and the unit DIGITAL AUDIO OPTICAL OUT Connects digital audio under play mode into an AV amplifier or a receiver equipped with digital audio decoder for you to enjoy the theatre quality sound in your home S VIDEO OUTPUT Connects to TV or monitor equipped with S VIDEO input In order to achieve a sharper and cleaner picture than when connected via VIDEO ...

Page 13: ...is indicator is lit up after recognizing the disc PLAY PAUSE indicator 1 REPEAT MODE indicator In case you want to repeat and play a chapter or track ALL In case you want to repeat and play a title or disc 2 MP3 indicator Indicates the track number when MP3 disc is played 3 NUMBER CHARACTER indicator Chapter track number and time are displayed in loading DVD CD disc while track number and time are...

Page 14: ... FAST BACKWARD SEARCH BUTTON SUBTITLE BUTTON A B REPEAT BUTTON ATONIC TONE OPEN CLOSE BUTTON NUMBER BUTTON MENU BUTTON RETURN BUTTON V MODE BUTTON STOP BUTTON RAISE TONE SYSTEM BUTTON INTRO BUTTON ZOOM BUTTON PROGRAM BUTTON ONE CHAPTER TRACK FORWARD BUTTON PLAY ENTER BUTTON MUTE BUTTON 3D SURROUND BUTTON FAST FORWARD SEARCH BUTTON SLOW BUTTON CHANNEL BUTTON After setting the mode by using SETUP me...

Page 15: ... digital signal output COAXIAL OPTICAL You may select as you need Manufactured under license from Dolby Laboratories Dolby and the double D symbol are trademarks of Dolby Laboratories Confidential Unpublished works 1992 1997 Dolby Laboratories Inc All rights reserved DTS and DTS Digital Out are trademarks of Digital Theater Systems Inc C B A Connects either A A B B C or C ...

Page 16: ...ifier 2 Push STAND BY ON button on the front panel or button on the remote control to turn the unit on 3 Push OPEN CLOSE button to open the disc tray and insert the disc with its label upward Push OPEN CLOSE button again to close the disc tray The unit begins to read the disc The TV screen shows the DVD menu and title menu When playing a DVD DVD menus and titles are displayed on TV screen In the c...

Page 17: ...lows According to the system of the TV to be connected set the system of the unit to make it match the TV In STOP mode push SYSTEM button on the remote control then choose TV TYPE SYSTEM V MODE In case of connecting the SCART press the V MODE on the remote control in STOP mode to select RGB or S VIDEO When you connect the SCART picture color is strange press the V MODE on the remote control to sel...

Page 18: ...17 BASIC OPERATIONS DISPLAY Press the DISPLAY button when playing a disc the TV screen shows the information as DISPLAY DVD CD MP3 ...

Page 19: ... 2 Push PLAY to play normally when playing fast The marked FAST PLAY speed on owner s manual and real fast play speed can be different depending on which disc you play Push PLAY to play normally Push PLAY to play normally SLOW PLAY Enjoy slow motions by the following steps Push SLOW button to play slowly SLOW X2 X4 X8 X16 X32 PLAY 1 2 3 4 5 6 X2 X4 X8 X16 X32 PLAY 1 2 3 4 5 6 PAUSE STEP Push PAUSE...

Page 20: ...t languages 2 You can push AUDIO button to choose the language you want when you play multi language DVD discs CHANNEL AUDIO LEFT MONO RIGHT MONO STEREO MIX MONO SELECTING 3D AUDIO This function outputs 3D effects on the stereo audio analog output where 3D effects are broken down Press 3D button Every time you press 3D button the 3D sound toggles between 3D ON 3D OFF 3D You can use channel functio...

Page 21: ...menu screen will appear only when the disc has PBC function and PBC ON is activated 1 Push the PLAY button after pressing the œ or number button to select the desired title The selected title now starts playing 2 Some movie discs may contain multiple titles If the disc has a movie title menu recorded on it the TITLE PBC button can be used to select the movie title Details of operation may differ d...

Page 22: ...he numeric buttons on the remote control and then press PLAY button 3 REPEAT PLAY When play a DVD disc this function can be used to repeatedly play a title chapter or disc Push REPEAT button the screen shows orderly Repeat CHAPTER Repeat TITLE CD DVD Repeat TRACK Repeat ALL OFF Push REPEAT to cancel the repeat function OFF REPEAT MP3 Press on the remote control to choose next title or folder next ...

Page 23: ...GE When play a multi subtitle DVD you may select one subtitle to show it on the screen Keep pressing SUBTITLE button till the user s preferred language appears If a DVD disc includes subtitle information every time the user presses SUBTITLE button ENGLISH FRENCH SPANISH and others appear one by one 1 Remove the subtitle Press SUBTITLE until the screen shows SUBTITLE OFF 2 SUBTITLE 1 For some discs...

Page 24: ...pter or Time Press the SEARCH button to select SEARCH mode Press Down button highlight desired item TITLE Input title number CHAPTER Input chapter number TIME Input time hh mm ss Hour Minute Second Press ENTER button GOTO A DESIRED SECTION SEARCHING DVD WITH A TITLE CHAPTER NUMBER OR A TIME SEARCHING CD AND SOMETHING DISC WITH A TIME OR TRACK TIME This function does NOT apply to MP3 N Note SEARCH ...

Page 25: ... book mark function push RETURN button ZOOM PLAY This function can be used to enjoy a motion or motionless picture BOOK MARK Push MARK button the screen will show the following frame Push ZOOM button when playing the screen shows orderly 1 Push UP DOWN LEFT RIGHT œ button to move the enlarged picture 2 ZOOM 1 1 Push direction button to select the saving position on the screen Push PLAY button to s...

Page 26: ...P button two times to remove program play If you want to remove any program number put the cursor in the position of the program number push RETURN button 4 First is title second is chapter If the disc has only one title TT will not be displayed N Note After the programming is finished push direction button to select Play Program Push PLAY button to start playing If you want to remove any program ...

Page 27: ...ction button and push PLAY button to start playing 3 Push STOP button two times to remove program play If you want to remove any program number put the cursor in the position of the program number push RETURN button 4 Program Input Play Program Clear All 1 _ _ _ _ 2 _ _ _ _ 3 _ _ _ _ 4 _ _ _ _ 5 _ _ _ _ 6 _ _ _ _ 7 _ _ _ _ 8 _ _ _ _ 9 _ _ _ _ 10 _ _ _ _ 11 _ _ _ _ 12 _ _ _ _ Some DVD discs do not ...

Page 28: ...t type And push PLAY button 2 SELECT DIGEST TYPE TRACK DIGEST DISC DIGEST TRACK INTERVAL T 01 10 00 05 INTRO TRACK DIGEST The player will display each track Push direction button to select the track then push PLAY button the player will begin to play from the track you selected DISC DIGEST The player will play the disc every other 10 minutes TRACK INTERVAL The player will play 5 seconds each track...

Page 29: ...de show will be launched Each picture in the JPEG will be displayed consecutively in a slide show fashion and will be scaled to fit in the whole TV screen Press PAUSE button to display an image indefinitely Press SKIP œ œ button to view the next or previous picture Press PLAY button to resume the slide show JPEG mode ...

Page 30: ... select the zoom enlarging scale In zoom mode Press ARROW button to move the picture to adjust the picture to be displayed on the screen With zoom mode off the next picture will be scaled to normal fitting to the whole TV screen Press PLAY button to cancel the zoom and resuming to the slide show JPEG file format limitations JPEG file of CMYK color mode is not supported The range of pixels should b...

Page 31: ...anish Italian French Dutch German Portuguese English Spanish Italian French Dutch German Portuguese Others Off English Spanish Italian French Dutch German Portuguese Others Auto OSD LANG SUBTITLE AUDIO DISC MENU Normal PS Normal LB Wide NTSC PAL EU PAL AUTO On Off On Off On Off TV Display TV Type Angle Mark Captions Screen Saver ...

Page 32: ...ingua Indonesian No 47 48 49 50 51 52 53 54 55 56 57 58 59 60 61 62 63 64 65 66 67 68 69 70 71 72 73 74 75 76 77 78 79 80 81 82 83 84 85 86 87 88 89 90 91 92 Code Value 7383 7384 7387 7465 7473 7487 7565 7575 7576 7577 7578 7579 7583 7585 7589 7665 7678 7679 7684 7686 7771 7773 7775 7776 7778 7779 7782 7783 7784 7789 7865 7869 7876 7879 7982 8065 8076 8083 8084 8185 8277 8279 8285 8365 8368 8372 L...

Page 33: ...ge in the DISC it is played in English AUDIO Selecting an audio language Set it as the preferred audio language In case the audio language is set and recorded in the DISC it is automatically played in the set language in every playing For example English is set and recorded as audio language in the DISC it is played in English DISC MENU Selecting Disc Menu language Please set it as the preferred D...

Page 34: ...own on the screen but with some parts cut automatically 1 1 NORMAL LB This is selected when the unit is connected with a normal TV Wide screen images are shown on screen with black belts on the top and bottom 2 2 WIDE 16 9 This is selected when the unit is connected with a wide screen TV 3 3 TV TYPE You may select according to the colour system of the TV to be connected Select PAL for a PAL TV Sel...

Page 35: ...o the page 14 when a Dolby Digital DVD DTS DVD or MPEG DVD is played select this the coaxial or optical port will output in the corresponding digital format source code The power amplifier to be connected must have Dolby Digital DTS and MPEG DVD is played the optical or coaxial port will output in PCM 2 channel format PCM Select this when the DVD player is connected with a TV or a power amplifier ...

Page 36: ...he screen suggests you enter the code after pushing PLAY button you can watch if the code is right PASSWORD Select PASSWORD in Others menu to setup password input a password DEFAULT RESET Each function setting returns to the factory initial status if you select this The password is set by yourself The password is 3308 when the unit is turned on initially or you forget the password Enter a password...

Page 37: ...rectly Make sure the audio connection between the unit and amplifier is right DISC CAN NOT BE PLAYED There is no disc in the unit Insert the disc on the disc tray properly with the label side up Clean the disc Moisture has condensed in the unit Remove the disc and leave the unit on for about one hour REMOTE CONTROL DOES NOT WORK Remove barriers between the remote control and the unit Replace the b...

Page 38: ...oad impedance 75Ω 100 240V 50Hz 60Hz 12W 430 x 38 x 260 mm 3 5Kg 2 6Kg wavelength 650nm NTSC PAL EU PAL AUTO 20Hz 20KHz 1dB 90dB 85dB 1KHz 80dB 1KHz Channel separation Dynamic range Output Audio Output Video Analog Digital Composite S video Power RGB Body W x H x D Packing Dimensions Weight Gross Net 487 x 103 x 378 mm Notes Design and specifications in this owner s manual are subjected to change ...

Page 39: ...38 MEMO ...

Page 40: ... ELECTRIC SHOCK DO NOT OPEN 20 18 16 14 12 10 8 6 4 3 21 19 17 15 13 11 9 7 5 3 1 AUDIO AUDIO VIDEO INPUT VIDEO PLEASE CONNECT THE FOLLOWING PLUGS TO THESE INPUTS RED PLUG into Audio Out R WHITE PLUG into Auido Out L YELLOW PLUG into Video Out Or SCART lead from EURO AV on DVD player to the Scart socket on your TV set INSERT THE OTHER END OF THE AUDIO VISUAL CORD INTO THE SAME SOCKETS ON YOUR TV S...

Page 41: ...Yellow plugs 02 With the other end of the Video Audio cord please connect the plugs to the same inputs on your TV set 03 04 On the Front Panel of your DVD player press the Stand By On button once On the display of your DVD player you will see Load and then No Disc displayed 05 Press the button to open the disc tray 06 Insert the DVD film into the tray Press the button to close the disc tray 07 Pre...

Page 42: ...if service is needed on this product during the guarantee period KEEP THIS SECTION FOR FUTURE REFERENCE On the expiry date of the manufacturer s guarantee you will be sent details of our annual insurance plan but if you have already bought an extended warranty for this product from your retailer please tick box The information provided will be held on computer by the DAEWOO Registration Department...

Page 43: ...tions contained in the manual It must be used solely for domestic purposes For further information regarding your guarantee please see the section at the rear of your user manual The guarantee will be rendered invalid if the product is resold or has been damaged by inexpert repair DAEWOO disclaims any liability for incidental or consequential damages The guarantee is in addition to and does not di...

Reviews: