background image

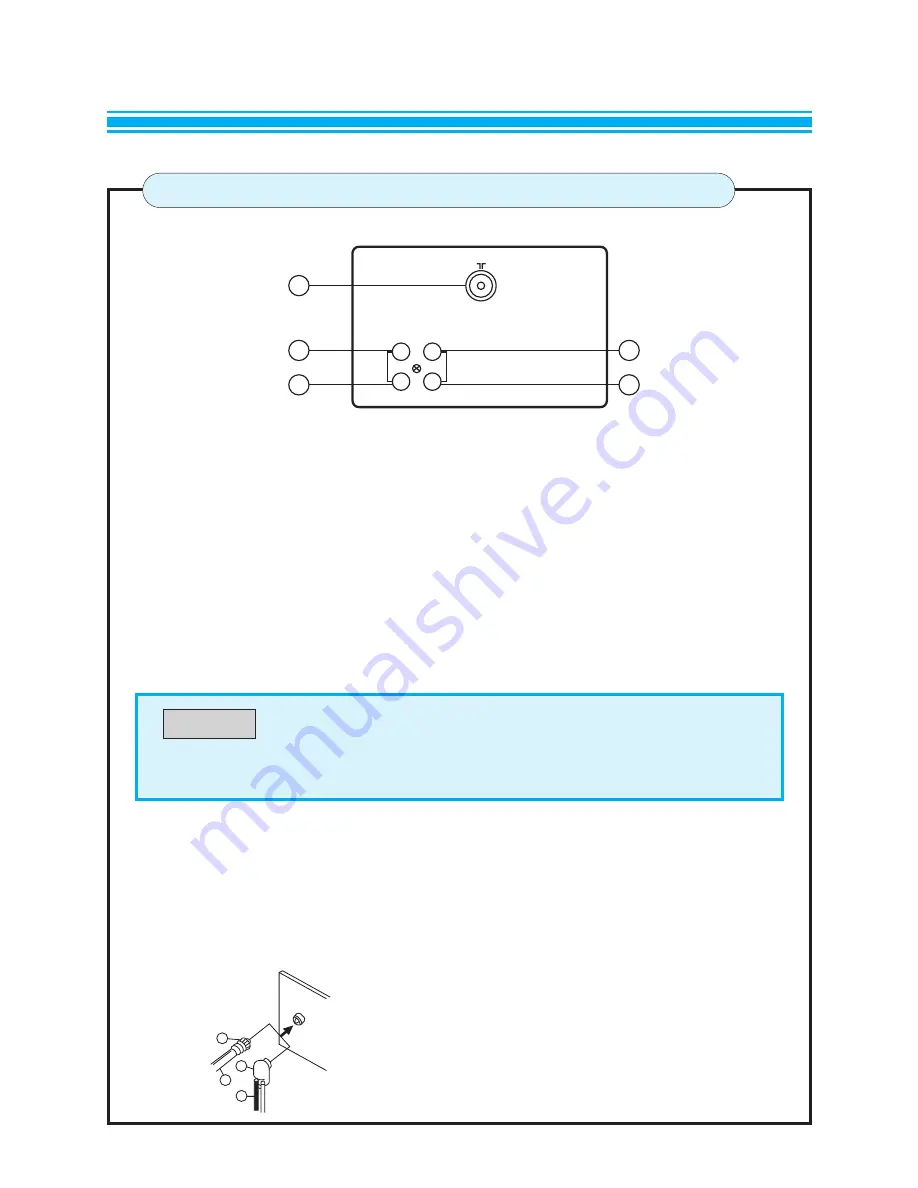
Antenna Terminal

Audio Input Terminal (Phono pin type)

Video Input Terminal (Phono pin type)

Audio Output Terminal = TV Audio Out (Phono pin type)

Video Output Terminal = TV Video Out (Phono pin type)

For reception of true colour reproduction, an effective antenna installation  is the most
important. Please make sure that your antenna is correctly connected.
1. If you are located in a relatively strong signal area, you will be able to use the VHF

rod antenna. To connect the antenna, insert the plug of the VHF antenna into the TV
set antenna terminal.

2. When using an external antenna, the antenna is usually connected to the TV set by

means of a 75 ohm coaxial antenna cable. To make the connection, first attach a
suitable coaxial plug to the antenna cable and then insert the plug into the antenna
terminal on the rear of the set.
If your antenna system uses 300 ohm parallel feeder, connect the feeder to a 300
ohm 

→ 

75 ohm coversion plug and insert the plug into the TV set antenna terminal.

a) Coaxial plug (IEC-Type)
b) 300 ohm 

→ 

75 ohm converter plug (IEC-Type)

c) 75 ohm coaxial cable
d) 300 ohm parallel feeder

4

ANTENNA CONNECTION

VIDEO AUDIO

ANT

OUT

IN

2

4

5

3

1

The supplied rod antenna cannot be used to receive UHF
brodcasts. To receive UHF broadcasts, please use a UHF
antenna or VHF/UHF combination antenna.

NOTE

a

b

c

d  


ANT

Summary of Contents for DTC-1472

Page 1: ......

Page 2: ...JLL90X01 14 INCH A48JLL90X 20 INCH Screen Size 37cm Diagonal 14 INCH 51cm Diagonal 20 INCH Operating Frequencies Video IF 38 9MHz Sound IF 33 4MHz 32 9MHz 32 4MHz 34 4MHz Channel Coverage VHF LOW E2 E...

Page 3: ...e of the unit unplug it immediately and call a qualified technician for removal Never allow cord to become knotted or tangled Do not lengthen the cord When removing the power plug from the socket alwa...

Page 4: ...the set for an extended period always make sure of switching off the MAIN POWER SWITCH of the TV set and remove the power plug from the socket Thank you for your purchase of this TV set This model is...

Page 5: ...g an external antenna the antenna is usually connected to the TV set by means of a 75 ohm coaxial antenna cable To make the connection first attach a suitable coaxial plug to the antenna cable and the...

Page 6: ...5 LOCATION OF CONTROLS FRONT VIEW 1 STAND BY INDICATOR STAND BY 2 ON TIMER INDICATOR ON TIMER 3 INFRARED SENSOR WINDOW REMOTE SENSOR DTC 1472 DTC 2072 3 3 2 2 1 1...

Page 7: ...N TV VIDEO 4 MENU BUTTON 5 ENTER BUTTON 6 VOLUME UP BUTTON VOL CURSOR UP BUTTON 7 VOLUME DOWN BUTTON VOL CURSOR DOWN BUTTON 8 PROGRAM UP BUTTON PR DATA UP BUTTON 9 PROGRAM DOWN BUTTON PR DATA DOWN BUT...

Page 8: ...s equipped with RCA JACK for your desired equipment to be connected VCR video disc player satellite receiver or other AV apparatus can be connected to the RCA JACK on the rear panel of the TV receiver...

Page 9: ...the two batteries making sure that battery polarity matches with the marks inside of the battery compartment Incorrect polarity could damage to the unit 3 Close the battery compartment cover 8 BATTER...

Page 10: ...UP DATA UP 5 16 PR DOWN DATA DOWN 6 16 VOL DOWN CURSOR DOWN 7 16 VOL UP CURSOR UP 8 17 TV VIDEO 9 18 NORMAL 10 18 RECALL 11 18 QUICK VIEW 12 17 MUTE 13 17 SLEEP TV VIDEO 0 1 4 1 2 3 4 7 2 5 8 3 6 9 ME...

Page 11: ...of the receiver or remote control unit 10 OPERATIONOFCONTROLS MAINS SUPPLY POWER ON OFF MENU ENTER MENU PRESET SYSTEM PICTURE CONTROL CLOCK ON OFF TIMER PRESET PR12 AUTO SEARCH SEARCH FINE TUNING AFT...

Page 12: ...12 AUTO SEARCH SEARCH FINE TUNING AFT ON SKIP OFF BAND VHF L PRESET PR12 AUTO SEARCH SEARCH FINE TUNING AFT ON SKIP OFF BAND VHF L PRESET PR12 AUTO SEARCH SEARCH FINE TUNING AFT ON SKIP OFF BAND VHF L...

Page 13: ...SYSTEM PICTURE CONTROL CLOCK ON OFF TIMER AUTO PAL SECAM 4 43NTSC 3 58NTSC AUTO PAL SECAM 4 43NTSC 3 58NTSC AUTO PAL SECAM 4 43NTSC 3 58NTSC AUTO PAL SECAM 4 43NTSC 3 58NTSC AUTO PAL SECAM 4 43NTSC 3...

Page 14: ...room will need the higher contrast setting than a dark room 3 COLOR Adjust the strength of the color as preferred 4 SHARPNESS This is used to change the sharpness degree of the picture It is the most...

Page 15: ...elect the program number by using the PR buttons or PR SELECT buttons 0 9 1 4 3 EVERY DAY ON TIME Place the cursor at EVERY DAY ON TIME and toggle it by using PR buttons 4 OFF TIME Place the cursor at...

Page 16: ...ER button Then the searching indication bar appears on the bottom of the screen with red color After searching the indication bar is changed to yellow color 4 FINE TUNING If you can t get a good pictu...

Page 17: ...e VOL UP button increases the sound volume and the VOL DOWN button decreases it When you push these buttons the volume indication bar appears at the bottom of the screen with green color Pushing the C...

Page 18: ...es OSD characters remains on TV screen for the interval of 3 seconds Then it will disappear from the TV screen and set up sleep function mode simultaneously On the other hand if the ENTER button is pr...

Page 19: ...vels are as follows This button is used to change from the present program No to the previous one 18 Preference Brightness Contrast Colour Sharpness Tint User store User store User store User store Us...

Page 20: ...IGHTNESS and CONTRAST Picture is too dark controls are correctly adjusted Check if ANTENNA CABLE is broken All channels lose Check if ANTENNA CABLE is broken colour intermittently Check if ANTENNA is...

Page 21: ...ck if ANTENNA CABLE is broken Check if ANTENNA is disconnected Check if ANTENNA is damaged Ghost images appear Check if ANTENNA direction has changed after storm or strong wind etc Ghost images are ca...

Reviews: