background image

IMPORTANT 
If  the  unit  has  not  been  used  for  a  long  period  of  time,  the  rechargeable  battery  may  be 
completely  discharged  into  a  “sleep  mode”  condition.  This  is  the  characteristics  of  all  the 
rechargeable battery. For the first time to recharge (to wake up) the battery, it is recommended 
to charge for a period exceed 5 hours but not exceed 24 hours.


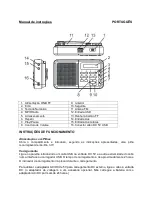
Radio 
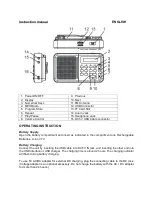
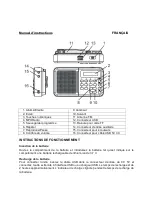
1. Switch Power button to ON position to switch on the unit. 
2. Press Next or Previous button for a second to start radio scanning. 
3. Adjust the sound volume by pressing Vol- & Vol+ 
4. Switch Power button to OFF position to switch off the unit. 
 
Radio Preset 
1. Press Play Button for 2 seconds to start Auto-Scan Preset Stations. It will auto-stop when all 
the stations have been found out. 
2. Press Next or Previous button once to select preset stations. 
 
Program Radio Preset 

1. Select and Play the Radio. 
2.  Press  the  Program  Store  button  once,  the  display  will  show  "P01",  which  “P01”  for  the 
program location. 
3. Then press Next

 or Previous

 button to select the desired program location. 

4. Press the Program Store button again to store the radio station. 
5. Continue entering tracks in this way until all the desired radio stations are stored (up to a limit 
of 50 stations). 

 
Input Radio Station 
Press  Number  Keys  to  direct  enter  the  frequency  of  Radio  Station.  The  unit  will  tune  to  the 
entered radio station immediately. 

 
To improve reception:
 

Pull out the telescopic aerial. To improve FM Reception incline and turn the aerial, reduce its 
length if the FM-signal is too strong (very close to a transmitter). 


USB, TF Card PLAYBACK 

Able  to  decode  and  playback  all  MP3  files  which  stored  in  the  memory  media  with  USB 
connector or TF Card. 
 
1. Press MP3/Radio once to MP3 mode. 
2. Before connecting the USB media to the unit, make sure the port is in correct direction and 
will connect. Or insert TF Card straightly without bending. 
3. The system will automatically start reading the MP3 files in the USB Storage Media, or TF 
Card. 
4. Press 

Next / Previous

 / PLAY Buttons for 

Next / Previous

 / PLAY FUNCTION. 

5. Press

 Number Keys to direct enter the sound track sequence.


Wrongly connect the USB Storage Media, or TF Card upside down could damage the unit 
or the USB Storage Media or TF Card. A locked TF Card cannot detected or playback.


Summary of Contents for DRP-122

Page 1: ...IO DIGITAL FM CON USB Y TF USB TF DIGITAL FM RECEIVER R DIO DIGITAL FM AVEC USB ET TF RADIO DIGITAL FM USB TF DRP 122 MANUAL DE INSTRUCCIONES INSTRUCTION MANUAL MANUEL D INSTRUCTIONS MANUAL DE INSTRU...

Page 2: ...oduzca tal y como se indica en el propio compartimento la bater a recargable suministrada ion litio de 3 7 V Carga de la bater a Para conectar la unidad inserte el cable USB en el conector de entrada...

Page 3: ...e Siguiente o Anterior para seleccionar la localizaci n que desee para la emisora 4 Vuelva a pulsar el bot n Guardar emisora para guardar la emisora de radio 5 Siga introduciendo emisoras de este modo...

Page 4: ...endio o descarga el ctrica no exponga la unidad a lluvia ni humedad Para evitar descargas el ctricas no abra la carcasa consulte a un agente del servicio t cnico o a un t cnico cualificado Declaraci n...

Page 5: ...nt and insert as indicated in the compartment one Rechargeable Batteries Li ion 3 7V Battery Charging Connect the unit by inserting the USB cable into DC 5V IN jack and inserting the other end into th...

Page 6: ...n 4 Press the Program Store button again to store the radio station 5 Continue entering tracks in this way until all the desired radio stations are stored up to a limit of 50 stations Input Radio Stat...

Page 7: ...bjectives of EMC Directive 89 336 EC To check the entirely declaration of conformity of this model visit www electronicaflamagas com Guarantee This product is guaranteed against all manufacturing defe...

Page 8: ...ble USB 5V CC INSTRUCTIONS DE FONCTIONNEMENT Insertion de la batterie Ouvrez le compartiment de la batterie et introduisez la batterie tel qu est indiqu sur le compartiment une batterie rechargeable...

Page 9: ...Ant rieur pour s lectionner les missions pr d termin es Configuration des programmes radio 1 S lectionnez et initiez la reproduction de la radio 2 Appuyez une fois sur la touche Sauvegarder le program...

Page 10: ...afin de garantir son correct fonctionnement pour une longue dur e de vie utile Par exemple ne jamais placer l unit dans la zone de bain ou proximit du chauffage et des radiateurs 2 Si vous croyez que...

Page 11: ...s batteries t l commandes couteurs sont exclus de cette garantie Pour que cette garantie soit valable il est n cessaire de pr senter le ticket d achat original Importateur exclusif Industrias Masats S...

Page 12: ...rtimento e introduza segundo as indica es apresentadas uma pilha recarreg vel de i o l tio 3 7V Carregamento Ligue o aparelho introduzindo um cabo USB na entrada DC 5V e a outra extremidade do cabo nu...

Page 13: ...o Armazenar outra vez para armazenar a emissora 5 Continue a introduzir as emissoras deste modo at armazenar todas as emissoras desejadas m ximo de 50 emissoras Introduzir Emissora Utilize o Teclado N...

Page 14: ...CE de Compatibilidade Eletromagn tica Para consultar a declara o de conformidade completa visite www electronicaflamagas com Guarantia Este equipamento tem uma garantia de 2 anos a partir da data de...

Page 15: ...cambiados por otro siempre que 1 El producto haya sido utilizado solo en el uso normal para el que estaba previsto 2 No haya sido abierto manipulado o alterado por persona ajena al Servicio T cnico O...

Reviews: