background image

17

PC
Connection

PC CONNECTION NOTES:

1) The resolution of the TV set is best at 1360(6) x 768(WXGA).
2)  If there is a [Vertical Frequency] setting menu in the [Display] Menu of the PC, adjust the frequency to 60Hz.
3) If the PC resolution is too high, it may be hard to detect signals. Select a suitable resolution.
4) HDMI input port receives only digital Signal.
5)  Depending on the graphic card when you plug & unplug the HDMI connection the screen may not display cor-

rectly. Restart the computer if this happens.

6)  Depending on graphic card, problems like no signal detected or line noises can occur. If these problems do oc-

cur contact the graphic card company for help.

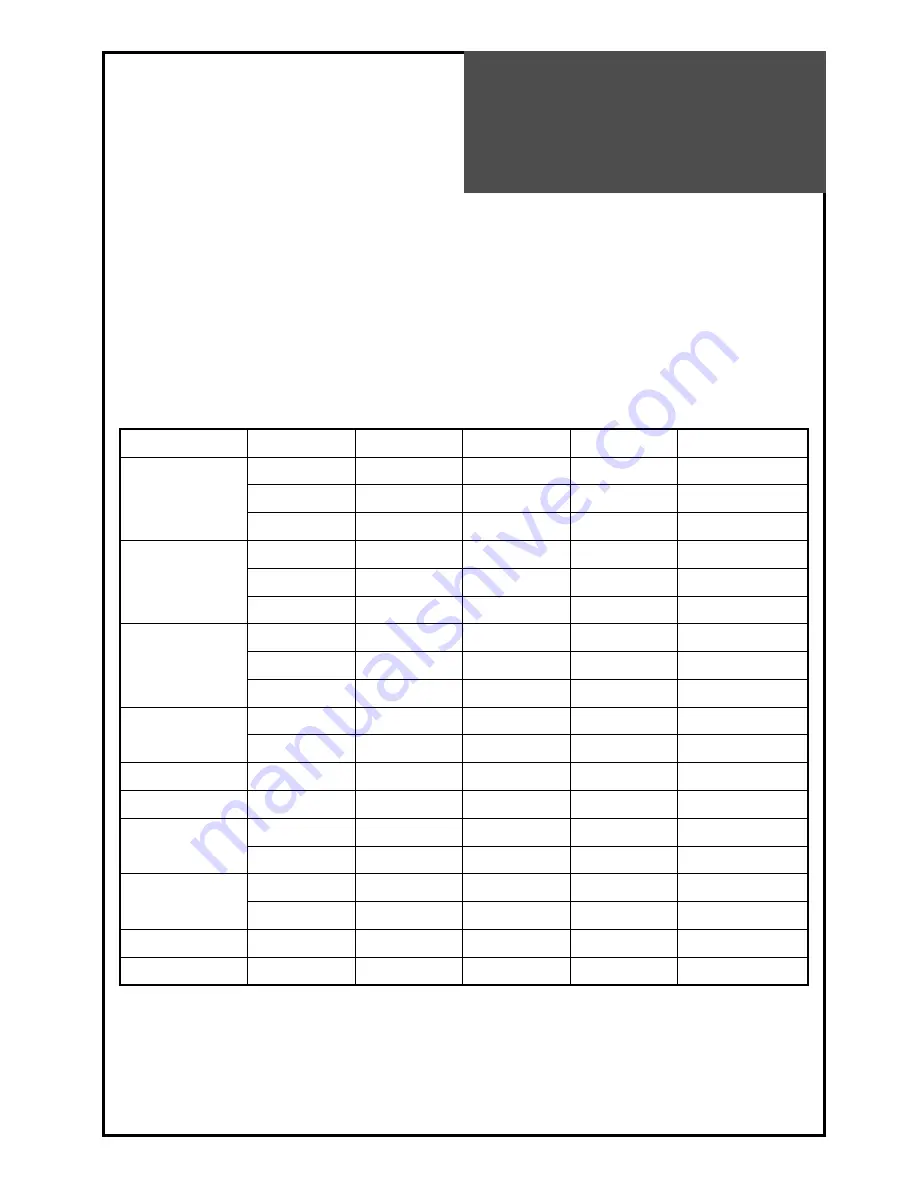
Multi input resolution available in LCD TV.

Resolution

V-freq

HDMI

PC(D-Sub)

Component

Standard

640 X 480

60Hz

o

o

x

72Hz

o

o

x

75Hz

o

o

x

VESA Standard

800 X 600

60Hz

o

o

x

VESA Standard

72Hz

o

o

x

VESA Standard

75Hz

o

o

x

1024 X 768

60Hz

o

o

x

VESA Standard

70Hz

o

o

x

VESA Standard

75Hz

o

o

x

VESA Standard

1360(6) x 768

60Hz

o

o

x

75Hz

o

o

x

720 X 480

60Hz

o

x

o

720 X 576

50Hz

o

x

o

1280 X 720

50Hz

o

o

o

60Hz

o

o

o

1920 X 1080i

50Hz

o

x

o

60Hz

o

x

o

720 X 480i

60Hz

x

x

o

720 X 576i

50Hz

x

x

o

Note :

• 

When you connect with component, D-Sub, and HDMI, you must check the input resolution of external devices.

• 

1280 X 720 mode is commonly used for Component.

• 

So if this mode is used at PC mode, the screen can be enlarged.

Summary of Contents for DLT-32G1

Page 1: ...GB LCD TELEVISION INSTRUCTION MANUAL DLT 32G1 DLT 37G1 DLT 42G1 ...

Page 2: ... of the symbol on the product its accessory or packaging indicates that this prod uct shall not be treated as household waste Please dispose of this equipment at your applica ble collection point for the recycling of electrical electronic equipments waste In the European Union and Other European countries which there are separate collection systems for used elec trical and electronic product By en...

Page 3: ...ating Do not cover the ventilation openings in the cabinet and never place the set in a confined space such as a built in cabinet unless proper ventilation is provided Leave a minimum 10 cm gap all around the unit 8 Power Source ThisTV should be operated only from the type of power source indicated on the marking label If you are not sure of the type of power supplied to your home consult your app...

Page 4: ...ng electrodes and requirements for the grounding electrode 16 Servicing Do not attempt to service thisTV yourself as opening or removing covers may expose you to dangerous voltage or other hazards Refer all servicing to qualified service personnel 17 Damage Requiring Service Unplug theTV from the wall outlet and refer servicing to qualified service personnel under the following conditions a When t...

Page 5: ...s to the product unplug the unitfromtheoutletduringa lightningstorm orwhenitis leftunattendedandunused for a long period of time Donotputonorusetheprod uctnearwaterandmoisture suchasinabathroom wash bowl etc Itmaycausefireand electricshockhazards Slotsandopeningsinthecaseare providedforventilationtoensure reliableoperationoftheproduct Neverputinanyitems suchascoins paper matches throughthese openi...

Page 6: ...roductisinternal lyoverheated Theproductshouldbesituat edawayfromanyheatsource suchasradiators heatregis ters stoves orotherproducts thatproduceheat Do not put heavy items on thepowerleadsinceitmay result in a fire or hazardous electric shock if the lead is damaged Please be aware of electric wires and cables when in stalling the antenna It may beacauseofhazardouselec tric shock and fire if the an...

Page 7: ...tion 18 Connect with the Dolby Digital AMP 19 Name of Each Part 20 Basic Guide Parts of the Remote Control 22 MethodTo Use Basic Menu 24 To WatchTV 25 Setting UpTV Stations 27 DVB Menu 31 Selection of AV and Multimedia Input Signal 40 Application Guide Screen Adjustment 42 PiP Mode 46 Sound Adjustment 48 Selection of Language 50 Adjustment ofTime 51 Other Functions 52 Teletext 53 Troubleshooting 5...

Page 8: ...UT P S IZE P P R PR PA GE OK SE LE CT 1 2 3 4 5 6 7 8 0 9 Cable holder Cover Bottom except DLT 42G1 model When you install on a wall mounting you can fit cover bottom as shown in upper picture Themethodofwirearrangement 1 Assemble the cable holder enclosed on the back ofTV PICTURE1 ASSEMBLY METHOD After you push the peg part of cable holder A in the hole rotate the cable holder clockwise at an ang...

Page 9: ...g adapter WHENTHE IMAGE IS NOT CLEAR Unclear screen image and bad reception may be a cause of a wrong antenna connection Be sure to check its direction and site when installing 2 Connect the combining adapter to the antenna input at the left side of theTV set WHEN USINGTHE COMBINING ADAPTOR You may obtain the combining adapter at your nearest Service Cen tre Back of the tv set Antenna Input combin...

Page 10: ...tenna installation may be found in most of communial apartments When a coaxial cable is used Plug the coaxial cable to the antenna socket and fix it firmly by turning it to the right Antenna socket at the left side of the TV set Antenna socket on the wall ANT CABLE ...

Page 11: ...HF and or UHF may be necessary for installation in private houses Single Antenna Connection VHF Antenna UHF Antenna Left side of the tv set ANT CABLE Separate Antenna Connection ANT CABLE ANTENA combining Adapter Separate purchase In case of coaxial cable In case of feeder cable VHF Antenna UHF Antenna ...

Page 12: ...heTV set will only detect the S Vid eo mode If your AV device has both Video OUT terminal and S Video OUT terminal the S Video connection is recom mended for better picture quality Connecting with SCARTVIDEO 1 Prepare the scart lead for picture sound 2 Connect the SCART input output terminal of your video with the SCART1 AV1 SCART2 AV2 input output terminal of theTV 3 Turn on the video Insert the ...

Page 13: ...ture below 3 Turn on theTV set and camcorder video game 4 Select AV3 S video mode using the AV button of the Remote controller or button of theTV set Side of the tv set Video game Camcorder Note If the S video and RCA jack are connected at the same time theTV set only detects the S Video mode If your AV device has both Video OUT terminal and S Video OUT terminal the S Video connection is recom men...

Page 14: ...nt output for a better picture When you connect with a component video output from your DVD player to the TV please check that the col our of the cables between the DVD andTV set Matches the sockets on both appliance When connecting with a S VIDEO cable and RCA cable Note If S video and RCA jack are connected at the same time theTV set will only detect the S Video mode If your AV device has both V...

Page 15: ...Pr Pb Y OPTICAL PC AUDIO PC INPUT DIGITAL AUDIO COMPONENT INPUT HDMI 1 HDMI 2 R AUDIO L Pr Pb Y OPTICAL PC AUDIO PC INPUT DIGITAL AUDIO When connecting with a HDMI cable Back of the tv set Set Top Box When connecting with a component cable Set Top Box Back of the tv set ...

Page 16: ...set 4 Select PC mode by pressing the MULTIMEDIA button on the remote control or button of theTV set Back of the tv set PC PC Back of the tv set When connecting with a HDMI cable 1 First adjust resolution of the PC Refer to table in page 17 2 Then disconnect your monitor from your PC and connect between PC andTV set using the HDMI and Audio ca ble as shown in the picture below if necessary See note...

Page 17: ...If these problems do oc cur contact the graphic card company for help Multi input resolution available in LCDTV Resolution V freq HDMI PC D Sub Component Standard 640 X 480 60Hz o o x 72Hz o o x 75Hz o o x VESA Standard 800 X 600 60Hz o o x VESA Standard 72Hz o o x VESA Standard 75Hz o o x 1024 X 768 60Hz o o x VESA Standard 70Hz o o x VESA Standard 75Hz o o x VESA Standard 1360 6 x 768 60Hz o o x...

Page 18: ...dinstalled a cable receiver You may make the connection to either the Component input or SCART input AV1 or AV2 Cable TV Broadcasting Station Input CATV Receiver Antenna Input Connection Watching cable television is only possible after you have subscribed to the local broadcasting company and in stalled a cable receiver Coaxial cable Cable TV Broadcasting Station Input Output Coaxial cable ANT CAB...

Page 19: ...C INPUT DIGITAL AUDIO I N P U T Connect with the Dolby Digital AMP Optical output Dolby Digital AMP L Woofer Centre R Surround L Surround R Back of the tv set If you connect the optical output to a Dolby digital AMP you can listen to better quality sound Only DVB T Mode ...

Page 20: ...hange yourTV s volume or to move the cursor in the menu PR Buttons Use these buttons to change channels on yourTV or to move the cursor in the menu POWER ON button Use this button to change fromTV STANDBY mode toTV ON mode LED Indicator The led lights up red in STANDBY mode and Lights up blue in TV on mode When TV is Child Lock mode LED will cycle through red blue in STANDBY mode Remote control si...

Page 21: ...21 COMPONENT UP GRADE PORT INPUT HDMI 1 HDMI 2 R AUDIO L Pr Pb Y OPTICAL PC AUDIO PC INPUT DIGITAL AUDIO S VIDEO VIDEO AV 3 R AUDIO L Name of Each Part Side and Rear Panel Side Panel Rear Panel ...

Page 22: ...MI2 COMP 5 AV Each time you press this button theTV will cycle through TV AV1 AV2 AV3 S Video TV 6 NORMAL The NORMAL buttonchanges picture mode as follows Normal Cinema Dynamic Favourite Normal 7 VOL Adjusts the volume 8 PR PAGE Changes the program on yourTV 9 Moves the cursor up down in the menu 10 Accesses and adjusts item in the menu 11 OK SELECT AutoTuning Start and ManualTuning Store 12 GUIDE...

Page 23: ...u can listen to the virtual surround sound The sound will cycle through Off SPATIAL 3D Pano rama BBE Off 22 NUMBER Pressthenumbersonthisboard youcanselectPRdirectly inTV mode 23 STILL Press this button to freeze the picture 24 SLEEP SleepTimer setting SLEEP TIMER OFF 15 30 45 60 75 90 105 120 OFF 25 Colour Keys Red Green Yellow Blue Using on text or DVB T mode 26 TEXT TEXT REVEAL T CANCEL SIZE S C...

Page 24: ...lected the relevant sub items are displayed upward 1 Press the MENU button The main menu appears if you press the MENU button 2 Press the button You may setup according to the directions on the screen after selecting the desired item by pressing the button If the setup is completed exit from the menu by pressing the MENU button P i c t u r e AdjustsPictureMode Brightness Contrast Colour Sharpnessa...

Page 25: ...power is turned on Note You can also turn on the TV using PR key and number buttons in the ST BY mode When pressing the Program button Select two digits if using the number button for channel selection For example to watch channel No 9 Press the number buttons 0 and 9 If pressing only number 9 it takes a longer time to select channel To suddenly turn sound off Press the MUTE button No sound is hea...

Page 26: ...lamp turns on in red Press buttonofthemainbodyor POWER but ton on the remote control The STANDBY LED lamp on the front panel begins to flicker in red and blue and theTV turns on 2 Adjust program Select the desired program by pressing the PR button or the number button 3 Adjust volume Sound reduces by pressing the VOL button Sound increases by pressing the VOL button Note Sound mutes by pressing th...

Page 27: ...n DVB AutoTuning Access ManualTuning Access Setup Access Edit Access Move Select Exit Picture Screen Sound Install Function DVB Setting UpTV Stations AutoTuning All stations that can be received are stored by this method It is recommended that you use Auto tuning during in stallation of this set 1 Press the MENU button to select the Install menu MovetheselectionbartotheInstallmenuwith buttons 2 Se...

Page 28: ...e the selection bar on ManualTuning and press the button 3 Execute ManualTuning A tuningscreenwillappearandcursorwillmovefrom left to right from right to left If you want to stop tun ing press the MENU button You should press the OK button to store a program thenthePRnumberischangedtored Ifyoudon twant to store the program press button to skip the program To store another program select other PR n...

Page 29: ...s Channel System Frequency Station name Program number and Store to PR number 1 Searching for channels in the Setup menu Pressthe PR buttonstoselectaprogramnumber you want Move to Setup in the Install menu Search a real channel informations Channel System and Program with buttons If you save the selected channel to favourite program number move the cursor to StoreTo and select using the buttons 2 ...

Page 30: ...V Stations Edit The Edit menu shows you information as follows Program position assignment Program number and Station name Real channel number Skip information Yes or No 1 Deleting the program positions Move to Edit in the Install menu Move the selection bar to the program number to de lete with the buttons Press the Delete Red button 2 Moving the program positions Move to Edit in the Install menu...

Page 31: ...econds at the bottom of the screen DVB Menu Press the Menu button to display the main menu Then select DVB MENU You may see the DVB MENU OSD Whenever you need more information during any DVB MENU directory press info button then you will see more detailed information on the screen And in some menus you can use the cyan yellow red green buttons Those buttons function depend on which menu it is This...

Page 32: ...m new number for the channel you selected Then the previous channels will be au tomatically moved to the next number The Select and Delete function is to choose or delete the channel Select the Edit Name function to change the channel name as you want Press the UP DOWN key to change characters If you want to lock some channels for several reasons select the Lock function and enter the password you...

Page 33: ...ght side For example If there is mark on BBC ONE that means BBC ONE is selected as your favourite list 1 You can make up to 5 favourist lists Once the Favourite function is activated you can only select the channels you have already stored in each Fa vourite list If you press the number key on the remote control you can watch the entered channel and Favourite mode will be canceled return to full c...

Page 34: ...formation 32 Cartoon Nwk The Live Times of Junip Xiaolin Showdown 33 Boomerang Closedown Inspector Gadget 37 Quiz Call UnitedWindom Money Mayhem 55 Ttext Holidays No information No information 60 Television X programmes start at 11 programmes start at 11 Guides Now Next EPG List Schedule EPG Timeline Schedule EPG MENU Exit SELECT Select DVB Menu Guides Select each sub menus Now Next EPG You can ch...

Page 35: ...3 13 More 4 Timeline Schedule EPG Wed 10 03 15 03 List Schedule EPG You can check program schedules here Navigate channel by pressing UP DOWN RIGHT LEFT button Press Yellow cyan buttons to change date Red green buttons are for changing the time Press Info key to see detailed information of each program DVB Menu Timeline Schedule EPG You can check program schedules by timeline Navigate channel by p...

Page 36: ...ch a special program on time without having to use the remote everyday please setup Timers At first press select key You will see time setup OSD See the right You can change channel at Name Setting start end time as you want at Start End Select Mode Once Daily Weekly If a channel is set to change to LOCKed channel password OSD will be displayed before channel changing To change the password go to ...

Page 37: ...urite list see page 33 in Favourite Mode If it is selected as off all channels are shown Change Channels List Show all TV only RADIO only TEXT only Parental Setting enables you to make individual services DVB MENU and Installation are protected by a password The default password for parental setting is 0000 To change the default password select Parental Settings using the up down buttons and press...

Page 38: ...el Automatic Search be fore it is completed the previous list of services is used if already stored Manual Search is the function to scan for an indi vidual channel Enter the Channel number to be scanned Signal Quality consists of 5 levels none poor medium good very good Language System Select some language then OSD is displayed in that language English German French Italian Spanish Danish Polish ...

Page 39: ...e screen When you insert the CI Card Common interface module inserted appears on the screen Then you can watch pay channels If you remove the CI Card from the slot Common interface module removed appears on the screen then you can t watch pay channel any more until you insert the CI card again The Common Interface menu allows you to access a pay per view PPV service on yourTV set This feature oper...

Page 40: ... PC HDMI1 HDMI2 TV 1 Pressing the AV button on the remote control The screen changes as follows TV AV1 AV2 AV3 S Video TV Note Cautions in menu setup The menu disappears if you do not operate any button for about 25 seconds from the menu appearing In the case of connecting both composite video signal and S video signal at the AV3 terminal the S video signal has priority If sound signal is mono onl...

Page 41: ...put table Multimedia Input Format Resolution V freq HDMI PC D Sub Component Standard 640 x 480 60Hz o o x 72Hz o o x 75Hz o o x VESA Standard 800 x 600 60Hz o o x VESA Standard 72Hz o o x VESA Standard 75Hz o o x 1024 x 768 60Hz o o x VESA Standard 70Hz o o x VESA Standard 75Hz o o x VESA Standard 1360 6 x 768 60Hz o o x 75Hz o o x 720 x 480 60Hz o x o 720 x 576 50Hz o x o 1280 x 720 50Hz o o o 60...

Page 42: ...ing the brightness contrast or col our individually 1 Pressing the NORMAL button The screen changes as follows Normal Cinema Dynamic Favourite Normal The screen adjustment status changes as the following screens are displayed sequentially whenever pressing the NORMAL button Note Normal For a highly defined image in a normally bright room Cinema Supports softer image than Normal mode Dynamic Ideal ...

Page 43: ...er pressing the button you can select Picture Mode Brightness Contrast Colour Sharpness N R and ColourTemperature EG Warm or cool if red dish bluish picture The screen appears as on the right if pressing the buttons after selecting items desired to adjust with the buttons You can adjust all items by pressing the but ton Note Picture Mode Changing the picture mode Normal Cinema Dynamic Favourite Br...

Page 44: ... 9 Zoom16 9 Auto Full Full This mode will display full screen irrespective of signal information of a broadcasting station 4 3 GeneralTV screen currently broadcasted 14 9 This mode will display a 14 9 picture at its standard 14 9 size without any stretching Zoom 14 9 Screen that enlarges image by 1 33 times bigger than 14 9 image Zoom 16 9 Screen that enlarges image by 1 33 times bigger than 16 9 ...

Page 45: ... Screen Adjustment Adjustment of the screen in the PC mode 1 Auto Adjustment Move to Auto in the Screen menu Press the buttons to detect optimal resolution automatically 2 Adjustment of the H Position Move to H Position in the Screen menu Press the buttons to adjust the horizontal position of displayed image 3 Adjustment of theV Position Move to V Position in the Screen menu Pressthe buttonstoadju...

Page 46: ... PiP Pressthe buttonstoselect SoundOutputchang es as follows Main Sub Main Note On the side by side you can select the sound output di rectly by activating outline using buttons on the remote controller 3 Pressing the P MODE button on the remote con troller The PiP Mode changes as follows PiP off Side by Side PiP PiP off SidebySide Thismodewilldisplaytwoscreenleft Main and right Sub PiP This mode ...

Page 47: ...P PR buttons on the remote controller Sub screen is switched to RF mode and you change channels by pressing PR Up Down buttons Note In the PiP mode you can t enter the Install and DVB in the MENU OSD If you want to select the Install or DVB in the MENU switch off the PiP mode On the PiP mode The highest HDMI resolution is 720p If the HDMI resolution is too high ex 1080i exit the PiP mode automatic...

Page 48: ...ontrolOn Offbypressing button thenthevolumeissameeverytimeyouswitch theTV on 2 Select Dynamic Bass Mode Move to Dynamic Bass in the Sound menu Select either Dynamic Bass On or Off using the button Note Dynamic Bass Using this function increases the bass responce 3 To adjust the audio equalizer Move to Equalizer in the Sound menu Select and use the relevant frequency by pressing the button You can ...

Page 49: ...ound and Stereo 1 Mono Sound Selection During Stereo sound reception if the stereo is weak you can switch to MONO by pressing the button Then the colour of MONO character will change to Red In Mono reception the depth of sound is improved To switch back to stereo press the button again Note only works in RF mode 2 Adjustment of Bilingual sound In bilingual broadcast reception you can switch from D...

Page 50: ...ound Install Function DVB Selection of Language Selection of Language When you first turn on theTV set the on screen display of language selection is displayed automatically 1 Press the MENU button and select Function 2 Select Language by pressing button 3 Selectyourdesiredlanguagebypressingthe button Then it will set automatically The language changes as follows English German French Espanol Ital...

Page 51: ...e Hour Minute with the buttons Place the cursor to Clock with buttons and then press the MENU button to complete Note ManuallysetclockisnotmemorizedanymorewhenTV is completely powered off from the A C mains 2 Setting theWake up time Program To go to the Wake Up press the button Select the Wake Up to On SettheWakeuptimeandPrograminthesameway as above for the Clock The set will turn on at the se lec...

Page 52: ...Install Function DVB Other Functions 1 Setup of Child Lock Move to Child Lock in the Function menu Select Child Lock to On using the button Note This prevents the use of theTV set without the remote control IftheTVsetisinChildLockmode theLEDwillcyclebe tween red and blue IftheChildLockis On thenthesetcanonlybeswitched back on using the remote control ...

Page 53: ... at a sub page for a longer period of time press the HOLD button The HOLD symbol appears and the contents of the sub page shown are kept on the screen and no longer updated or switched to other sub pages By pressing the HOLD button again the current sub page appears CALLING UP SUB PAGE DIRECTLY Pressing the S CODE button appears Enter the sub page number that you want to call up with the NUMBER bu...

Page 54: ...lled correctly and if not adjust the antenna towards the broadcasting transmitter Picturehas snow noise Check the antenna is installed correctly and if not adjust the antenna towards the broadcasting transmitter Check the antenna or its connection is correct and if not correct the an tenna fault or connection cable fault Check if car traffic or neon sign disturbs the sound effect Stripes on pictur...

Page 55: ...and frequency on the table not listed then no picture will be displayed NO SIGNAL ap pears on the screen Ensure that the signal cable is firmly connected to PC andTV Image is not clear Adjust the PHASE control Image is not cen tred Adjust the H POSITION and V POSITION control AFTER SALES SERVICE Do not hesitate to contact your retailer or service agent if a change in the perfomance of your product...

Page 56: ...27mm x 0 681mm Contrast Ratio 5000 1 5000 1 5000 1 Dimension W x H x D 806 x 590 x 260mm 940 x 682 x 260mm 1044 x 757 x 345mm Weight 17 6Kg 23 5Kg 31 5Kg Power Consumption Show on the back of product TV System PAL B G D K I I SECAM B G D K L L NTSC AV Power Source 220 240V 50 60Hz 110 240V 50 60Hz Owing to our policy of continuous improvement specifications may change ...

Reviews: