background image

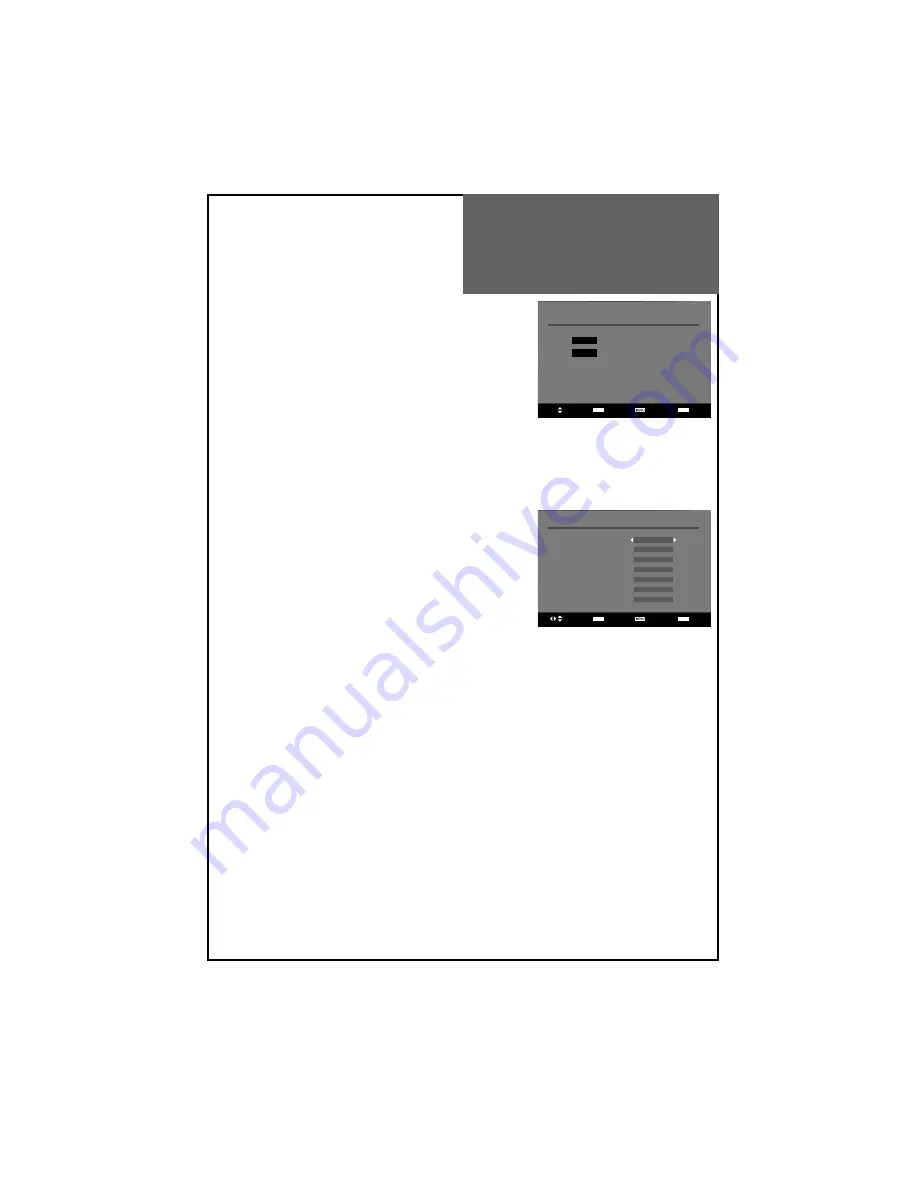
Select Access Return  Exit

User Settings

Menu language 

English 

Audio language 

English


Audio language 2 

English

Subtitles language 

English

Subtitles language 2 

English

Subtitle display 

Off

Antenna Power 

Off

Select Access Return  Exit

New Channels

TV 13 

ITV1

TV 14 

ITV3

DVB Menu

-  

New Channels

 shows the channels that you recently added in the 

channel list. The type icon of the program is displayed against the 
channel name.

Note :

•  The DVB system requires a good signal to provide the best picture. 

For the DVB system, interference can disrupt the flow of data caus-
ing the picture to appear to be made up of large blocks or to freeze 
intermittently. Also if there are no channels in the list after installa-
tion, do install process again.

•  If the picture disappears completely, this could mean that signal 

quality is very poor. If this happens, you may need to improve your 
aerial system to provide a better signal.

USER SETTINGS

- Menu Language

You can select DVB menu language among the followings: English, 
French, German, Italian, Spanish, Danish, Netherland, Greek, Portugal, 
Turkey.

Notes :

•  When you change the DVB menu language, Analogue menu language 

will be changed simultaneously.

• If the language you selected in this menu is not available among the 
Analogue OSD languages, then the Analogue OSD will be replaced 
by English automatically. For example, if you select Turkey for the DVB 
menu then the Analogue menu will be set to English (also refer “Avail-
able Language Table” on page 41).

- Audio language / Audio language 2

This function select which language soundtrack you will hear when switching to a channel broadcasting with mul-
tiple soundtracks. Move cursor to the 

Audio language

 item and select the desired language by “

/

” buttons.

Also you can set 

Audio language 2

 in the same way as Audio language selection. 

- Subtitle language / Subtitle language 2

You can selects the subtitle language in this menu. Move cursor to the 

Subtitle language

 and select desired lan-

guage. Also you can set 

Subtitle language 2

 in the same way as Subtitle language selection. 

- Subtitle display

You can toggle between subtitle 

On

 and 

Off

also you can control this with the “

SUBTITLE

” button on the remote control.

- Antenna power (option)

If 

On

 mode is selected, you can use an external antenna that does not have a 5V adapter power.

Be sure that if you don’t use external antenna this menu should be in 

Off

 mode to avoid problem like short circuit.

Summary of Contents for DLT-19W4T

Page 1: ...GB LCD TELEVISION INSTRUCTION MANUAL DLT 19W4T DLT 22W4T DLT 20J1T DLT 20J3T DLT 20J9T Helpline Number 0870 100 2525...

Page 2: ...y The meaning of the symbol on the product its accessory or packaging indicates that this prod uct shall not be treated as household waste Please dispose of this equipment at your applicable collectio...

Page 3: ...rotect it from overheating Do not cover the ventilation openings in the cabinet and never place the set in a con ned space such as a built in cabinet unless proper ventilation is provided Leave a mini...

Page 4: ...s and requirements for the grounding electrode 16 Servicing Do not attempt to service thisTV yourself as opening or removing covers may expose you to dangerous voltage or other hazards Refer all servi...

Page 5: ...the unitfromtheoutletduringa lightningstorm orwhenitis leftunattendedandunused for a long period of time Donotputonorusetheprod uctnearwaterandmoisture suchasinabathroom wash bowl etc It may cause re...

Page 6: ...reormalfunctionof theproduct Donotcoverthetopofthetel evisionset Ventilationwillbe prevented anditmaycausea reiftheproductisinternal lyoverheated Theproductshouldbesituat edawayfromanyheatsource sucha...

Page 7: ...quipment Connection 17 PC Connection 18 Multimedia Connection Notes 19 Digital Amp Connection 20 Basic Guide MethodTo Use Basic Menu 21 To WatchTV 22 Setting UpTV Stations 24 DVB Menu 28 AV Selection...

Page 8: ...lowing accessories are provided with the product Remote control Instruction manual Batteries 2 x 1 5V AAA Cover Stand Base Frame Stand Screws Cover Stand Base and Frame Stand are only for DLT 19W4T an...

Page 9: ...ews 3 x 12mm in the hole at the bottom of the stand and tighten Please insert two screws in the hole at the bottom of the stand 2 Place theTV faced down on a soft cloth or cushion on a table and inser...

Page 10: ...rs buttons on this board you can se lect programmes directly 7 S EFFECT Using this button you can listen to the virtual sur round sound The sound will cycle through Off SPATIAL 3D Panorama Off 8 MTS Y...

Page 11: ...37 21 NORMAL The NORMAL button changes picture mode as follows Normal Movie Favourite Dynamic Normal 22 RECALL You can recall the present modes TV Video Compo nent HDMI PC andSignalinformation InTVmod...

Page 12: ...4T Name of Each Part PowerOn Off PRUp Down VolumeUp Down AV RemoteSensor LEDIndicator RemoteSensor LEDIndicator DLT 20J1T DLT 20J9T PowerOn Off PRUp Down VolumeUp Down AV RemoteSensor LEDIndicator DLT...

Page 13: ...3 HDMI inputs 4 Headphone jack 5 Audio Input L R Socket 6 Video Input Socket 7 Digital Audio out coaxial 8 PC Input 9 PC Audio 10 CI socket 11 Aerial jack Name of Each Part Rear DLT 20J1T DLT 20J3T D...

Page 14: ...1 5V type R03 or AAA Make sure that the polarity matches with the and marks inside of the battery compartment Note To avoid damage from possible battery leakage remove the batter ies if you do not pla...

Page 15: ...Connection CONNECTINGTHETV DIRECTLYTO AN AERIAL Connect an aerial cable 75 ohm coaxial cable to the Aerial terminal on the back of theTV set Aerial Aerialcable Aerialterminal DLT 20J1T DLT 20J3T DLT...

Page 16: ...en you should store the VCR DVD channel on pro gramme number ZERO using the Manual tuning function See page 25 If your VCR DVD has this fa cility Now you can watch the VCR DVD inTV mode by selecting t...

Page 17: ...he meaning of HDMI is High De nition Multimedia Interface If your A V equipment has only DVI output you shoulduseDVI to HDMIcabletoconnectwiththisTV However this will only produce Video output There f...

Page 18: ...f theTV set BDL PG UIF UW TFU 1 1 When connecting with a HDMI cable 1 First adjust resolution of the PC refer to table in page 19 Using the PC s original monitor 2 Then disconnect your monitor from yo...

Page 19: ...I Component HDMI 720 x 480i 60Hz o x o x 720 x 480p 60Hz o o o o 720 x 576i 60Hz o x o x 720 x 576p 60Hz o o o o 1280 x 720p 50Hz o o o o 60Hz o o o o 1920 x 1080i 50Hz o o o o 60Hz o o o o If possibl...

Page 20: ...8PPGFS FOUSF 3 4VSSPVOE 4VSSPVOE 3 If you connect the coaxial output to a digital AMP you can listen to surround sound and output will be to the below table POOFDUPS PEF 0VUQVU PBYJBM PVUQVU 57 3 7 57...

Page 21: ...ed item is selected the relevant sub items are displayed upward 1 Press the MENU button The main menu appears if you press the MENU button 2 Press the button You may setup according to the directions...

Page 22: ...indicator will be red In this case use the re mote control as indicated in a c If the stand by indicator is ashing red and greenthentheTVsetisinchildlockmode Itis necessarytousetheremotecontrolPOWER...

Page 23: ...ect the TV from the mains supply Remove the mains plug from the wall socket when the TV set is not used for a prolonged period of time When you turn on the MAIN POWER SW the set will be in stand by or...

Page 24: ...Select Access Exit Picture Screen Sound Install Function DVB Setting UpTV Stations AutoTuning All stations that can be received are stored by this method It is recommended that you use Auto tuning dur...

Page 25: ...tton 3 Execute ManualTuning A tuningscreenwillappearandcursorwillmovefrom left to right from right to left If you want to stop tun ing press the MENU button You should press the OK button to store a p...

Page 26: ...2 with buttons Search Pressandholdformorethan1second the remote control buttons to start up down manual tuning Searching will stop automatically at the next channel found tostoptuning presstheremoteco...

Page 27: ...tion as follows Program position assignment Program number and Station name Real channel number Skip information Yes or No 1 Deleting the program positions Move to Edit in the Install menu Move the se...

Page 28: ...henever you need more information press INFO button then you will see more detailed information on the screen And in some menus you can use the cyan yellow red and green but tons Those buttons functio...

Page 29: ...p or add all rst press the GREEN button then press either the RED button to skip all or the GREEN button to add all A channel selected as a locked appears in the channel list with a lock icon red butt...

Page 30: ...deletetheselectedfavouritelist Thepop up menu will ask if you con rm or cancel the delete operation Note Thedefaultfavouritechannellistnames RADIOandTV arenot displayed in the list so you can only del...

Page 31: ...enulanguage Analoguemenulanguage will be changed simultaneously If the language you selected in this menu is not available among the Analogue OSD languages then the Analogue OSD will be replaced by En...

Page 32: ...oceed or not Please note that if you proceed this all private settings and other user data will be erased Software Upgrade Select the SoftwareUpgrade item and press the OK button to enter the Software...

Page 33: ...ers such as children from watching unsuitable programmes by a digit PIN code that is de ned by the user PIN Personal Identi cation Number PARENTAL CONTROL YoucanselectbetweenEnabledandDisabledbyusing...

Page 34: ...ules by pressing the GUIDE button on the remote control When you enter EPG the current program is highlighted and you can navigate channels by pressing the channel up down buttons to change channels a...

Page 35: ...e on page 19 Note The menu disappears if you do not operate any button for about 60 seconds from the menu appearing In the case of connecting both composite video signal and S video signal at the AV3...

Page 36: ...n you can select Picture Mode Brightness Contrast Colour Sharpness N R and Colour Temperature EG Warm reddish pic ture Cool bluish picture The screen appears as on the right if pressing the buttons af...

Page 37: ...can be forced by repeated press ing of the remote control ASPECT button The following picture formats is available DLT 19W4T 22W4T DLT 20J1T 20J3T 20J9T RF AV1 AV2 MODE 4 3 FULL SCREEN WIDE FULL SCRE...

Page 38: ...itor During the moving picture Auto Adjust is unable to work correctly So you must execute Auto Adjust on a still image Auto Adjust works incorrectly on a part graphic card or picture When Auto Adjust...

Page 39: ...when the modulation signal is high as in the adverts then the sound out put will be lowered automatically 2 Select Sound Effect Mode The Effect changes as follows Off SPATIAL 3D Panorama Off Note 3DPA...

Page 40: ...tion if the stereo is weak you can switch to MONO by pressing the button Then the colour of MONO character will change to Red In Mono reception the depth of sound is improved To switch back to stereo...

Page 41: ...tugal Cheskey Polish Ro mania Russian Magyar Bulgarian Note When you rst turn on theTV set the language selection is displayed automatically When you change the Analogue menu language the DVB menu lan...

Page 42: ...ER 0 9 buttons or PR UP DOWN buttons to bring the set out of stand by mode The local PR UP DOWN buttons on theTV set willnotfunction Onceon thestand byindicatorturnsto green and the picture appears on...

Page 43: ...key on your remote handset will switch the TV Set into game mode If you press the same key in game mode you will exit game mode with out saving your grid STARTINGTHE GAME You can either decide to res...

Page 44: ...he game and save your grid for further play move the cursor to the right hand side on the Exit menu and press OK This will close the game and return to normalTV mode PLAYING Use direction keys on the...

Page 45: ...or switched to other sub pages By pressing the HOLD button again the current sub page appears CALLING UP SUB PAGE DIRECTLY option Pressing the SUBCODE button appears Enter the sub page number that you...

Page 46: ...correctly and if not adjust the antenna towards the broadcasting transmitter Picturehas snow noise Check the antenna is installed correctly and if not adjust the antenna towards the broadcasting tran...

Page 47: ...DTV Refer to the table of PC mode input format If registered resolu tion and frequency on the table not listed then no picture will be displayed Image is not clear Adjust the PHASE control Image is no...

Page 48: ...4 x 400 x 81 with stand 476 3 x 401 5 x 190 514 x 498 x 239 545 4 x 426 x 81 Weight Net w o stand 4 9 Kg 7 0 Kg 5 6 Kg with stand 5 2 Kg 8 0 Kg 5 9 Kg Power Consumption 42 W 52 W 50 W Sound Output 2 0...

Reviews: