background image

Warning

5

This section must be read carefully and followed by the user prior to the operation of the product.

The manual states important instructions for the user's own safety, and the proper operation of the product.

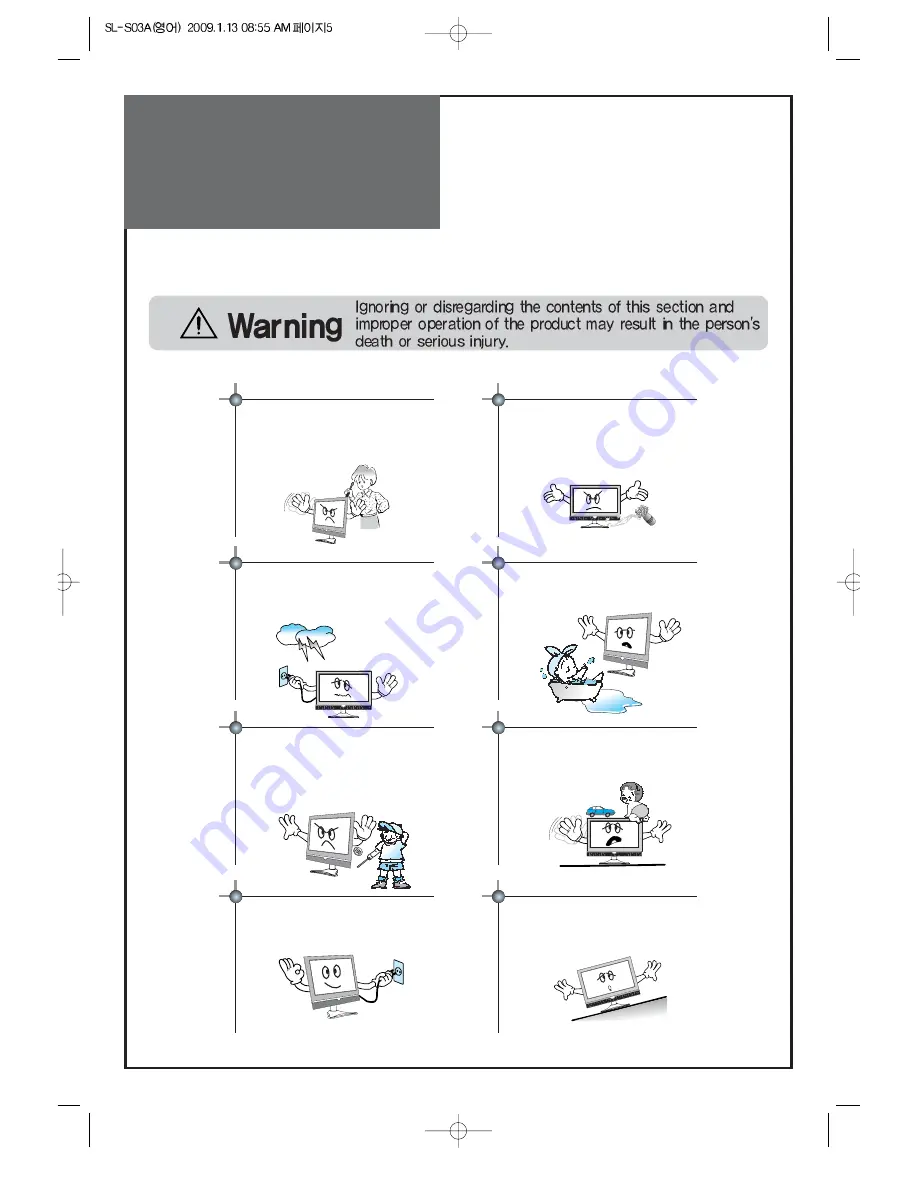
In case of an accident, please unplug the unit from the outlet immediately.

Hold the plug when unplugging the unit
from the outlet. The cord may cause fire or
electric shock if damaged.

Do not cause the product to lean or put it in an
unstable place since it may cause a serious
injury to a person, as well as damage to the
product if it falls.

Do not put any object that contains water -
such as flowerpot - 

near to 

the unit.

The water may penetrate into the unit, and be
a cause of fire or hazardous electric shock.

To reduce the risk of electric shock, do not
remove cover or back. No user -serviceable
parts inside. Refer to qualified service
personnel for repair.

Do not put on or use the product near water and
moisture-such as in a bathroom, washbowl, etc.
It may be a cause of fire and electric shock
hazards.

To prevent fire and damages to the product,
unplug the unit from the outlet during lightning
storm, or when it is left unattended and unused
for a long period of time. 

Do not let children hang on or climb on the
product since it may be a cause of serious
injury.

Slots and openings in the case are provided for
ventilation to ensure reliable operation of the
product. Never put in any item-such as a coin,
paper, match- through these openings since it
may touch dangerous voltage points that could
result in fire or shock hazard. 

Summary of Contents for DLA-32C5

Page 1: ...RUCTION MANUAL LCD TELEVISION DLA 32C5 DLA 32C7 DLA 37C7 DLA 42C5 DLA 42C7 Proper use guarantees product life Before using the product be advised that you read this owner s manual well and try to operate it ...

Page 2: ...O NOT REMOVE COVER OR BACK NO USER SERVICEABLE PARTS INSIDE REFER SERVICING TO QUALIFIED SERVICE PERSONNEL The lightning flash with arrowhead symbol within an equilateral triangle is intended to alert the user to the presence of uninsulat ed dangerous voltage within the product s enclosure that may be of sufficient magnitude to constitute a risk electric shock The exclamation point within an equil...

Page 3: ...d space such as built in cabinet unless proper ventilation is provided Leave a minimum 10 cm gap all around the unit 8 Power Source This TV should be operated only from the type of power source indicated on the marking label If you are not sure of the type of power supplied to your home consult your appliance dealer or local power company 9 Grounding or Polarization This TV is equipped with a pola...

Page 4: ... to service this TV yourself as opening or removing covers may expose you to dangerous voltage or other hazards Refer all servicing to qualified service personnel 18 Damage Requiring Service Unplug the TV from the wall outlet and refer servicing to qualified service personnel under the following conditions a When the power supply cord or plug is damaged b If liquid has been spilled or objects have...

Page 5: ...unit and be a cause of fire or hazardous electric shock To reduce the risk of electric shock do not remove cover or back No user serviceable parts inside Refer to qualified service personnel for repair Do not put on or use the product near water and moisture such as in a bathroom washbowl etc It may be a cause of fire and electric shock hazards To prevent fire and damages to the product unplug the...

Page 6: ...ted connections from the unit to prevent electric shock At least two people must work together to move the TV set when transporting to prevent the TV from falling and consequently any serious injury or damage Do not touch the power cord with moisturized or wet hands when plugging to or unplugging from the outlet since it may be a cause of electric shock Pleasebeadvisedofelectricwiresandcableswheni...

Page 7: ...16 Cable TV Broadcasting Connection 18 Name of Each Part 19 Basic Guide Functionsa of the Remote Control 20 Basic Menu 21 To Watch TV 22 Setting Up TV Stations 24 Selection of TV VIDEO Input Signal 28 Selection of Multimedia Input Signal 29 Application Guide Picture Adjustment 31 Sound Adjustment 35 Features Closed Caption 39 Features ETC 46 Time Setting 47 Channel Banner 50 Troubleshooting 51 Sta...

Page 8: ...mount set the cover bottom as shown above Cable holder Wall Mounting Unit OPTIONAL 1 2 3 The method of wire arrangement 1 Assemble the cable holder enclosed on the back of TV PICTURE 1 ASSEMBLY METHOD After you push the A prominence part of cable holder in the hole rotate the cable holder clockwise as an angle of 90 You can separate in reverse order of assembly 2 Open the cable holder PICTURE 2 yo...

Page 9: ...g antenna connection Be sure to check its direction and place when installing 2 Connect the combining adapter to the antenna input at the left side of the TV set WHEN USING THE COMBINING ADAPTER You may obtain the combining adapter at your closest Service Center Combining adapter Y PC AV HDMI1 HDMI2 R AUDIO L SERVICE COMPONENT VIDEO PC HDMI1 AUDIO ANT Pr Pb R L AUDIO Y Antenna Input REAR OF THE TV...

Page 10: ...set ANT ANT Combining adapter Antenna Connection When a coaxial cable is used Plug the coaxial cable to the antenna socket on the wall When a feeder cable is used Plug the coaxial cable to the antenna socket on the wall Antenna socket at the back of the TV set ...

Page 11: ...ion such as VHF or and UHF may be necessary for installation at private houses Single Antenna Connection Separate Antenna Connection Y PC AV HDMI1 HDMI2 R AUDIO L SERVICE COMPONENT VIDEO PC HDMI1 AUDIO ANT Pr Pb R L AUDIO Y VHF Antenna UHF Antenna ANT REAR OF THE TV SET ANT ...

Page 12: ...o Connection 12 Y PC AV HDMI1 HDMI2 R AUDIO L COMPONENT VIDEO PC HDMI1 AUDIO ANT Pr Pb R L AUDIO Y SERVICE Connecting with an External Source You can make the connection with the AV input REAR OF THE TV SET ...

Page 13: ...he RCA connector 2 These connectors connect to AV as shown below 3 Turn on the TV set and camcorder video game 4 Press INPUT and then You can see input menu Select AV mode by pressing and OK key Y PC AV HDMI1 HDMI2 R AUDIO L SERVICE COMPONENT VIDEO PC HDMI1 AUDIO ANT Pr Pb R L AUDIO Y REAR OF THE TV SET ...

Page 14: ... L AUDIO Y Y PC AV HDMI1 HDMI2 R AUDIO L SERVICE COMPONENT VIDEO PC HDMI1 AUDIO ANT Pr Pb R L AUDIO Y REAR OF THE TV SET REAR OF THE TV SET Note When you connect with the component please check the color of cable between DVD and TV set When connecting with a component cable When connecting with a RCA cable ...

Page 15: ...E COMPONENT VIDEO PC HDMI1 AUDIO ANT Pr Pb R L AUDIO Y REAR OF THE TV SET Set Top Box Y PC AV HDMI1 HDMI2 R AUDIO L SERVICE COMPONENT VIDEO PC HDMI1 AUDIO ANT Pr Pb R L AUDIO Y REAR OF THE TV SET When connecting with a HDMI cable When connecting with a component cable ...

Page 16: ...K key Y PC AV HDMI1 HDMI2 R AUDIO L SERVICE COMPONENT VIDEO PC HDMI1 AUDIO ANT Pr Pb R L AUDIO Y 1 Adjust PC resolution to available resolution in LCD TV 2 Connect the PC and TV set using the HDMI and Audio cable like below the picture 3 Turn on the PC and TV set 4 Press INPUT and then You can see input menu Select PC mode by pressing or OK key REAR OF THE TV SET REAR OF THE TV SET When connecting...

Page 17: ...ble resolution 3 HDMI input port receives only Digital Signal 4 Depending on the graphic card when you plug unplug the HDMI connection the screen may not display correctly Restart the computer if this happens Note 1 When you connect with component PC D Sub and HDMI you must check the input resolution of external devices 2 So if this mode is used at PC mode the screen can be enlarged PC CONNECTION ...

Page 18: ... Y PC AV HDMI1 HDMI2 R AUDIO L SERVICE COMPONENT VIDEO PC HDMI1 AUDIO ANT Pr Pb R L AUDIO Y External Input Connection Source Antenna Input Connection Watching cable television is only possible after you have subscribed to the local broadcasting company and installed a cable receiver You may make the connection to either the Component or the AV input REAR OF THE TV SET ...

Page 19: ...hange your TV s volume or to move cursor in the menu CH Buttons Use this buttons to change channels on your TV or to move cursor in the menu POWER Button Use this button to TV STAND BY mode TV ON mode Remote control signal receiver The screen contains the remote control signal receiving window therefore point the remote control towards the screen when using it Stand by LED Indicator LED RED Standb...

Page 20: ...o the previous channel 5 DTV Used to enter a program number for multiple program channels such as 2 1 2 2 etc 6 VOL Adjust the volume 7 OPTION Use to quickly select frequently used functions 8 INPUT Each time you press this button the TV will cycle Through AIR CABLE AV Component HDMI1 HDMI2 PC 9 CH Press to switch to your memorized channels in sequence 10 NAVIGATION KEY You can use Navigation Key ...

Page 21: ...Saving Time Sleep Timer On Timer and Off Timer Color temp Aspect Ratio PC Screen Mode Move Off 16 9 R G Noise Reduction User 42 81 58 50 OK Select MENU Exit 2 Press the button You may setup according to the directions on the screen after selecting the desired item by pressing the button If the setup is completed exit from the menu by pressing the MENU button Color temp Aspect Ratio PC Screen Mode ...

Page 22: ...to select the channel To watch the No 9 1 channel Press the button 9 1 and OK in sequence Press the POWER button on TV set or Remote control Note The buttons of the remote control and the main body operate only when AC power turn on You must pull out the plug of TV set to shut off the AC Power To turn sound off Press the MUTE button No sound is heard if MUTE is displayed on the screen Sound is hea...

Page 23: ...s to flicker in red color and the TV turns on 2 Press the CH button Select the desired program by pressing the CH button or the number buttons 3 Adjust volume Sound reduces by pressing the VOL button Sound increases by pressing the VOL button Note Sound mutes by pressing the MUTE button 4 Press the POWER button of right side of the set or Remote control for turning the TV off TV turns off and the ...

Page 24: ... Select MENU Return Edit Channel Fine Tune Signal Strength 2 Antenna This will automatically search the channels do you wat to preoceed Auto Search OK Select MENU Return Cancel OK Move Move Select MENU Return Edit Channel Fine Tune Signal Strength 2 Antenna 1 Press the MENU button to select the Channel menu Move the selection bar to the Channel menu with buttons 3 Select the Auto Search Place the ...

Page 25: ... you are unable to get a good picture or Sound because of a poor broadcasting signal adjustment of Frequency might improve it 1 Adding the Channel Select a Channel number you want to add with the NUMBER buttons Press MENU Button Select Channel by pressing Move to Edit Channel Then select ADD DEL by pressing CB 2 Deleting the Channel Press MENU Button Select Channel by pressing Move to Edit Channel...

Page 26: ...Search mode received channels are in the position of Add and scrambled channels are in the position of Del Scrambled channels are displayed in S and deleted channels are presented normal ex Scrambled Channel 11 1 S Deleted Channel 11 1 Scrambled channels can be moved to Add side If you want to watch scrambled channels you have to contact cable TV service ...

Page 27: ...g button Press FAV CH button again on the Edit Channel mode then disappeared 3 Viewing the Favorite CH Whenever pressing FAV CH button the Channel changes as the selected Channel order FAV CH You can set channel you watch frequently as favorites MENU P MODE GUIDE FAV CH MEDIA PIP INPUT SWAP POSITION MTS STILL EXIT Move Change MENU Return Edit Channel Fine Tune Antenna Signal Strength 14 1 16 10 Re...

Page 28: ...as follows by pressing and OK buttons AIR CABLE AV Component HDMI1 HDMI2 PC Air Analog 26 INPUT AV When watching video Camcorder DVD Cable TV with External Input OPTION INPUT OK VOL MENU EXIT CH Note If sound signal is mono mode connect it to the L terminal of the sound input terminal ...

Page 29: ...you presses INPUT Button You can select as follows by pressing the buttons AIR CABLE AV Component HDMI1 HDMI2 PC Note If sound signal is mono mode connect it to the L terminal of the sound input terminal INPUT HDMI 2 INPUT PC VGA INPUT Component INPUT HDMI 1 OPTION INPUT OK VOL MENU EXIT CH ...

Page 30: ... PC D Sub and HDMI you must check the input resolution of external devices 2 So if this mode is used at PC mode the screen can be enlarged Resolution V freq HDMI PC D Sub Component Standard 640 X 480 60Hz O O X VESA Standard 800 X 600 60Hz O O X VESA Standard 1024 X 768 60Hz O O X VESA Standard 1280 X 1024 60Hz O O X VESA Standard 1360 X 768 60Hz O O X 720 X 480i 60Hz X X O 720 X 480p 60Hz O O O 1...

Page 31: ...MENU Picture Aspect Ratio button The screen changes as below whenever by pressing the button 16 9 4 3 ZOOM 1 ZOOM 2 16 9 Color temp Dimming Aspect Ratio PC Screen Mode Off 16 9 R G Noise Reduction 42 81 58 10 4 Move Change MENU Return Color temp Dimming Aspect Ratio PC Screen Mode Off ZOOM 1 R G Noise Reduction 42 81 58 10 4 Move Change MENU Return Color temp Dimming Aspect Ratio PC Screen Mode Of...

Page 32: ...n the PC mode 1 Select Picture by pressing the Menu button The menu screen appears as follows 2 Select PC Screen Mode Move to PC Screen Mode in the Picture menu by pressing the buttons Press the button Color temp Dimming Aspect Ratio Off 16 9 R G Noise Reduction 42 81 58 10 4 PC Screen Mode Move Change MENU Return 3 Select and adjust each items Move to item what you want by pressing the button Adj...

Page 33: ...G Noise Reduction 80 100 50 10 65 Move Change MENU Return Color temp Dimming Aspect Ratio PC Screen Mode Off 16 9 R G Noise Reduction 50 100 50 10 55 Move Change MENU Return Color temp Dimming Aspect Ratio PC Screen Mode O Cinema ff 16 9 R G Noise Reduction 30 70 40 10 65 Move Change MENU Return When setting up various screen modes 1 Picture Mode selects what you want Press MENU button and Select ...

Page 34: ...lect in order of Brightness Contrast Color Tint NTSC Only Sharpness Noise Reduction Color Temp Dimming Aspect Ratio PC Screen Mode Only in PC Mode You can adjust all items by pressing the buttons Note Brightness Adjust the whole of screen brighter or darker Contrast Adjust difference between brightness and darkness between objects and background on the screen Color Adjust color thinly or thickly T...

Page 35: ...alizer On Normal Speaker 16 Digital Volume Off Auto Volume Control ST Voice Move Change MENU Return Equalizer On Normal Speaker 16 Digital Volume Off Auto Volume Control Dynamic Bass Note ST Voice Allows human voice to be heard more clearly Dynamic Bass Suitable for the bass effect Move Change MENU Return Equalizer On Normal Speaker 16 Digital Volume Off Auto Volume Control Off 2 Select AVC Auto V...

Page 36: ...rol Off Move Change MENU Return Equalizer On Movie Speaker 16 Digital Volume Off Auto Volume Control Off Move Change MENU Return Equalizer On Music Speaker 16 Digital Volume Off Auto Volume Control Off When adjusting sound to taste 3 Sound mode selects what you want Move to Mode in the Sound menu Select desirable Sound mode by pressing the buttons under the effect mode is off The Sound status chan...

Page 37: ...e adjustment method used for audio product 10 kHZ High sound range 1 3 3 kHz Middle sound range 100 330 Hz Low sound range Move Change MENU Return Equalizer On User Speaker Off Auto Volume Control Off Move Change MENU Return 10 KHz 3 3 KHz 1 KHz 330 Hz 100 Hz Equalizer Setting 5 Adjust the Digital Volume Digital TV mode only Move to Digital volume in the Sound menu Adjust the Digital volume level ...

Page 38: ...ss the MTS button again MTS Mono MTS SAP MTS Stereo MENU P MODE GUIDE FAV CH MEDIA PIP INPUT SWAP POSITION MTS STILL EXIT MENU P MODE GUIDE FAV CH MEDIA PIP INPUT SWAP POSITION MTS STILL EXIT Note The availability of these additional audio tracks depends on the program In DTV broadcasting you can select audio tracks simultaneous translations of the program into foreign languages by pressing the MT...

Page 39: ...o a specific frame CC2 The Special Non Synchronous Use Captions This channel carries data that is intended to augment information carried in the program CC3 Secondary Synchronous Caption Service Alternate program related caption data typically second language captions CC4 Special Non Synchronous Use Captions Similar to CC2 The Closed Caption feature doesn t work in PIP POP mode Viewing Closed Capt...

Page 40: ... being broadcast Default means to follow the standard set by the broadcaster Text Size This option consists of Default Small Standard and Large The default is Standard Text Font This option consists of Default Font1 7 You can change the font you want The default is Style 0 Text Color This option consists of Default White Black Red Green Blue Yellow Magental and Cyan You can change the color of the...

Page 41: ... Password New Password Confirm 0 9 Enter OK OK MENU Return Cancel OK 1 Change password Move to Parental control in the Features menu The message Enter password will appear Enter your 4 digit password Note The default password of a new TV set is 0 0 0 0 Move to Change Password in the Parental Control Press the buttons to change the password The Change password screen will appear Choose any 4 digits...

Page 42: ...d by adult No One 17 and Under Admitted Adult only Not Rated by MPAA PG MPAA PG13 R NC17 X NR Adjustment of Parental Control 3 MPAA Move to MPAA in the Parental Control and press the buttons The MPAA screen will appear Press the buttons to select the MPAA categories G General audience PG Parental guidance PG 13 Viewers 14 and over R Mature audience NC17 No children under age 17 X Adult only NR Not...

Page 43: ... example if you block Y category then Y7 will automatically be blocked Similarly if you block the G category then all the categories in the young adult group will be blocked G PG 14 and MA The Sub ratings D L S and V work together similarly Y Y7 G PG 14 MA FV D L S V D L S V L Allow All S TV Rating Children General V Move OK Select MENU Return Move Select MENU Return Rating Status Change Password ...

Page 44: ...e VOL buttons to select the Can English Rating categories Press the EXIT button to exit C Programming intended for children under age 8 C8 Programming generally considered acceptable for children 8 years and over to watch on their own G General programming suitable for all audiences PG Parental Guidance 14 Programming contains themes or content which may not be suitable for viewers under the age o...

Page 45: ...3 ans 16 ans and 18 ans will automatically be blocked also 7 Downloadable RRT Allow all Press to unlock all TV ratings Block all Press to lock all TV ratings Parental restriction levels differ depending on the broadcasting station The default menu name and Downloadable US rating changes depending on the downloaded information Even if you set the On screen display to your desired language the Downl...

Page 46: ...cent level of OSD background by pressing the buttons Note New technology MGDi Plus brings viewers more detailed clearer and more natural image with picture compensation algorithm When viewing how MGDi improves the picture Selection of Language Move Change MENU Return Caption 11 Language MGDI Demonstration Menu Opacity Parental Control Initialize English 1 Select Language Move to Language in the Fe...

Page 47: ...h the buttons and then presses the OK button to complete Note 1 Information of Auto Clock is required to DTV signal 2 Current Time Set is available in MANUAL mode 3 Time Zone Move to Time zone in the Time menu Select the Time zone to desirable Time zone by pressing the button The Time zone change as the followed Central Eastern Atlantic Hawaii Alaska Pacific Mountain Move Select MENU Return Clock ...

Page 48: ...Move to On Timer in the Time menu Select the On Timer to On by pressing the button Move to On Time with the buttons To go to On Time press the buttons Place the cursor to AM PM Hour Min with the buttons Set the AM PM Hour Min with the buttons and then press the OK and then press MENU buttons Move to On CH in the Time menu Select the On CH to desirable Channelby pressing the buttons Move to On Vol ...

Page 49: ... Timer Off Time Move to On Timer in the Time menu Select the On Timer to On by pressing the button Move to Off Time with the buttons To go to Off Time press the buttons Place the cursor to AM PM Hour Min with the buttons Set the AM PM Hour Min with the buttons and then press the OK and then press MENU buttons Note If an active signal is not present for about 30 minutes the set will automatically t...

Page 50: ...current next program time start end Digital TV mode only Icon Displays the service items Channel State Screen Size Audio Service Dolby Digital Favorite Channel and ETC in the current program Note Owing to our policy of continuous improvement the availability of icon which depends upon the program may change Current time Displays the current time The channel banner displays information about a chan...

Page 51: ... the broadcasting station Picture has snow Check the antenna or its connection is correct and if not correct the noise antenna fault or connection cable fault Check if car traffic or neon sign disturbs the sound effect Stripes on Check the susceptible interference by other electronic devices such picture as radio and television and keep magnetic or electronic devices away from the TV Bad stereo or...

Page 52: ...n and frequency of your PC Then adjust them to optimum condition for LCD TV NO SIGNAL appears on the screen Refer to the table of PC mode input format If registered resolution and Frequency on the table no listed then no picture will be displayed Not available appears on the screen Ensure that the signal cable is firmly connected to PC and TV Image is not clear Adjust the PHASE control Image is no...

Page 53: ...l Aspect Ratio 16 9 Resolution 1366 x 768 WXGA Pixel Pitch 170 25 x 510 75 x RGB 0 200 x 0 600 mm x RGB 0 227 x 0 681 mm x RGB Dimension W x H x D Set Dimension 796 x 563 x 244mm 927 x 656 x 320mm 1033 x 714 x 320mm Power Consumption Marked on the back of the product TV System NTSC M PAL M PAL N Power Source 110 240V 50 60Hz ...

Reviews: