background image

PLAYBACK

37

36

Other Disc Playback

3

Select the thumbnail you want to display using [

…†œ √

] and press

[ENTER]. 

4

The full size image will be displayed and a slide show starts
automatically with a time interval of 10 seconds.

5

Press [NEXT] or [PREV] to manually skip to the next or previous image.

6

Press [

] (or [

œ

]) to rotate the image (counter) clockwise.

7

Press [STOP] to exit the slideshow.

• If the disc contains MP3 files as well as JPEG files, you can change the

Play mode to play MP3 files by pressing [TITLE]. 

• When a CD contains both MP3 files and JPEG files, the default Play

mode is JPEG image files.

• The DVD RVCR can playback up to 1000 files per disc.
• MP3 files encoded below 64kbps are not supported.

You can enjoy a slide show while listening to MP3 music files. 

1

Prepare a CD which includes both MP3 and JPEG files.

2

Insert the CD and play an MP3 file. 

3

Press [TITLE] while playing the MP3 file to change the Play mode. The music playback will not stop.

4

Select an image file and press [ENTER] to start the slide show.

5

The MP3 file you selected continues to play during the JPEG slide show.

Playing MP3 Files During a Slide Show

Other Disc Playback

Other Disc Playback

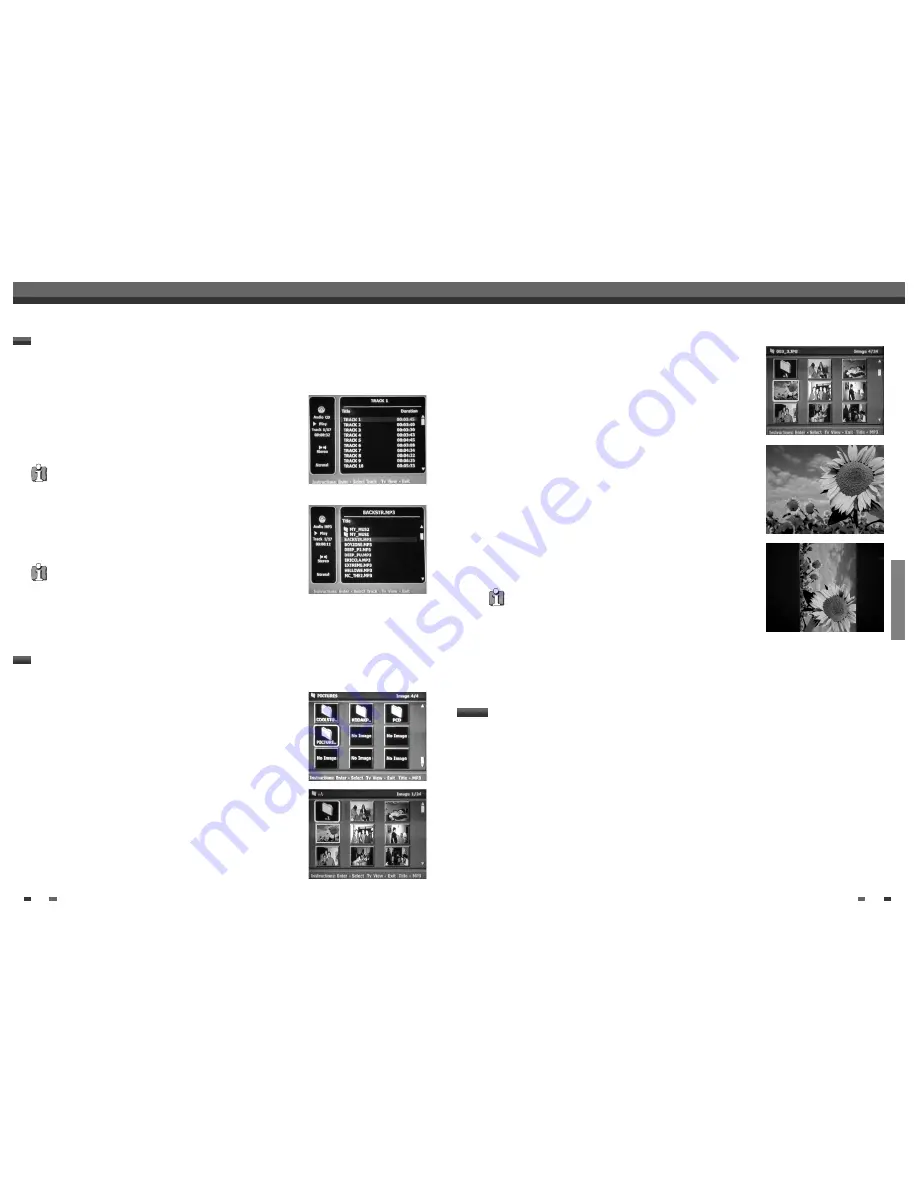
The DVD RVCR can play audio CDs and MP3 files on CD-ROM,
CD-R or CD-RW discs. 

1

Insert the CD disc and close the tray. The Audio CD or MP3 CD menu
appears on the TV screen after a few moments to load the disc.

2

Use [

…†

] to select a track or a file, then press [PLAY] or [ENTER].

During playback, the current track's elapsed playing time will appear
on the front panel display and menu. Playback will stop at the end of
the disc.

3

While playing an Audio CD, use [FF] or [REW] for 2x speed playback. 

4

Use [PLAY/PAUSE] to pause playback while the disc is playing.

5

To stop playback at any time, press [STOP].

Audio CD/MP3 PLAYBACK

• Press [REPEAT] to repeat a track (file) and press again to repeat the

whole disc.

• If the disc contains JPEG files as well as MP3 files, you can change the

Play mode to display JPEG image files by pressing [TITLE].

• On the MP3 CD menu, you can display the folders on the disc. Use

[

…†œ √

] to select the folder icon on the MP3 CD menu then press

[ENTER] or [PLAY]. You can also display just the tracks in the folders. Use
[

…†œ √

] to select a folder then press [ENTER].

••• Audio CD •••

••• MP3 •••

The DVD RVCR can display JPEG files on CD-R/RW and Kodak
Picture CDs.

1

Insert your CD and close the tray. The JPEG CD or Kodak Picture CD
folder tree appears. 

2

If there are folders which contain JPEG files (e.g., pictures on a Kodak
Picture CD), select the desired folder using [

…†œ √

] and press

[ENTER].

JPEG / Kodak Picture CD PLAYBACK

Summary of Contents for DF-N71N

Page 1: ...DVD Recorder VCR DVD Recorder VCR DVR S04 DVR S05 User Manual P N 97P95600N0 E0...

Page 2: ...be adhered to 4 Follow all instructions All operating and use instructions should be followed i Important Safeguards Important Safeguards CAUTION TO REDUCE THE RISK OF ELECTRIC SHOCK DO NOT REMOVE COV...

Page 3: ...d cleaners 7 Do not block any ventilation openings Install in accordance with the manufacturer s instructions Slots and openings in the cabinet are provided for ventilation and to ensure reliable oper...

Page 4: ...CD Compact Disc Digital Audio CD R CD recordable Audio MP3 files CD RW CD rewritable Audio MP3 files Not all recordable CDs may be played by your player 2 Overview Overview DVD DVD R DVD RW What is a...

Page 5: ...ssage will be displayed on screen Video that is copy once only can only be recorded using DVD RW discs with CPRM Copyright Notice Audio and video recordings you make using the DVD Recorder VCR are for...

Page 6: ...ck Unlock the front panel and Remote control by pressing and holding it over 5 seconds Cassette Compartment VCR deck Insert a video cassette here VCR EJECT Ejects the tape in the VCR deck Disc Tray DV...

Page 7: ...ns the DVD Recorder VCR on and off Opens and closes the disc tray in DVD mode Ejects the tape in the VCR deck in VCR mode Switches the view on your TV to the DVD Recorder VCR tuner Selects DVD mode Se...

Page 8: ...If you are using a cable box to tune channels it is not necessary to run Auto Channel Search as indicated on page 18 Caution Make sure the DVD Recorder VCR is connected directly to the TV and the TV i...

Page 9: ...ure will appear scrambled 1 Connect the COMPONENT PROGRESSIVE VIDEO OUT jacks on the DVD Recorder VCR to the corresponding in jacks on your TV using an optional Y Pb Pr cable C 2 Connect the Left and...

Page 10: ...ctions Enter Confirm Setup Exit Move Installation Welcome Press Enter to begin auto channel search Ensure antenna is connected Instructions Setup Exit You must follow the initial installation process...

Page 11: ...Setup Exit Move Select The TV Standard TV CATV If you are receiving channels from a cable box or satellite receiver connected to the LINE1 or LINE2 inputs there is no need to set Tuning Band or searc...

Page 12: ...tions above to make sure that Tuning Band is set correctly TV or CATV Add Remove Channels This feature allows you to manually add or delete channels from your channel list 1 Follow steps 1 2 as shown...

Page 13: ...Off Instructions Enter Confirm Setup Exit Move Select Auto Chapter Off 5min 10min 15min 1 Press SETUP 2 Use to select Preference 3 While Preference is selected press to select Video 4 Press ENTER The...

Page 14: ...i Fi Instructions Enter Confirm Setup Exit Move Select Digital Output Off Bitstream LPCM Audio Digital Output Off Dynamic Range Off Virtual Surround Off VCR Reception Stereo Tape Play Back Hi Fi Instr...

Page 15: ...ter Confirm Setup Exit Move The initial password is 0000 You must enter this password before you can change the Parental Level Set the new password to something other than 0000 Parental Control Set Pa...

Page 16: ...enables the DVD Recorder VCR to set the clock automatically whenever it is in Standby mode plugged in but powered off Follow the same procedure as AutoPlay to set the Auto Clock status Preference Vide...

Page 17: ...TV Audio Channel OSD Menu Options for DVD The On Screen Display provides feedback on the status of the DVD Recorder VCR and or the currently loaded disc or tape To access the On Screen Display or OSD...

Page 18: ...l go into Pause mode 2 You can back up or advance the picture frame by frame by pressing FF repeatedly during Pause mode Fast Forward Backward 1 Press REW or FF during playback The DVD Recorder VCR wi...

Page 19: ...t by pressing A B key again DVD Playback Zoom The Zoom function allows you to magnify the video image and scroll around the enlarged image 1 Press ZOOM during Play mode to activate the Zoom function E...

Page 20: ...automatically stop when the counter returns to about 0 00 00 by setting the counter to 0 00 00 in the Go To Search function under Setup Preference VCR see page 26 Special Playback Features VCR Playbac...

Page 21: ...r VCR can play audio CDs and MP3 files on CD ROM CD R or CD RW discs 1 Insert the CD disc and close the tray The Audio CD or MP3 CD menu appears on the TV screen after a few moments to load the disc 2...

Page 22: ...ecording mode by pressing REC MODE repeatedly DVD HQ High Quality 1 hr disc SP Standard Quality 2 hrs disc EP Average Quality 4 hrs disc or SLP Low Quality 6 hrs disc VCR SP Standard Play SLP Super Lo...

Page 23: ...Search with FF REW button 4 Press COPY to resume copy Copy Edit VCR DVD Quick Copy Menu Please Select Quick Record Option DVD VCR VCR DVD Instructions Enter Confirm Move Basic Recording 1 Insert a Dis...

Page 24: ...programming a timer recording Media Choose desired media DVD or VHS using Ch Choose the desired channel or one of the external inputs from which to record Date Choose a date up to 1 month in advance...

Page 25: ...use the DVD Recorder VCR remote to control the camcorder using the STOP PLAY and PAUSE functions 4 Press REC once to start recording Recording is automatically stopped if the DVD Recorder VCR detects...

Page 26: ...Type DVD RW Recordings 5 Total Title 00 57 57 Free Space 01 48 48 Finalized Locked No Compatible Yes Instructions Setup Exit Erase the disc Erase the disc All recordings will be lost Yes No Instructi...

Page 27: ...ons Enter Confirm Erase Title Would you like to Erase the title Yes No Instructions Enter Confirm Move Erase Title Title is being erased Please wait a moment 48 Change Disc Name You can rename your di...

Page 28: ...re Split Title Instructions Enter Confirm Setup Exit Move Choose the edit Function Add Delete Delete All After editing is complete a DVD RW disc will not be compatible with other DVD players until you...

Page 29: ...front panel display is lit Insert a playable disc Check the disc type color system and regional code Place the disc with the playback side down Place the disc on the disc tray correctly inside the gu...

Page 30: ...orded with copy once material cannot be played on other players The remaining blank space on the disc is insufficient The source you are trying to record is copy protected When setting the recording c...

Page 31: ...EO Recordable discs DVD R DVD RW Recordable time DVD Approx 1 hour HQ mode 2 hours SP mode 4 hours EP mode 6 hours SLP mode VCR SP 2 hours T 120 SLP 6 hours T 120 8 hours T 160 Video recording format...

Page 32: ...in violation of instructions furnished by us nor units which have been repaired or altered outside of our factory nor to cases where the serial number thereof has been removed defaced or changed This...

Reviews: