background image

EN

12

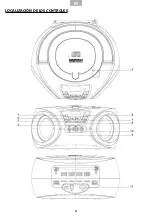
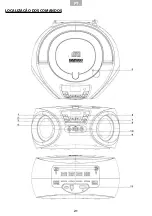
CONTROL DEFINITIONS

1. 

POWER: 

In standby mode, press to turn the unit on. Press again to turn the unit off .

2. 

PREV/TUN-/NEXT/TUN+

Radio mode:

 Press once to go to the next or previous station; press for a few seconds  

to scan the stations.

CD/USB mode: 

Press once to go to the next or previous song; press for a few seconds 

to fast forward or rewind.

3. 

MD/EQ

Press once to switch between the sound sources: Radio/CD/USB/AUX.
Press and hold to switch between EQ functions: ROCK/POP/FLAT/CLASS/JAZZ.

4. 

PHONES:

 You can connect your earphones to enjoy the music without disturbing.

5. 

OPEN/CLOSE:

 gently pull up/down to open/close the CD door

6. 

PLAY/PAUSE/P+/SCAN

Press the Play/Pause Button to play or pause a loaded CD.

In Radio mode

, press once to select a preset station. Press for a few seconds to auto 

search.

7. 

STOP/REP/MEM

In USB/CD mode

: Press for a few seconds to stop play. Press once to program repeat 

tracks, you can choose between ONE/ALL/RAND/OFF.

In FM mode

: Press to store a station. The unit can save up to 20 channels.

8. 

VOL+/VOL-:

 Press to increase or decrease the volume.

9. 

AUX:

 Use the Auxiliary input to connect an external audio source (MP3 player).

10. 

USB:

 Plug your USB to enjoy the music. 

11. 

AC Power Input:

 Use the power cord provided to connect the unit to an AC power 

source.

Tuning the FM Radio

1. Turn on the device by pressing the “ POWER ” button, then press the Function Button 

“ MD/EQ ” and adjust the Function shown on the display to “ Rad ”. Extend the FM 

antenna to improve FM radio reception.

2. Press “


I




/


TUN - ” or “




I


/ TUN + ” once to manually tune a station or press it 

continuously to search the next available station.

3. You can auto search and store up to 20 radio stations by pressing “


/ P + / SCAN” for  

a few seconds, the unit will search and auto store the fi rst 20 stations received

4. To manually store a desired station in one of the 20 preset stations you should search 

the desired station and then press “ 

/ REP / MEM ” button, you can select the preset 

number from P1 to P20 by pressing the button “


/P + / SCAN ” and fi nally press “

/

REP/MEM” button again to confi rm.

5. Press the button 

“ 

 /P + / SCAN “ to listen to the stored radio stations P1, P2...P20.

Summary of Contents for DBU-050

Page 1: ...ucciones User manual Manuel d instructions Manual de instruções REPRODUCTOR ESTÉREO CD MP3 USB Y RADIO STEREO PORTABLE CD MP3 USB AND RADIO PLAYER REPRODUCTEUR DE CD PORTABLE MP3 USB RADIO REPRODUTOR PORTÁTIL CD MP3 USB RÁDIO ...

Page 2: ...lquier cambio o modificación de la unidad que no haya sido autorizado por la parte responsable de cumplimiento puede anular la autorización del usuario para utilizar el equipo ADVERTENCIA Para evitar incendios o descargas eléctricas no exponga esta unidad a lluvia o humedad PRECAUCIÓN Peligro de explosión si la batería está mal insertada Sustitúyala solo por otra igual o equivalente No mezcle bater...

Page 3: ...ES 3 ENCENDIDO DE LA UNIDAD Funcionamiento con corriente alterna Enchufe el cable de CA a una salida estándar de CA 100 240 V 50 60 Hz Funcionamiento con batería Requiere 4 baterías tipo C no incluidas ...

Page 4: ...ES 4 LOCALIZACIÓN DE LOS CONTROLES ...

Page 5: ...mpuje suavemente para abrir cerrar la puerta del CD 6 REPRODUCIR PAUSA P BUSCAR Pulse el botón de reproducción pausa para reproducir o hacer una pausa en el CD cargado En modo Radio pulse una vez para seleccionar una emisora predeterminada Pulse durante unos instantes para realizar una búsqueda automática 7 STOP REP MEM En modo USB CD Pulse durante unos instantes para detener la reproducción Pulse...

Page 6: ...s P1 P2 P20 Reproducir un CD 1 Abra la puerta del CD e introduzca un CD o CD R RW en el reproductor 2 Ajuste la Función en modo CD 3 Pulse el botón P SCAN para iniciar la reproducción del CD cargado 4 Puede seleccionar la pista que desee pulsando los botones I TUN o I TUN Reproducir un USB 1 Conecte su USB al conector USB frontal y seleccione USB pulsando el botón MD EQ 2 El USB iniciará la reprod...

Page 7: ...woo Modelo DBU 50 Al que se refiere esta declaración con las normas u otros documentos normativos LVD 2014 35 EU EN 60065 2014 EMC 2014 30 EU EN 55032 2015 EN 55020 2017 A11 2011 A12 2016 EN 6100 3 2 2014 EN 6100 3 3 2013 Información adicional De acuerdo con las disposiciones de la Directiva 99 05 CE del Parlamento Europeo y del Consejo de 9 de Marzo de 1999 transpuesta a la legislación española me...

Page 8: ...urridos DOS AÑOS desde su fecha de venta serán reparados o cambiados por otro siempre que 1 El producto haya sido utilizado solo en el uso normal para el que estaba previsto 2 No haya sido abierto manipulado o alterado por persona ajena al Servicio Técnico Oficial de la marca 3 No haya sufrido daños por golpes inundación sobrecalentamiento sobrecarga eléctrica o cualquier otra circunstancia externa...

Page 9: ...NING Changesormodificationstothisunitnotapprovedbytheparty responsible for compliance could void the user s authority to operatic the equipment WARNING To prevent fire or shock hazards do not expose this unit to rain or moisture CAUTION Danger of explosion if battery is incorrectly replaced Replace only with the same orequivalent type Do not mix old and new batteries Do not mix alkaline standard car...

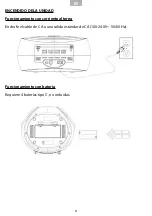
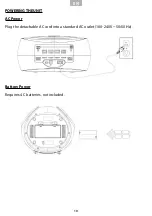
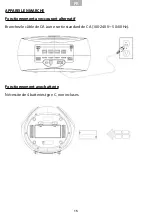
Page 10: ...EN 10 POWERING THE UNIT AC Power Plug the detachable AC cord into a standard AC outlet 100 240 V 50 60 Hz Battery Power Requires 4 C batteries not included ...

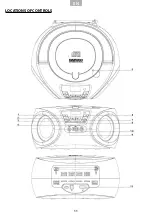
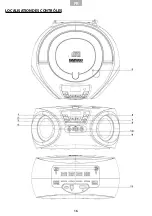
Page 11: ...EN 11 LOCATIONS OF CONTROLS ...

Page 12: ...Press to store a station The unit can save up to 20 channels 8 VOL VOL Press to increase or decrease the volume 9 AUX Use the Auxiliary input to connect an external audio source MP3 player 10 USB Plug your USB to enjoy the music 11 AC Power Input Use the power cord provided to connect the unit to an AC power source Tuning the FM Radio 1 Turn on the device by pressing the POWER button then press th...

Page 13: ...ut on an MP3 player 2 Adjust the Function to AUX IN mode Audio played through the connected MP3 player will now be heard through the unit Product disposal Attention shouldbe drawn to theenvironmentalaspects of batterydisposal Don t throw used batteries in dustbin Please contact your retailer in order to protect the environment Electrical products should not be disposal of with household waste Plea...

Page 14: ...te quel changement ou modification de l unité qui ne soit pas autorisé par la partie responsable d accomplissement peut annuler l autorisation à l utilisateur AVERTISSEMENT Pouréviterdes incendies ou desdécharges électriques ne pas exposer l unité à la pluie ou à l humidité PRÉCAUTION Danger d explosion si la batterie est mal installée Remplacer par une égale ou équivalente Nepasmélanger des batter...

Page 15: ...15 APPAREIL EN MARCHE Fonctionnement avec courant alternatif Branchez le câble de CA à une sortie standard de CA 100 240 V 50 60 Hz Fonctionnement avec batterie Nécessite de 4 batteries type C non incluses ...

Page 16: ...FR 16 LOCALISATION DES CONTRÔLES ...

Page 17: ...ant quelques instants pour arrêter la reproduction Appuyez une fois pour programmer la répétition de pistes vous pouvez choisir parmi ONE une ALL toutes RAND aléatoirement OFF éteint En mode FM Appuyez pour sauvegarder une émission L unité permet de garder jusqu à 20 canaux 8 VOL VOL Appuyez sur la touche pour monter ou baisser le volume 9 AUX Utilisez l entrée auxiliaire pour connecter un disposi...

Page 18: ...o Utiliser l entrée auxiliaire 1 Connectez un câble de 3 5 mm non inclus sur l entrée auxiliaire de l unité et la sortie audio à un reproducteur MP3 2 Ajustez la fonction en mode AUX IN L audio reproduit a travers du reproducteur MP3 connecté s écoutera maintenant à travers l unité Elimination du produit Soyez attentifs aux aspects environnementaux de l élimination des piles Ne jamais jeter les pi...

Page 19: ...lho Consulte sempre um profissional qualificado para reparações AVISO Quaisquer modificações a este aparelho que não tenham sido previamente aprovadas pelo responsável do cumprimento poderão anular a garantia AVISO Para evitar o risco de incêndio ou choque elétrico não exponha este aparelho à chuva ou à humidade CUIDADO Perigo de explosão se a pilha for substituída incorretamente substituir por pilha...

Page 20: ...PT 20 LIGAR O APARELHO Alimentação elétrica Ligue o cabo AC de alimentação a uma tomada da rede elétrica 100 240V 50 60Hz Alimentação com pilhas São necessárias 4 pilhas C não incluídas ...

Page 21: ...PT 21 LOCALIZAÇÃO DOS COMANDOS ...

Page 22: ...programar a repetição de faixas numa das seguintes opções ONE ALL RAND OFF Uma Todas Aleatório Desligado Modo FM Prima para armazenar a emissora Este aparelho pode armazenar 20 emissoras 8 VOL VOL Prima para aumentar ou diminuir o volume 9 AUX Utilize a entrada Aux para ligar uma fonte de áudio externa Reprodutor MP3 10 USB Ligue o seu dispositivo USB para desfrutar da música 11 Entrada AC Utilize...

Page 23: ...ara selecionar a opção AUX IN O áudio reproduzido através do reprodutor MP3 externo será ouvido através do aparelho Eliminação do produto Deverá ter atenção aos aspetos ambientais ao eliminar as pilhas Não deite as pilhas usadas no caixote de lixo Os produtos elétricos não devem ser eliminados juntamente com o lixo doméstico Recicle este produto em instalações adequadas Consulte as Autoridades Loc...

Reviews: