


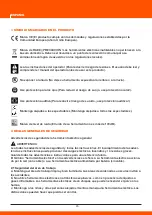


1. SÍMBOLOS MARCADOS EN EL PRODUCTO
Marca CE (El producto cumple con las demandas y regulaciones establecidas por la
Comunidad Europea (ahora Unión Europea).
Marca de RAEE (¡PRECAUCIÓN! Las herramientas eléctricas inutilizables no pertenecen a la
basura doméstica. Deben ser llevados a un punto de recolección comunal para su
eliminación ecológica de acuerdo con las regulaciones locales).
Lea las instrucciones del operador (Para reducir el riesgo de lesiones. El usuario debe leer y
comprender el manual del operador antes de usar este producto).
No exponer a la lluvia (No deje su herramienta expuesta al aire libre o a la lluvia).
Use protección para los ojos (Para reducir el riesgo de su ojo, use protección ocular!).
Use protección auditiva (Para reducir el riesgo de su oído, ¡use protección auditiva!).
Mantenga alejados a los espectadores (Mantenga alejados a todos los espectadores).
Marca de nivel de ruido (El ruido de su herramienta no es más de 103dB).
2. REGLAS GENERALES DE SEGURIDAD
Advertencias de seguridad de la herramienta eléctrica general
ADVERTENCIA
:
Lea todas las advertencias de seguridad y todas las instrucciones. El incumplimiento de las adver-
tencias e instrucciones puede provocar descargas eléctricas, incendios y / o lesiones graves.
Guarde todas las advertencias e instrucciones para una referencia futura.
El término "herramienta eléctrica" en las advertencias se refiere a su herramienta eléctrica acciona-
da por la red (con cable) o a su herramienta eléctrica alimentada por batería (sin cable).
2.1 Seguridad del área de trabajo
a
)
Mantenga el área de trabajo limpia y bien iluminada. Las áreas desordenadas u oscuras invitan a
los accidentes.
b
)
No utilice herramientas eléctricas en atmósferas explosivas, como en presencia de líquidos o
gases inflamables. Las herramientas eléctricas crean chispas que pueden encender el polvo o los
humos.
c
)
Mantenga a los niños y otras personas alejados mientras maneja una herramienta eléctrica. Las
distracciones pueden hacer que pierdas el control.
2.2 Seguridad electrica
a) Los enchufes de la herramienta eléctrica deben coincidir con la salida. Nunca modifique el
enchufe de ninguna manera. No use enchufes adaptadores con herramientas eléctricas conectadas
a tierra. Los enchufes no modificados y las tomas correspondientes reducirán el riesgo de descarga
eléctrica.
b
)
Evite el contacto del cuerpo con superficies puestas a tierra o puestas a tierra, como tuberías,
radiadores, cocinas y refrigeradores. Existe un mayor riesgo de descarga eléctrica si su cuerpo está
conectado a tierra o a tierra.
c
)
No exponga las herramientas eléctricas a la lluvia ni a las condiciones de humedad. El agua que
ingresa a una herramienta eléctrica aumentará el riesgo de descarga eléctrica.
d) No maltrate el cable. Nunca use el cable para transportar, tirar o desenchufar la herramienta
eléctrica. Mantenga el cable alejado del calor, aceite, bordes filosos y partes móviles. Los cables
dañados o enredados aumentan el riesgo de descarga eléctrica.
e) Al operar una herramienta eléctrica en el exterior, use un cable de extensión adecuado para uso
en exteriores. El uso de un cable adecuado para uso externo reduce el riesgo de descarga eléctri-
ca.
f) Si es inevitable utilizar una herramienta eléctrica en un lugar húmedo, utilice un suministro prote-
gido de corriente residual (RCD). El uso de un RCD reduce el riesgo de descarga eléctrica.
2.3 Seguridad personal
a) Manténgase alerta, observe lo que está haciendo y use el sentido común cuando opere una
herramienta eléctrica. No use una herramienta eléctrica mientras esté cansado o bajo la influencia
de drogas, alcohol o medicamentos. Un momento de falta de atención mientras opera las herra-
mientas eléctricas puede ocasionar lesiones personales graves.
b) Use equipo de protección personal. Siempre use protección ocular. Los equipos de protección,
como máscaras anti polvo, calzado de seguridad antideslizante, casco o protección auditiva; utili-
zados para las condiciones adecuadas reducirán las lesiones personales.
c) Prevenir el arranque involuntario. Asegúrese de que el interruptor esté en la posición de apagado
antes de conectarlo a la fuente de alimentación y / o al paquete de baterías, al levantar o transpor-
tar la herramienta. Llevar herramientas eléctricas con el dedo en el interruptor o herramientas
eléctricas energizantes que tienen el interruptor encendido invita a los accidentes.
d) Retire cualquier llave de ajuste o llave antes de encender la herramienta eléctrica. Una llave o
llave dejada unida a una parte giratoria de la herramienta eléctrica puede ocasionar lesiones perso-
nales.
e) No te excedas Mantenga la postura y el equilibrio en todo momento. Esto permite un mejor
control de la herramienta eléctrica en situaciones inesperadas.
f) Vístete apropiadamente. No use ropa suelta o joyas. Mantenga el cabello, la ropa y los guantes
alejados de las piezas móviles. Ropa suelta, joyas o cabello largo pueden quedar atrapados en
partes móviles.
g) Si se proporcionan dispositivos para la conexión de las instalaciones de extracción y recolección
de polvo, asegúrese de que estén conectados y sean utilizados adecuadamente. El uso de recolec-
ción de polvo puede reducir los riesgos relacionados con el polvo.
2.4 Uso y cuidado de la herramienta
a) No fuerce la herramienta eléctrica. Use la herramienta eléctrica correcta para su aplicación. La
herramienta eléctrica correcta hará el trabajo mejor y más seguro a la velocidad para la que fue
diseñado.
b) No use la herramienta eléctrica si el interruptor no la enciende y apaga. Cualquier herramienta
eléctrica que no se pueda controlar con el interruptor es peligrosa y debe repararse.
c) Desconecte el enchufe de la fuente de alimentación y / o del paquete de baterías de la herramien-
ta eléctrica antes de realizar ajustes, cambiar accesorios o almacenar herramientas eléctricas.
Dichas medidas preventivas de seguridad reducen el riesgo de iniciar la herramienta eléctrica
accidentalmente.
d) Guarde las herramientas eléctricas inactivas fuera del alcance de los niños y no permita que las
personas que no estén familiarizadas con la herramienta eléctrica o estas instrucciones operen la
herramienta eléctrica. Las herramientas eléctricas son peligrosas en manos de usuarios no entrena-
dos.
e) Mantener herramientas eléctricas. Compruebe si hay desalineación o atascamiento de piezas
móviles, roturas de piezas y cualquier otra condición que pueda afectar el funcionamiento de la
herramienta eléctrica. Si está dañado, haga reparar la herramienta eléctrica antes de usarla.
Muchos accidentes son causados por herramientas eléctricas mal mantenidas.
f) Mantenga las herramientas de corte afiladas y limpias. Las herramientas de corte correctamente
mantenidas con bordes de corte afilados tienen menos probabilidades de unirse y son más fáciles
de controlar.
g) Use la herramienta eléctrica, los accesorios y las brocas, etc. de acuerdo con estas instruccio-
nes, teniendo en cuenta las condiciones de trabajo y el trabajo a realizar. El uso de la herramienta
eléctrica para operaciones diferentes de las previstas podría dar como resultado una situación
peligrosa.
2.5 Uso y cuidado de la herramienta y de la batería
a) Recargue solo con el cargador especificado por el fabricante. Un cargador que es adecuado para
un tipo de paquete de baterías puede crear un riesgo de incendio cuando se usa con otro paquete
de baterías.
b) Use herramientas eléctricas solo con paquetes de baterías específicamente diseñados. El uso de
cualquier otro paquete de baterías puede crear un riesgo de lesiones e incendios.
c) Cuando la batería no esté en uso, manténgala alejada de otros objetos metálicos, como clips de
papel, monedas, llaves, clavos, tornillos u otros objetos metálicos pequeños, que puedan estable-
cer una conexión de una terminal a otra. Cortar los terminales de la batería juntos puede causar
quemaduras o un incendio.
d) En condiciones abusivas, el líquido puede ser expulsado de la batería; evitar el contacto. Si
ocurre el contacto accidentalmente, enjuague con agua. Si el líquido entra en contacto con los ojos,
busque ayuda médica adicional. El líquido expulsado de la batería puede causar irritación o quema-
duras.
2.6 Servicio
Haga reparar su herramienta eléctrica por un técnico de reparación calificado que use solo repues-
tos idénticos. Esto asegurará que se mantenga la seguridad de la herramienta eléctrica.
2.7 Advertencias de seguridad de la sierra de cadena
a) Mantenga todas las partes del cuerpo alejadas de la cadena de la sierra cuando la sierra de
cadena esté funcionando. Antes de encender la sierra de cadena, asegúrese de que la cadena de la
sierra no esté en contacto con nada. Un momento de falta de atención mientras opera las motosie-
rras puede enredar su ropa o cuerpo con la cadena de la sierra..
b) Siempre sostenga la sierra de cadena con su mano derecha en el mango trasero y su mano
izquierda en el mango delantero. Sostener la sierra de cadena con una configuración de mano
invertida aumenta el riesgo de lesiones personales y nunca debe hacerse.
NOTA Para las sierras de cadena diseñadas con la barra de guía en el lado izquierdo, la referencia a
la posición de "mano derecha" y "mano izquierda" se invierte.
c) Use gafas de seguridad y protección auditiva. Se recomienda más equipo de protección para la
cabeza, las manos, las piernas y los pies. La vestimenta de protección adecuada reducirá las
lesiones personales por escombros voladores o por contacto accidental con la cadena de la sierra..
d) No opere una sierra de cadena en un árbol. El funcionamiento de una motosierra mientras está
arriba en un árbol puede provocar lesiones personales.
e) Siempre mantenga una base adecuada y opere la sierra de cadena solo cuando esté sobre una
superficie fija, segura y nivelada. Las superficies resbaladizas o inestables, como las escaleras,
pueden causar la pérdida de equilibrio o el control de la motosierra.
f
)
Al cortar una extremidad que está bajo tensión, esté alerta para la recuperación de la primavera.
Cuando se libera la tensión en las fibras de la madera, la extremidad accionada por resorte puede
golpear al operador y / o tirar la sierra de cadena fuera de control.
g
)
Tenga extrema precaución al cortar el cepillo y los retoños. El material delgado puede atrapar la
cadena de la sierra y ser azotado hacia usted o desequilibrarlo.
h
)
Lleve la sierra de cadena por el mango delantero con la sierra de cadena desconectada y lejos de
su cuerpo. Cuando transporte o almacene la sierra de cadena siempre coloque la cubierta de la
barra de guía. El manejo adecuado de la sierra de cadena reducirá la probabilidad de contacto
accidental con la cadena de sierra en movimiento.
i
)
Siga las instrucciones para lubricar, tensar la cadena y cambiar los accesorios. La cadena tensa-
da o lubricada incorrectamente puede romper o aumentar la posibilidad de retroceso.
j
)
Mantenga las manijas secas, limpias y libres de aceite y grasa. Mangos grasientos y grasientos
resbaladizos que causan pérdida de control.
k
)
Corta madera solo. No use sierras de cadena para fines no previstos. Por ejemplo: no use sierras
de cadena para cortar plásticos, mampostería o materiales de construcción no madereros. El uso
de la sierra de cadena para operaciones diferentes a las previstas podría dar como resultado una
situación peligrosa.
2.8 Prevención de causas y operadores de retroceso
El contragolpe puede ocurrir cuando la punta o punta de la barra de guía toca un objeto, o cuando
la madera se cierra y pellizca la cadena de la sierra en el corte.
El contacto de la punta en algunos casos puede causar una reacción inversa repentina, pateando la
barra guía hacia arriba y hacia atrás hacia el operador.
Si pellizca la cadena de la sierra a lo largo de la parte superior de la barra de guía, puede empujar la
barra de guía rápidamente hacia el operador.
Cualquiera de estas reacciones puede hacer que pierda el control de la sierra, lo que podría ocasio-
nar lesiones personales graves. No confíe exclusivamente en los dispositivos de seguridad integra-
dos en su sierra. Como usuario de sierra de cadena, debe realizar varios pasos para evitar acciden-
tes o lesiones en sus trabajos de corte.
El contragolpe es el resultado del mal uso de la herramienta y / o procedimientos o condiciones de
operación incorrectos y se puede evitar tomando las precauciones adecuadas que se detallan a
continuación:
a
)
Mantenga un agarre firme, con los pulgares y los dedos alrededor de las asas de la sierra de
cadena, con ambas manos sobre la sierra y coloque su cuerpo y brazo para que pueda resistir las
fuerzas de retroceso. Las fuerzas de retroceso pueden ser controladas por el operador, si se toman
las precauciones adecuadas. No sueltes la motosierra.
b
)
No se sobrepase ni corte por encima de la altura del hombro. Esto ayuda a evitar el contacto no
intencionado con la punta y permite un mejor control de la motosierra en situaciones inesperadas.
c
)
Utilice únicamente barras y cadenas de repuesto especificadas por el fabricante. Bandas y
barras de reemplazo incorrectas pueden causar rotura de la cadena y / o contragolpe.
d
)
Siga las instrucciones de afilado y mantenimiento del fabricante para la cadena de la sierra.
Disminuir la altura del calibre de profundidad puede provocar un aumento de la descarga.
2.9 Advertencias de seguridad para cargadores de batería
1. Mantenga el cargador de batería alejado de la lluvia o la humedad. La penetración de agua en el
cargador de la batería aumenta el riesgo de una descarga eléctrica.
2. No cargue otras baterías. El cargador de batería solo es adecuado para cargar baterías de iones
de litio dentro del rango de voltaje listado. De lo contrario, existe peligro de incendio y explosión.
3. Mantenga el cargador de la batería limpio. La contaminación puede conducir al peligro de una
descarga eléctrica.
4. Antes de cada uso, verifique el cargador de la batería, el cable y el enchufe. Si se detecta daño,
no use el cargador de batería. Nunca abra el cargador de batería usted mismo. Haga reparaciones
realizadas solo por un técnico calificado y solo utilizando piezas de repuesto originales. Los carga-
dores de batería, cables y enchufes dañados aumentan el riesgo de una descarga eléctrica.
5. No opere el cargador de batería en superficies fácilmente inflamables (por ejemplo, papel, texti-
les, etc.) o alrededores. El calentamiento del cargador de la batería durante el proceso de carga
puede representar un peligro de incendio.
6. Los niños deben ser supervisados para asegurarse de que no jueguen con el cargador de bate-
ría.
3. DESCRIPCIÓN DE PARTES
1. Mango trasero
2. Paquete de baterías
3. Mango delantero
4. Protector de mano
5. Cadena de sierra
6. Barra guía
7. Perilla de tensión de la cadena
8. Perilla de bloqueo de ajuste de la barra
9. Cubierta lateral
10. Botón de seguridad
11. Interruptor
12. Cubierta del motor
13. Tapa del depósito de aceite
14. Protector de la hoja
15. Botón de inicio
4. DATOS TÉCNICOS
Modelo: DACS1640Li
Voltaje nominal: 40V d.c.
Sin velocidad de la cadena de carga: 5000rpm
Longitud de la barra guía: 14 pulgadas (350mm)
Peso neto: 5.5 kg
Nivel de presión acústica en la posición del operador: 92.4dB(A) K=3 dB(A)
Nivel de potencia de sonido medido: 100.2dB(A) K=2.68dB(A)
Nivel de potencia de sonido garantizado: 103dB(A)
Vibración: 2.291m/s² K=1.5 m/s²
Batería Iones de litio
Número de modelo:
DYMA81
DYMA72E
Voltaje nominal
40V d.c.
40V d.c.
Capacidad
90Wh
144Wh
Cantidad de batería
20pcs
20pcs
Número de modelo
DYMA83
Entrada: 220-240VAC,50Hz,1A
Salida: 40V d.c.,2A
Rango de temperatura de carga permisible: 0-50
°C
5. MONTAJE
5.1 Armar la barra de guía y cortar la cadena
a) Use guantes antes del montaje. Perilla de bloqueo del ajuste de la barra de aflojamiento (8) en
sentido anti horario una o dos vueltas completas.
b) La perilla de tensión de la cadena (7) debe girarse en sentido anti horario para detenerse.
c) La perilla de bloqueo del ajuste de la barra (8) debe girarse en sentido anti horario para detener-
se.
d) Luego quite la cubierta lateral. (Fig.2).
e) Coloque la cadena en la ranura de la barra guía, asegurándose de que los dientes de la sierra
estén orientados en la dirección correcta haciendo coincidir la flecha en la barra guía ( Fig. 3A)
f) Coloque la cadena de la sierra alrededor de la rueda dentada (16) con los dientes con los bordes
de corte alejados de la rueda dentada de transmisión a lo largo del borde superior de la barra de
guía. Mientras tanto, la perilla de tensión de la cadena (18) debe girarse en el sentido de las agujas
del reloj hasta su tope para tensar la cadena de la sierra.
(
Fig.3A/ Fig.3B
).
g) Inserte la cubierta lateral (9) en la ranura (17) y asegúrese de que la cubierta lateral esté firme-
mente asentada de forma fija, como se muestra en la (Fig. 4A / Fig.4B).
h) Asegurándose de que la cadena correctamente asentada en el riel de la barra de guía y la barra
de guía esté fija, entonces la perilla de bloqueo debe girarse en el sentido de las agujas del reloj
hasta su tope. (Fig.5).
Para ajustar la tensión de la cadena, consulte la instrucción". 8.6 Ajuste de la tensión de la cadena".
5.2 Reúne la barra guía y la cadena. (Fig.6a/ Fig.6b/ Fig.6c).
ADVERTENCIA:
Para su seguridad y almacenamiento, recoja el protector de corte después de
cada operación.
5.3 Armar la batería
1. Inserte la batería en el soporte de la batería. (Fig.7A).
2. Asegúrese de que el pestillo en la parte inferior del paquete de baterías encaje en su lugar y que
la batería esté completamente asentada. (Fig.7B).
5.4 Quitar la batería
1. Mantenga presionado el botón de bloqueo de la batería en la parte inferior del paquete de bate-
rías. (Fig.8A)
2. Retire la batería del producto. (Fig.8B).
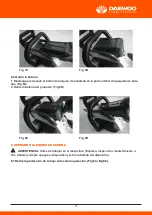
6. OPERANDO LA SIERRA DE CADENA
ADVERTENCIA:
Antes de trabajar en el dispositivo (limpieza, inspección, mantenimiento u
otro trabajo) siempre apague el dispositivo y retire la batería del dispositivo.
6.1 Retire la protección de la hoja antes de la operación. (Fig.9a/ Fig.9b).
6.2 Iniciar el dispositivo
Presione el botón de inicio (15) cuando "ENCENDIDO" encienda la luz verde y presione el botón de
seguridad (10) en el mango trasero y también presione el interruptor disparador. (11). (Fig.10A/
Fig.10B).
6.3 LED
Consulte la siguiente tabla para conocer el significado de la pantalla LED.
6.4 Detener el dispositivo
Para detener la sierra de cadena, suelte el gatillo interruptor y el botón de seguridad.
ADVERTENCIA:
Si ocurre alguna emergencia durante la operación, simplemente empuje hacia
delante el protector de mano para su seguridad personal. (Fig.11A/ Fig.11B).
6.5 Reúne la barra guía y la cadena. por favor refiera a 5.2
ADVERTENCIA:
Para su seguridad y almacenamiento, recoja el protector de corte después de
cada operación.
7. CORTE
7.1 Corte básico
ADVERTENCIA:
Siempre asegúrese de mantener el pie y sostenga firmemente la sierra de
cadena con ambas manos mientras el motor está funcionando.
1. Suponga que el agarre y la posición de corte adecuados están en frente de la madera con la
sierra apagada. Presione el bloqueo del gatillo y apriete el gatillo del interruptor. Deje que la cadena
alcance su velocidad máxima antes de comenzar el corte.
2. Comience a cortar presionando ligeramente la barra guía contra la madera. Use solo una ligera
presión, dejando que la sierra haga el trabajo.
3. Mantenga una velocidad constante durante todo el corte, liberando presión justo antes del final
del corte.
7.2 Poda
Al podar, asegúrese de que todos los espectadores o ayudantes estén a una distancia segura de
las ramas que caen y no estén directamente frente o detrás del operador de la sierra. Asegure
cualquier rama que pueda representar un peligro. Use el equipo auxiliar apropiado. Mantenga un
buen equilibrio, sostenga firmemente la sierra con ambas manos y no se sobrepase.
Con la sierra a toda velocidad, ponga la parte inferior de la barra de guía en contacto con la rama
que se va a cortar. Continúe cortando usando una ligera presión. Para ramas más grandes, primero
haga un corte poco profundo en la parte inferior de la rama y luego termine el corte desde la parte
superior. Cortar una rama grande completamente desde la parte superior podría causar astillas. Un
corte completo desde la parte inferior puede hacer que la rama pellizque el barrido.
7.3 Talando un árbol (Fig.12)
Cuando dos o más personas realizan operaciones de tronzado y talado, al mismo tiempo, la opera-
ción de tala debe separarse de la operación de tronzado por una distancia de al menos dos veces
la altura del árbol que se está talando. Los árboles no se deben talar de manera que pongan en
peligro a cualquier persona, golpeen cualquier línea de servicio público o causen daños a la propie-
dad. Si el árbol hace contacto con cualquier línea de servicio público, la compañía de servicios
debe ser notificada inmediatamente.
El operador de la sierra de cadena debe mantenerse en el lado cuesta arriba del terreno, ya que es
probable que el árbol ruede o se deslice cuesta abajo después de ser talado. Una ruta de retirada
debe planificarse y borrarse según sea necesario antes de comenzar los cortes. El camino de
retirada debe extenderse hacia atrás y diagonalmente hacia la parte posterior de la línea de caída
prevista.
Antes de comenzar la tala, considere la inclinación natural del árbol, la ubicación de las ramas más
grandes y la dirección del viento para determinar en qué dirección caerá el árbol. Elimine la sucie-
dad, las piedras, la corteza suelta, las uñas, las grapas y el alambre del árbol donde se realizarán
los cortes de tala.
7.3.1 Apretando las extremidades (Fig.13)
Haga la muesca 1/3 del diámetro del árbol, perpendicular a la dirección de caída. Realice primero el
corte de muesca horizontal inferior. Esto ayudará a evitar pellizcar la cadena de la sierra o la barra
de guía cuando se haga la segunda muesca.
7.3.2 Tala de corte trasero (Fig.14)
Realice el corte hacia atrás al menos 2 pulgadas (51 mm) más alto que el corte de muesca horizon-
tal. Mantenga el corte de corte paralelo al corte de corte horizontal. Haga que la tala quede cortada
para que quede suficiente madera como bisagra. La madera de bisagra evita que el árbol se tuerza
y caiga en la dirección deseada.
No corte a través de la bisagra.
A medida que el corte de tala se acerca a la bisagra, el árbol debería comenzar a caer. Si existe la
posibilidad de que el árbol no caiga en la dirección deseada o se balancee y ate la cadena de la
sierra, detenga el corte antes de que se complete el corte y use cuñas de madera, plástico o alumi-
nio para abrir el corte y soltarlo el árbol a lo largo de la línea deseada de caída.
Cuando el árbol comience a caer, retire la sierra de cadena del corte, pare el motor, baje la sierra de
cadena, luego use el camino de retirada planificado. Esté alerta para que los miembros superiores
caigan y observe el equilibrio.
7.3.3 Cortar un árbol (Fig.15)
Esto es quitar las ramas de un árbol caído. Al podar, deje las extremidades inferiores más grandes
para soportar el tronco del suelo. Retire las extremidades pequeñas en un corte. Las ramas bajo
tensión se deben cortar de abajo hacia arriba para evitar que se enganche la sierra de cadena.
7.3.4 Tronzado de un tronco
Tronzar es cortar un tronco en longitudes. Es importante asegurarse de que el equilibrio sea firme y
el peso esté distribuido uniformemente en ambos pies. Cuando sea posible, el tronco debe levan-
tarse y apoyarse mediante el uso de ramas, troncos o cuñas.
7.4 Siga estas instrucciones simples para cortar fácilmente:
Cuando el tronco se soporta en toda su longitud, se corta desde la parte superior (leña). (Fig.16).
Cuando el tronco es soportado en un extremo, corte 1/3 del diámetro de la parte inferior (recorte). A
continuación, realice el corte final mediante sobre tronzado para cumplir con el primer corte.
(Fig.17).
Cuando el tronco es compatible con ambos extremos, corte 1/3 de ese diámetro desde el borde
superior. A continuación, realice el corte terminado por debajo del tronzado de los 2/3 inferiores
para cumplir con el primer corte. (Fig.18).
Cuando se curve en una pendiente, siempre párese en el lado cuesta arriba del tronco. (Fig.19).
Para mantener un control total al cortar, libere la presión de corte cerca del final del corte sin relajar
el agarre de las asas de la sierra de cadena. No permita que la cadena toque el suelo. Después de
completar el corte, espere a que la cadena de la sierra se detenga antes de mover la sierra de
cadena. Siempre detenga el motor antes de pasar de un árbol a otro.
8. MANTENIMIENTO Y LIMPIEZA
ADVERTENCIA:
Inspeccione la sierra de cadena. La inspección regular es el primer paso para
un mantenimiento adecuado. Al seguir las pautas a continuación, puede maximizar la seguridad y la
satisfacción. Si identifica partes dañadas o excesivamente desgastadas, reemplácelas inmediata-
mente.
ADVERTENCIA:
Retire la batería de la sierra de cadena antes de inspeccionar, limpiar o reali-
zar mantenimiento. Una herramienta que funciona con batería con el paquete de batería insertado
está siempre encendida y puede comenzar accidentalmente.
8.1 Antes de cada uso
a. Mangos: Los mangos delanteros y traseros no deben tener grietas u otros daños. Deben estar
limpios y secos.
b. Protección para las manos: la protección para las manos debe estar libre de daños y poder
moverse con facilidad hacia adelante y hacia atrás.
c. Barra de guía: la barra de guía debe estar recta y libre de virutas, grietas o desgaste excesivo.
d. Cadena de sierra: la cadena debe estar tensada correctamente y todos los componentes deben
estar libres de grietas, astillas o desgaste excesivo.
e. Cubierta lateral: la cubierta lateral debe estar libre de grietas u otros daños. Debe quedar bien
ajustado al cuerpo de la sierra sin combarse. Asegúrese de que la cadena no tenga grietas.
f. Paquete de batería: el paquete de batería debe estar limpio, seco, sin signos de perforación,
impacto u otro daño. Los contactos deben estar limpios, secos y libres de desechos.
g. Soporte de la batería: el soporte de la batería y los contactos deben estar limpios, secos y libres
de residuos.
h. Freno de cadena: pruebe el freno de la cadena para asegurarse de que esté funcionando correc-
tamente.
i. Nivel de aceite: el aceite debe llenar la ventana de inspección. Si no, llena el depósito de aceite
antes de usar.
j. Cubierta del motor: verifique si hay grietas en la cubierta y escombros en los orificios de entrada
de aire.
8.2 Limpieza de la sierra
ADVERTENCIA:
Cuando limpie la cabeza de la sierra de cadena, no la sumerja en agua u
otros líquidos.
a. Retire la batería antes de limpiarla.
b. Retire las astillas de madera y otras partículas del soporte de la batería. Asegúrese de que los
contactos estén limpios y secos.
c. Después del uso, limpie los desechos de la cadena y la barra guía. Limpie el cabezal de potencia
con un paño limpio humedecido con una solución de jabón suave. Nunca use limpiadores fuertes o
solventes.
d. Limpie siempre las astillas de madera, el polvo de sierra y la suciedad de la ranura de la barra
cuando reemplace la cadena de la sierra.
a. Piñón de transmisión: busque surcos profundos, dientes rotos o nudos.
b. Área de montaje de la barra: Asegúrese de que el perno de montaje de la barra no esté doblado,
desforrado o con rosca cruzada, y que la almohadilla de la barra y la brida de alineación estén libres
de residuos e intactas.
c. Cargador: el cargador debe estar limpio, seco y libre de pinchaduras u otros daños. La bandeja
de la batería y los contactos deben estar libres de desechos.
8.4 Reemplazando la barra de guía y la cadena de sierra (fig.20)
a
)
Use guantes y la sierra de cadena, fría y sin el paquete de baterías.
b) Aflojar la perilla de bloqueo del ajuste de la barra (8) en sentido anti horario una o dos vueltas
completas.
c) La perilla de tensión de la cadena (7) debe girarse en sentido anti horario hasta su tope.
d) La perilla de bloqueo del ajuste de la barra (8) debe girarse en sentido anti horario hasta su tope.
e) Luego quita la cubierta lateral.
f) Por último, puede quitarse la barra y la cadena gastadas y asegurarse de que la almohadilla de la
barra, el piñón y la perilla de tensión estén libres de residuos.
8.5 Instale nueva barra de guía y sierra de cadena
POR FAVOR REFIERA A 5.1
8.6 Ajuste de la tensión de la cadena
ADVERTENCIA:
Afilar cadena móvil. Para evitar una operación accidental, asegúrese de que la
batería se retire de la herramienta antes de realizar las siguientes operaciones.
a) Afloje la barra ajustando la perilla de bloqueo en sentido anti horario una o dos vueltas comple-
tas.
b) La perilla de tensión de la cadena debe girarse en sentido contrario a las agujas del reloj hasta su
giro adecuado para ajustar la tensión de la cadena.
c
)
Con la sierra sobre una superficie firme, verifique la tensión de la cadena de la sierra. La tensión
es correcta cuando la cadena se ajusta de nuevo después de haber sido tirada a 3 mm de la barra
de guía con una ligera fuerza desde el dedo medio y el pulgar, como se muestra en la figura (Fig.
21A). No debe haber "hundimiento" entre la barra de guía y la cadena en la parte inferior como se
muestra en la figura. (Fig.21B).
d) Una vez que la tensión de la cadena es correcta, apriete firmemente la barra para ajustar la
perilla de bloqueo en el sentido de las agujas del reloj para detenerla.
e) Cuando la cadena es nueva, verifique la tensión con frecuencia (después de retirar la batería)
durante las primeras 2 horas de uso, ya que una nueva cadena se estira un poco.
9. SOLUCIÓN DE PROBLEMAS
La siguiente tabla enumera los síntomas del problema, las posibles causas y las medidas correcti-
vas, si el producto de jardín no funciona correctamente. Si estos no identifican y corrigen el proble-
ma, contacte a su agente de servicio.
ADVERTENCIA: Apague y quite la batería antes de cualquier solución de problemas.
10. ELIMINACIÓN AMBIENTALMENTE AMISTOSA
De acuerdo con la directiva de la UE 2012/19 / UE sobre equipos eléctricos y electrónicos y su
implementación en la legislación nacional, todas las herramientas eléctricas deben ser recogidas
por separado y recicladas respetuosas con el medio ambiente. Eliminación alternativa: si el propie-
tario de la herramienta eléctrica no devuelve la herramienta al fabricante, es responsable de la
eliminación adecuada en un punto de recolección designado que prepara el dispositivo para el
reciclaje de acuerdo con las leyes y reglamentaciones nacionales de reciclaje.
Esto no incluye accesorios y herramientas sin componentes eléctricos o electrónicos.
Eliminación del acumulador
Los viejos acumuladores y baterías no deben agregarse a los desechos domésticos, sino que
deben eliminarse de acuerdo con la legislación aplicable.
Lleve las baterías recargables inutilizables a la tienda del concesionario o punto de recogida de
batería de la comunidad.
Eliminación del embalaje
El embalaje está hecho de cartón y papel de aluminio etiquetado por separado, que también es
reciclable.
Lleve estos materiales a un centro de reciclaje.
Paquetes de baterías / baterías
Li-lon
No arroje las baterías a la basura doméstica, al agua o al fuego. Los paquetes de baterías / baterías
deben recogerse, reciclarse o desecharse de forma respetuosa con el medio ambiente.
Solo para los países de la CE:
Las baterías defectuosas o muertas deben reciclarse de acuerdo con la directiva 91/157 / CE
ENGLISH
20
1. SYMBOL
CE Marking (The product meets demands and regulations set by the
European Community (now European Union).
WEEE marking (CAUTION! Unusable power tools do not belong with domestic waste.
They must be taken to a communal collecting point for environmentally friendly disposal in
accordance with local regulations).
Read the operator’s instructions (To reduce the risk of injury. User must read and understand
operator’s manual before using this product).
Do not expose to rain (Don’t leave your tool expose to outdoor or rain).
Wear eye protection (To reduce the risk of you eye, please wear eye protection).
Wear ear protection (To reduce the risk of you ear, please wear ear protection).
Keep bystanders away (Keep all bystanders away).
Noise level marking (Your tool noise is not more than 103dB).
2. GENERAL SAFETY RULES
General Power Tool Safety Warnings
WARNING
:
Read all safety warnings and all instructions. Failure to follow the warnings and instructions may
result in electric shock, fire and/or serious injury. Save all warnings and instructions for future refe-
rence.
The term “power tool” in the warnings refers to your mains-operated (corded) power tool or battery
operated (cordless) power tool.
2.1 Work area safety
a)Keep work area clean and well lit. Cluttered or dark areas invite accidents.
b) Do not operate power tools in explosive atmospheres, such as in the presence of flammable
liquids gases or dust. Power tools create sparks which may ignite the dust or fumes
c) Keep children and bystanders away while operating a power tool. Distractions can cause you to
lose control.
2.2 Electrical safety
a) Power tool plugs must match the outlet. Never modify the plug in any way. Do not use any adap-
ter plugs with earthed (grounded) power tools. Unmodified plugs and matching outlets will reduce
risk of electric shock.
b
)
Avoid body contact with earthed or grounded surfaces, such as pipes, radiators, ranges and
refrigerators. There is an increased risk of electric shock if your body is earthed or grounded.
c
)
Do not expose power tools to rain or wet conditions. Water entering a power tool will increase the
risk of electric shock.
d) Do not abuse the cord. Never use the cord for carrying, pulling or unplugging the power tool.
Keep cord away from heat, oil, sharp edges and moving parts. Damaged or entangled cords increa-
se the risk of electric shock
e) When operating a power tool outdoors, use an extension cord suitable for outdoor use. Use of a
cord suitable for out- door use reduces the risk of electric shock.
f) If operating a power tool in a damp location is unavoidable, use a residual current device (RCD)
protected supply. Use of an RCD reduces the risk of electric shock.
2.3 Personal safety
a) Stay alert, watch what you are doing and use common sense when operating a power tool. Do
not use a power tool while you are tired or under the influence of drugs, alcohol or medication. A
moment of inattention while operating power tools may result in serious person- al injury.
b) Use personal protective equipment. Al- ways wear eye protection. Protective equipment such as
dust mask, non-skid safety shoes, hard hat, or hearing protection used for appropriate conditions
will reduce personal injuries.
c) Prevent unintentional starting. Ensure the switch is in the off-position before connecting to power
source and/or battery pack, picking up or carrying the tool. Carrying power tools with your finger on
the switch or energising power tools that have the switch on invites accidents.
d) Remove any adjusting key or wrench before turning the power tool on. A wrench or a key left
attached to a rotating part of the power tool may result in personal injury.
e) Do not overreach. Keep proper footing and balance at all times. This enables better control of the
power tool in unexpected situations.
f) Dress properly. Do not wear loose clothing or jewelry. Keep your hair, clothing and gloves away
from moving parts. Loose clothes, jewelry or long hair can be caught in moving parts.
g) If devices are provided for the connection of dust extraction and collection facilities, ensure these
are connected and properly used. Use of dust collection can reduce dust-related hazards.
2.4 Power tool use and care
a) Do not force the power tool. Use the correct power tool for your application. The correct power
tool will do the job better and safer at the rate for which it was designed.
b) Do not use the power tool if the switch does not turn it on and off. Any power tool that cannot be
controlled with the switch is dangerous and must be repaired.
c) Disconnect the plug from the power source and/or the battery pack from the power tool before
making any adjustments, changing accessories, or storing power tools. Such preventive safety
measures reduce the risk of starting the power tool accidentally.
d) Store idle power tools out of the reach of children and do not allow persons unfamiliar with the
power tool or these instructions to operate the power tool. Power tools are dangerous in the hands
of untrained users.
e) Maintain power tools. Check for misalignment or binding of moving parts, breakage of parts and
any other condition that may affect the power tool’s operation. If damaged, have the power tool
repaired before use. Many accidents are caused by poorly maintained power tools.
f) Keep cutting tools sharp and clean. Properly maintained cutting tools with sharp cutting edges
are less likely to bind and are easier to control.
g) Use the power tool, accessories and tool bits etc. in accordance with these instructions, taking
into account the working conditions and the work to be performed. Use of the power tool for opera-
tions different from those intended could result in a hazardous situation.
2.5 Battery tool use and care
a) Recharge only with the charger specified by the manufacturer. A charger that is suitable for one
type of battery pack may create a risk of fire when used with another battery pack.
b) Use power tools only with specifically designated battery packs. Use of any other battery packs
may create a risk of injury and fire.
c) When battery pack is not in use, keep it away from other metal objects, like paper clips, coins,
keys, nails, screws or other small metal objects, that can make a connection from one terminal to
another. Shorting the battery terminals together may cause burns or a fire.
d) Under abusive conditions, liquid may be ejected from the battery; avoid contact. If contact acci-
dentally occurs, flush with water. If liquid contacts eyes, additionally seek medical help. Liquid
ejected from the battery may cause irritation or burns.
2.6 Service
Have your power tool serviced by a qualified repair person using only identical replacement parts.
This will ensure that the safety of the power tool is maintained.
2.7 Chain saw safety warnings
a) Keep all parts of the body away from the saw chain when the chain saw is operating. Before you
start the Chain saw, make sure the saw chain is not contacting anything. A moment of inattention
while operating chain saws may cause entanglement of your clothing or body with the saw
chain.
b) Always hold the Chain saw with your right hand on the rear handle and your left hand on the front
handle. Holding the Chain saw with a reversed hand configuration increases the risk of personal
injury and should never be done.
NOTE For chain saws designed with the guide bar on the left side, the reference to “right hand” and
“left hand” positioning is reversed.
c) Wear safety glasses and hearing protection. Further protective equipment for head, hands, legs
and feet is recommended. Adequate protective clothing will reduce personal injury by flying debris
or accidental contact with the saw chain.
d) Do not operate a chain saw in a tree. Operation of a chain saw while up in a tree may result in
personal injury.
e) Always keep proper footing and operate the chain saw only when standing on fixed, secure and
level surface. Slippery or unstable surfaces such as ladders may cause a loss of balance or control
of the chain saw.
f
)
When cutting a limb that is under tension be alert for spring back. When the tension in the wood
fibres is released the spring loaded limb may strike the operator and/or throw the chain saw out of
control.
g
)
Use extreme caution when cutting brush and saplings. The slender material may catch the saw
chain and be whipped toward you or pull you off balance.
h
)
Carry the chain saw by the front handle with the chain saw switched off and away from
your body. When transporting or storing the chain saw always fit the guide bar cover. Proper hand-
ling of the chain saw will reduce the likelihood of accidental contact with the moving saw chain.
i
)
Follow instructions for lubricating, chain tensioning and changing accessories. Improperly tensio-
ned or lubricated chain may either break or increase the chance for kickback.
j
)
Keep handles dry, clean, and free from oil and grease. Greasy, oily handles are slippery causing
loss of control.
k
)
Cut wood only. Do not use chain saw for purposes not intended. For example: do not use chain
saw for cutting plastic, masonry or non-wood building materials. Use of the chain saw for opera-
tions different than intended could result in a hazardous situation.
2.8 Causes and operator prevention of kickback
Kickback may occur when the nose or tip of the guide bar touches an object, or when the wood
closes in and pinches the saw chain in the cut.
Tip contact in some cases may cause a sudden reverse reaction, kicking the guide bar up and back
towards the operator.
Pinching the saw chain along the top of the guide bar may push the guide bar rapidly back towards
the operator.
Either of these reactions may cause you to lose control of the saw which could result in serious
personal injury. Do not rely exclusively upon the safety devices built into your saw. As a chain saw
user, you should take several steps to keep your cutting jobs free from accident or injury.
Kickback is the result of tool misuse and/or incorrect operating procedures or conditions and can
be avoided by taking proper precautions as given below:
a
)
Maintain a firm grip, with thumbs and fingers encircling the chain saw handles, with both hands
on the saw and position your body and arm to allow you to resist kickback forces. Kickback forces
can be controlled by the operator, if proper precautions are taken. Do not let go of the chain saw.
b
)
Do not overreach and do not cut above shoulder height. This helps prevent unintended tip con-
tact and enables better control of the chain saw in unexpected situations.
c
)
Only use replacement bars and chains specified by the manufacturer. Incorrect replacement bars
and chains may cause chain breakage and/or kickback.
d
)
Follow the manufacturer’s sharpening and maintenance instructions for the saw chain. Decrea-
sing the depth gauge height can lead to increased kickback.
2.9 Safety Warnings for battery chargers
1. Keep the battery charger away from rain or moisture. Penetration of water in the battery charger
increases the risk of an electric shock.
2. Do not charge other batteries. The battery charger is suitable only for charging lithium ion batte-
ries within the listed voltage range. Otherwise there is danger of fire and explosion.
3. Keep the battery charger clean. Contamination can lead to danger of an electric shock.
4. Before each use, check the battery charger, cable and plug. If damage is detected, do not use
the battery charger. Never open the battery charger yourself. Have repairs per- formed only by a
qualified technician and only using original spare parts. Damaged battery chargers, cables and
plugs increase the risk of an electric shock.
5. Do not operate the battery charger on easily inflammable surfaces (e. g., paper, textiles, etc.) or
surroundings. The heating of the battery charger during the charging process can pose a fire
hazard.
6. Children should be supervised to ensure that they do not play with the battery charger.
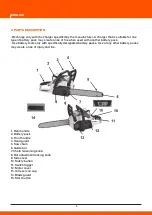
3. PARTS DESCRIPTION
•
Recharge only with the charger specified by the manufacturer. A charger that is suitable for one
type of battery pack may create a risk of fire when used with another battery pack.
•
Use battery tools only with specifically designated battery packs. Use of any other battery packs
may create a risk of injury and fire.
1. Rear handle
2. Battery pack
3. Front handle
4. Hand guard
5. Saw chain
6. Guide bar
7. Chain tensioning knob
8. Bar adjustment locking knob
9. Side cover
10. Safety button
11. Switch trigger
12. Motor cover
13. Oil reservoir cap
14 .Blade guard
15 .Start button
4. TECHNICAL DATA
Model: DACS1640Li
Power: 40 V
No Load Chain Speed: 5000 rpm
Guide Bar Length: 14 inch (350mm)
Net weight: 5.5 kg
Sound Pressure level at the operator’s position: 92.4dB(A) K=3 dB(A)
Measured Sound Power level: 100.2dB(A) K=2.68dB(A)
Guaranteed Sound Power level: 103dB(A)
Vibration: 2.291m/s² K=1.5 m/s²
Battery Lithium-ion
Model number
DYMA81
DYMA72E
Rated voltage
40V d.c.
40V d.c.
Capacity
90Wh
144Wh
Number of battery
20pcs
20pcs
Battery charger
Model number
DYMA83
Input
220-240VAC,50Hz,1A
Output
40V
d.c.,2A
Allowable charging temperature range
0-50°C
5. ASSEMBLY
5.1 Assemble the guide bar and saw chain
a) Wear gloves before assembly. Loosening bar adjustment locking knob
(
8
)
counterclockwise one
or two full turn .
b) The chain tensioning knob (7) must be rotated counterclockwise to its stop.
c) Bar adjustment locking knob (8) should be rotated counterclockwise to its stop.
d) Then take off the side cover. (Fig.2).
e)Place the chain in the slot of the guide bar, making sure the saw teeth are facing the correct
direction by matching the arrow on the guide bar ( Fig. 3A)
f) Place the saw chain around the sprocket (16) with teeth cutting edges facing away from the drive
sprocket along top edge of the guide bar. Meanwhile the chain tension knob (18) should be rotated
clockwise to its stop to tension the saw chain.
(
Fig.3A/ Fig.3B).
g) Insert the side cover (9) to the slot (17) and make sure the side cover is securely seated in a fixed
way as shown in (Fig. 4A/ Fig.4B).
h) Making sure the chain properly seated in guide bar rail and guide bar is fixed then locking knob
should be rotated clockwise to its stop. (Fig.5).
For adjustment of chain tension please refer to “8.6 ADJUSTING CHAIN TENSION” instruction.
5.2 Gather up guide bar and chain. (Fig.6a/ Fig.6b/ Fig.6c).
WARNING:
For you safety and storage, please gather up cutting guard after each operation.
5.3 Assemble the battery
1. Insert the battery pack into battery holder. (Fig.7A).
2. Make sure the latch on bottom of battery pack snaps in place and that battery pack is
fully seated. (Fig.7B).
5.4 Remove the battery
1. Press and hold the battery latch button at the bottom of the battery pack. (Fig.8A).
2. Remove battery pack from the product. (Fig.8B).
6. OPERATING THE CHAIN SAW
WARNING:
Before working on the device-cleaning, inspection
,
maintenance or other
work-always turn off the device and remove the battery from the device.
6.1 Remove the blade guard before operation. (fig.9a/ fig.9b).
6.2 Starting the device
Press start button (15) when “ON” turn on green light and press safety button
(
10
)
on the rear
handle and also press switch trigger (11). (Fig.10A/ Fig.10B).
6.3 LED
Please refer to the following table for the meaning of LED display.
6.4 Stopping the device
To stop the Chain saw
,
release the switch trigger and safety button.
WARNING: If any emergency happen during operation just push forward the hand guard for
your personal safety. (Fig.11A/ Fig.11B).
6.5 Gather up guide bar and chain. please refer to 5.2
WARNING:
For you safety and storage, please gather up cutting guard after each operation.
7. CUTTING
7.1 Basic cutting
WARNING:
Always be sure of footing and hold the chain saw firmly with both hands while the
motor is running.
1. Assume the proper cutting grip and stance in front of the wood with the saw off. Press the trigger
lock-out and squeeze the switch trigger. Let the chain reach full speed before beginning the cut.
2. Begin cutting by lightly pressing the guide bar against the wood. Use only light pressure, letting
the saw do the work.
3. Maintain a steady speed throughout the cut, releasing pressure just before the end of the cut.
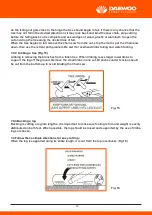
7.2 Pruning
When pruning, make sure all bystanders or helpers are a safe distance from falling branches and
are not directly in front of or behind the saw operator. Secure any branches that might pose a
hazard. Use the proper auxiliary equipment. Maintain good footing, hold the saw firmly with both
hands, and do not overreach.
With the saw at full speed, bring the bottom of the guide bar into contact with the branch to be cut.
Continue cutting using light pressure. For larger branches, first make a shallow undercut on the
bottom of the branch and then finish the cut from the top. Cutting a large branch completely from
the top could cause splintering. A complete cut from the bottom can cause the branch to pinch the
bar.
7.3 Felling a tree
(Fig.12)
When bucking and felling operations are being performed by two or more persons, at the same
time, the felling operation should be separated from the bucking operation by a distance of at least
twice the height of the tree being felled. Trees should not be felled in a manner that would endanger
any person, strike any utility line or cause any property damage. If the tree does make contact with
any utility line, the utility company should be notified immediately.
The chain saw operator should keep on the uphill side of the terrain as the tree is likely to roll or
slide downhill after it is felled. A retreat path should be planned and cleared as necessary before
cuts are started. The retreat path should extend back and diagonally to the rear of the expected line
of fall.
Before felling is started, consider the natural lean of the tree, the location of larger branches and the
wind direction to judge which way the tree will fall. Remove dirt, stones, loose bark, nails, staples,
and wire from the tree where felling cuts are to be made.
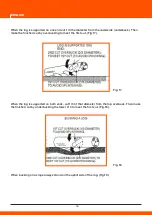
7.3.1 Notching undercut (Fig.13)
Make the notch 1/3 the diameter of the tree, perpendicular to the direction of fall. Make the lower
horizontal notching cut first. This will help to avoid pinching of either the saw chain or the guide bar
when the second notch is being made.
7.3.2 Felling back cut (Fig.14)
Make the felling back cut at least 2 inches (51mm) higher than the horizontal notching cut. Keep the
felling back cut parallel to the horizontal notching cut. Make the felling back cut so enough wood is
left to act as a hinge. The hinge wood keeps the tree from twisting and falling in the desired direc-
tion.
Do not cut through the hinge.
As the felling cut gets close to the hinge the tree should begin to fall. If there is any chance that the
tree may not fall in the desired direction or it may rock back and bind the saw chain, stop cutting
before the felling back cut is complete and use wedges of wood, plastic or aluminum to open the
cut and drop the tree along the desired line of fall.
When the tree begins to fall, remove the chain saw from the cut, stop the motor, put the Chain saw
down, then use the retreat path planned. Be alert for overhead limbs falling and watch footing.
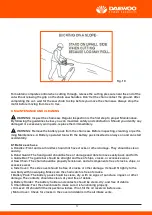
7.3.3 Limbing a tree (Fig.15)
Limbing is removing the branches from a fallen tree. When limbing, leave larger lower limbs to
support the log off the ground. Remove the small limbs in one cut. Branches under tension should
be cut from the bottom up to avoid binding the Chain saw.
7.3.4 Bucking a log
Bucking is cutting a log into lengths. It is important to make sure footing is firm and weight is evenly
distributed on both feet. When possible, the log should be raised and supported by the use of limbs,
logs or chocks.
7.4 Follow these simple directions for easy cutting:
When the log is supported along its entire length, it is cut from the top (overbuck). (Fig.16).
When the log is supported on one end cut 1/3 the diameter from the underside (underbuck). Then
make the finished cut by overbucking to meet the first cut. (Fig.17).
When the log is supported on both ends, cut 1/3 of that diameter from the top overbuck. Then make
the finished cut by underbucking the lower 2/3 to meet the first cut. (Fig.18).
When bucking on a slope always stand on the uphill side of the log. (Fig.19).
To maintain complete control when cutting through, release the cutting pressure near the end of the
cut without relaxing the grip on the chain saw handles. Don’t let the chain contact the ground. After
completing the cut, wait for the saw chain to stop before you move the chain saw. Always stop the
motor before moving from tree to tree.
8. MAINTENANCE AND CLEANING
WARNING: Inspect the chain saw. Regular inspection is the first step to proper Maintenance.
By following the guidelines below, you can maximize safety and satisfaction. Should you identify any
damaged or excessively worn parts, replace them immediately.
WARNING: Remove the battery pack from the chain saw. Before inspecting, cleaning, or perfor-
ming Maintenance. A Battery operated tool with the battery pack inserted is always on and can start
accidentally.
8.1 Before each use
a. Handles: Front and rear handles should not have cracks or other damage. They should be clean
and dry.
b. Hand Guard: The hand guard should be free of damage and able to move easily back and forth.
c. Guide Bar: The guide bar should be straight and free of chips, cracks, or excessive wear.
d. Saw Chain: The chain should be properly tensioned, and all components free of cracks, chips, or
excessive wear.
e. Side Cover: The side cover should be free of cracks or other damage. It should fit tightly to the
saw body with no warping. Make sure the chain catch is free of cracks.
f. Battery Pack: The battery pack should be clean, dry, with no signs of puncture, impact, or other
damage. The contacts should be clean, dry and free of debris.
g. Battery Holder: The battery holder and contacts should be clean, dry, and free of debris.
h. Chain Brake: Test the chain brake to make sure it is functioning properly.
i. Oil Level: Oil should fill the inspection window. If not, fill the oil reservoir before use.
j. Motor Cover: Check for cracks in the cover and debris in the air intake vents.
8.2 Cleaning the saw
WARNING:
When cleaning the chain saw power head, do not immerse in water or other liquids.
a. Remove battery pack before cleaning.
b. Remove wood chips and other debris from the battery holder. Make sure the contacts are clean
and dry.
c. After use, clean debris from the chain and guide bar. Wipe power head with a clean cloth moiste-
ned with a mild soap solution. Never use harsh cleaners or solvents.
d. Always clean out wood chips, saw dust, and dirt from the bar groove when replacing the saw
chain.
8.3 Periodically
a. Drive Sprocket: Look for deep grooves, broken teeth, or burrs.
b. Bar-Mounting Area: Make sure the bar- mounting stud is not bent, stripped, or cross-threaded
and that the bar pad and alignment flange are free of debris and intact.
c. Charger: The charger should be clean, dry, and free of punctures or other damage. The battery
tray and contacts should be free of debris.
8.4 Replacing the guide bar and saw chain(fig.20)
a
)
Wear gloves and the chain saw off and cool and the battery pack removed.
b) Loosening bar adjustment locking knob
(
8
)
counterclockwise one or two full turn.
c) The chain tensioning knob
(
7
)
must be rotated counterclockwise to its stop.
d) Bar adjust locking knob
(
8
)
should be rotated counterclockwise to its stop.
e) Then take off the side cover.
f) Last you can take off the worn bar and chain and make sure the bar pad, sprocket, and tensioning
knob are free of debris.
8.5 Install new guide bar and saw chain
PLEASE REFER TO 5.1
8.6 Adjusting chain tension
WARNING:
Sharp moving chain. To prevent accidental operation, ensure that battery is remo-
ved from the tool before performing the following operations.
a) Loosening bar adjust locking knob counterclockwise one or two full turn.
b) Chain tensioning knob must be rotated counterclockwise to its suitable turn to adjust chain
tension.
c
)
With the saw on a firm surface, check the saw chain tension. The tension is correct when the
chain snaps back after being pulled 1/8 inch (3mm) away from the guide bar with light force from the
middle finger and thumb as shown in figure (Fig.21A). There should be no “sag” between the guide
bar and the chain on the underside as shown in figure. (Fig.21B).
d) Once chain tension is correct, securely tighten bar adjust locking knob clockwise to stop.
e) When the chain is new, check the tension frequently (after removing battery) during the first 2
hours of use as a new chain stretches slightly.
9. TROUBLESHOOTING
The following chart lists problem symptoms, possible causes and corrective action, if your garden
product does not operate properly. If these do not identify and correct the problem, contact your
service agent.
WARNING:
Switch off and remove the battery prior to any troubleshooting.
Fault
POSSIBLE CAUSE
Remedial Action
Motor does
not run or runs
intermittently
Chain brake engaged.
Before starting, make sure the hand guard is in
its most rearward position (chain brake
disengaged). For correct hand guard position,
see “Starting The Saw” in this manual
Battery discharged
Check the charge-level indicator on the battery.
If no green indicator lights are on recharge
Trigger lock-out
not pressed
Trigger lock-out must be depressed. See
“Starting The Saw” in this manual
Battery pack not
fully inserted
Clean debris from the battery port and
terminals with a clean dry cloth or non-
conductive brush
Debris in side cover
Remove battery pack, then remove side cover
and clean out debris.
Battery pack cold
Allow battery to warm above the minimum
operating temperature of 10°F (-12°C).
Motor runs,
but chain does
not rotate
Chain not
engaging drive
sprocket
Reinstall the chain, making sure the drive links on
the chain are fully seated on the sprocket. See
“Maintenance and Cleaning” in this manual for
Zinstallation instructions
Chain brake does
not engage
Debris preventing
full movement of
hand guard
Clean debris from external chain brake
mechanism
Possible chain
brake malfunction
Contact an approved service location
immediately
Chain saw
does not cut
properly
Insufficient
chain tension
See “Tensioning Instructions” in this manual
Chain installed
backwards
See “Replacing the Bar and Chain” in this manual
Worn chain
Replace both the chain and stone. They
are designed to wear at the same rate
Dry or
excessively
stretched chain
Check the oil level. Refill oil reservoir if
necessary. See “Assembly” in this manual.
Check for a clogged oil system. A small amount
of oil should be delivered to the bar
10. ENVIRONMENTALLY FRIENDLY DISPOSAL
According to EU directive 2012/19/EU on electric and electronic equipment and its implementation
into national law, all electric tools must be separately collected and environmentally friendly recy-
cled. Alternative disposal: If the owner of the power tool does not return the tool to the manufactu-
rer, he is responsible for proper disposal at a designated collection point that prepares the device
for recycling according to national recycling laws and regulations.
This does not include accessories and tools without electric or electronic components.
Accumulator disposal
Old Accumulators and batteries must not be added to household waste, but should be disposed of
in accordance with the applicable legislation.
Take unusable rechargeable batteries to the dealer’s or community’s battery collection point.
Disposing of the packaging
The packaging is made of cardboard and separately labeled foil which is also recyclable.
Take these materials to a recycling centre.
Battery packs/batteries
Li-lon
Do not dispose of batteries into household waste, water or fire. Battery packs/batteries must be
collected, recycled or disposed of in an environmentally friendly way.
Only for EC countries:
Defective or dead batteries must be recycled according to the directive 91/157/EC


